
This project was created for the Crochetville Blog Tour
For this year’s blog tour I created a textured handbag that works up very quickly and is easy enough that someone starting out could create it. I’ve been working hard to add free patterns to my site and so far most of them I have made for people who don’t have a lot of crochet experience, or those who do and want a quick project. This bag fits the bill!
You can view all of my free crochet patterns here!
The lining and handles take a little time, but are optional. You could easily do a crocheted handle if you prefer. I think a fabric lining and purchased handles really give crochet and knitted bags a professional touch, and tend to use them often when I make a bag.
So, here it is! Hope you enjoy this free pattern!
Favorite this on Ravelry or buy the ad-free pdf here!

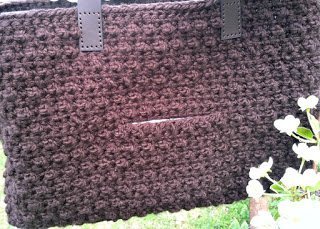
Chocolate Tote
By Amanda Saladin
WHAT YOU’LL NEED:
Yarn: Deborah Norville Serenity Chunky, each approximately 109 yards/100m (acrylic): 4 balls #7036 Fudge
Hook: K (6.5 mm)
Notions: Yarn needle
Handles
Craft Stabilizer (optional)
Lining Fabric (optional)
Matching Thread (if needed for lining and handles)
Craft Stabilizer (optional)
Lining Fabric (optional)
Matching Thread (if needed for lining and handles)
SKILL LEVEL: Easy
FINISHED MEASUREMENTS: approximately 13″ wide, 10″ tall and 4 1/2″ deep not including handles
GAUGE: 10 sts and 12 rows = 4″
Special Stitches:
Extra Extended Single Crochet (eesc): Insert hook into st and pull up a loop, (yo, pull through one loop on hook) twice, yo and pull through all loops on hook.
Pocket Lining (make two):
Ch 14.
Row 1: Sc in 2nd ch from hook and each ch across; turn – 13 sts.
Rows 2-14: Ch 1, work even in sc; turn.
Fasten off.
Front:
Ch 40.
Row 1: Sc in 2nd ch from hook and each ch across; turn – 39 sts.
Row 1: Sc in 2nd ch from hook and each ch across; turn – 39 sts.
Row 2: Ch 1, sc in next st, *eesc in next st, sc in next st; rep from * across; turn.
Row 3: Ch 1, work even in sc; turn.
Rows 4: Ch 1, sc in first 2 sts, *eesc in next st, sc in next st; rep from * across to last st, sc in last st; turn.
Row 5: Ch 1, work even in sc; turn.
Rows 6-13: Repeat rows 2-5.
Row 5: Ch 1, work even in sc; turn.
Rows 6-13: Repeat rows 2-5.
Row 14: Repeat row 2.
Row 15: Ch 1, sc 13, sc across 13 sts of top of pocket lining, sk 13 sts of front, sc last 13 sts of front.
Rows 16-17: Repeat rows 4-5.
Rows 18-25: Repeat rows 2-5.
Rows 26-27: Repeat rows 2-3.
Rows 18-25: Repeat rows 2-5.
Rows 26-27: Repeat rows 2-3.
Fasten off.
Back:
Work same as front.
Side (make two):
Ch 14.
Row 1: Sc in 2nd ch from hook and each ch across – 13 sts.
Rows 2-17: Work even in sc.
Rows 18-25: Repeat rows 2-5 of front.
Rows 26-27: Repeat rows 2-3 of front.
Fasten off.
Side Pocket (make two):
Ch 14.
Row 1: Sc in 2nd ch from hook and each ch across – 13 sts.
Rows 2-17: Repeat rows 2-5 of front.
Fasten off.
Bottom:
Ch 14.
Row 1: Sc in 2nd ch from hook and each ch across – 13 sts.
Rows 2-41: Repeat rows 2-5 of front.
Fasten off.
Row 1: Sc in 2nd ch from hook and each ch across – 13 sts.
Rows 2-41: Repeat rows 2-5 of front.
Fasten off.
Finishing:
Sew side pocket on top of side at sides and bottom.
Sew pocket lining to front/back at sides and bottom.
Stitch front and back to sides.
Attach bottom.
Sew on handles.
Sew pocket lining to front/back at sides and bottom.
Stitch front and back to sides.
Attach bottom.
Sew on handles.
Favorite this on Ravelry or buy the ad-free pdf here!
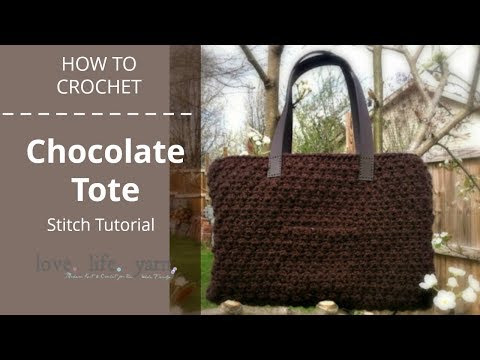
Chocolate Tote Stitch Tutorial
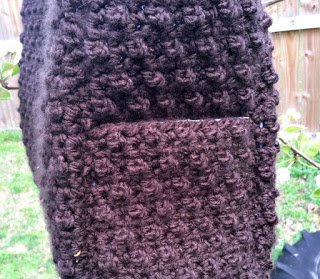
To help with the extra extended single crochet (eesc) in the chocolate tote pattern, I have created a video tutorial to help those of you who like to have visual instructions. It is an easy stitch to master and creates a small bobble on the face of the fabric, giving your tote texture.
For this example, I used the same number of stitches you will use to make a side pocket. The only difference between this example and the front/back of the tote is the number of stitches. The stitch pattern is exactly the same.
Chocolate Tote Stitch Tutorial
**If you are using the lining and purchased handles, check out the photo tutorial.**
I have been getting questions about row 15. Here is a graphic that will hopefully help explain:

Thanks for checking out this post and I hope you enjoy the rest of the stops on the Crochetville Blog Tour! I would love to hear from you – leave a comment below!
Amanda

I love this pattern and I really want to make it but I am not able to print it. The pattern is not fitting the page and I don’t know what to do. Please help! Thanks!
Hi Theresa!
I’m working on making the patterns available to print. Let me know if I need to email it to you! 🙂
I would love to have a printed version as well. thank you
I would like printed version also..
Thank you
Hi Danina,
This pattern is available to view here on the website or you can buy a downloadable version on etsy for $1.99. This little bit helps support my site and pay for hosting. The free pattern is always available here on the site.
I like this bag, would like to make it when I get some chunky yarn. Thanks for the pattern!
You are so welcome!
I am not understanding row 15 of the front. If you could explain it a little more for me please that would be great. I have already started it and would love to finish. Thank you.
Hi Amy! When you work row 15 you are making the pocket. To do this you will need to leave the center 13 sts unworked and instead work the 13 sts from the pocket lining. I added an image to the bottom of this post to see if it explains it better. Let me know if you have any other questions!
Got it the picture helped. The sk 13 sets of front part was what confused me but thank you very much for your help.
You’re very welcome 🙂
This looks like just the bag I’ve been looking for. I’m a little confused about the pocket “liners”. Do we attach the tops where it says to att ach the pocket liners? Is everything else then sewn on and see together when all the sides are done?
Hi Sharon!
You do just attach the tops when you are crocheting the pieces. Leave the sides and bottom free until you are actually assembling the bag. You can see in the first two steps of the lining tutorial how they are attached later. The first picture shows fabric placed over the pocket lining and you can tell it is only attached at the top. Let me know if you have other questions! 🙂
Hi, did you receive my pictures. Thanks.
Carolyn
Hi Carolyn,
I did! I sent you a response. 🙂
Amanda:
When you have a printable version of this pattern I would love to be notified about it.
Thank you!
Rev. Marcia Urban
Hi Marcia,
The printable version costs $1.99 and you can get it from my etsy shop. This little bit helps pay for the hosting for my site. 🙂
I’ve never used stabilizer and wonder how to use it and when?
Thanks,
Barb
Hi Barb!
Check out the lining tutorial for this project – it shows you exactly how and when to use the stabilizer. It is really the difference between a floppy bag and one that will hold its shape.
I would love to see this pattern on Youtube. Do you have a YouTube page where you can video the stitches and pattern? I cannot follow the written directions.
Thanks.
AG
Hi Alisa,
I have a short tutorial on youtube for how to complete the stitch pattern, but not a tutorial for the whole bag. You can view that tutorial here.
Hi Amanda, I really like this pattern. I am almost through working all the parts and was wondering how you “sew” the parts together. Did you use thread and needle or yarn with yarn needle. I am guessing you sew it together on the outside. Thanks so much for such a nice looking bag!😃
Hi Mary! I used two techniques to sew this bag together, but either one would work fine. I started out with putting the right sides of the bag together and slip stitching the seams with the same hook and yarn used for the bag, but then I used a whipstitch with yarn and yarn needle and it worked just as well! I have a lining tutorial and it shows me sewing it together and even if you choose not to line it there are pictures of the sewing part. 🙂 You can view it here. Hope it helps! I’d love to see pictures of your bag!
Thank you, the tutorial looks to be a good help. Sorry I didn’t look at it sooner. I appreciate your time. I hope to be able to send you a picture. Be well!
No problem! I’m not sure the link is very visible and it’s easy to overlook. Can’t wait to see how it turns out. 🙂
Hi I’m working on the bag and I’m confused about row 15…… Can you explain better thanks
Hi Diva,
I have received several questions about row 15 and further down the post I have a picture and a more detailed description. You are working 13 sts of the body of the bag then working the 13 sts across the pocket lining instead of the next 13 sts of the body of the bag (you leave those unworked). Then continue across the 13 sts remaining of the body of the bag. It leaves the center 13 sts open to become the pocket. Hope this helps!
Cannot print this pattern. Could/would you e-mail it to me. Thanks, Sharon
Hi Sharon,
The pattern is available online or you can pick up an ad-free downloadable version on etsy if you would like for $1.99. This little bit helps support the cost of running the website but I always offer the full free pattern here on the blog.
please send pattern for chocolate tote to my email
Hi Alice,
This pattern is available to view here on the website or you can buy a downloadable version on etsy for $1.99. This little bit helps support my site so I can keep sharing patterns. 🙂
Hi I love this tote! Question: the pocket liners are in single crochet and they don’t match the bag, but the pictures look like they were done in the stitch pattern (rows 2-5). Should they be done in the stitch pattern or am I reading the liners section wrong?
Hi Stephanie! Yes, the pocket liners are just in sc. The liners go on the inside and you don’t end up seeing them at all – they just form the inside of the pocket. The part you can see from the photos isn’t the pocket lining. Any other questions feel free to ask! 🙂
Love the tote. Have you or do you put some kind of liner in this bag and also, some kind of inside bottom for stability? I’ve seen plastic in some cut to size so that items are protected and yarn isn’t all stretched out. How would one crochet an inner divider? I suppose that would be fairly easy then stitch in place. Just my ideas to use.
Hi Gerry! Yes, this bag has both an interfacing of a stiff craft stabilizer and then a lining fabric to make it functional as well as pretty. 🙂 If you want a crochet divider I would just make another panel a bit smaller than the front/back and stitch it in place. Thanks for the ideas!
I don’t know how to apply craft stabilizer have read the pattern and seen tutorial but it is
not included. Can you help me?
Deanne Fraser
Hi Deanne!
The method I used for this bag was the same as the Buckle Bag – I did a lining tutorial for it that you can find here. The only difference is that I discovered that craft stabilizer was better for structure than the crinoline I used in that tutorial but you apply it the same way. You can find craft stabilizer at any craft store with the interfacing. The employees should be able to help you locate it. It really gives structure to the bag and makes it a lot more functional! It just takes very basic stitching skills – I use a back stitch to stitch mine in place. There are a ton of good tutorials on youtube for a back stitch if you need it. 🙂
I’m trying to view the video and the photo tutorial. One site wants me to download an extension. The other is how to build a website. I don’t want to do either one. How can I view both without downloading the extensions.
Chris
Hi Chris! Thanks for letting me know. This is an older pattern and I didn’t realize the redirects didn’t work. I’ve fixed it now. 🙂
Hi Amanda,
The redirects aren’t working again. I want to make this for my teacher bag this year! Looking forward to the help.
Ann Marie
Hi Ann Marie! Somehow when I moved my blog over from one url to another the photos for the lining tutorial got lost. 🙁 So I had to remove the lining tutorial for now. I’m going to search and see if I can find a copy of the photos.
Did you put a closure on this bag? If so what kind?
Hi Heather! I did put a magnetic clasp inside the lining of this bag, but most of the time I just leave it open as a tote. 🙂