
Knit a sweet sweater your kiddo will be proud to wear with our Kids Henley Knitting Pattern!

Buy the ad-free PDF pattern of this design in my shop here!
Deign Story and Inspiration for Our Kid’s Henley Sweater
I really love making sweaters for my boys, and this knit was for my youngest, who almost outgrew it before he could wear it! It’s a bit snug and I’ll be making him a larger sweater asap. I really want to share it with you so you can make one for a little guy or girl in your life!
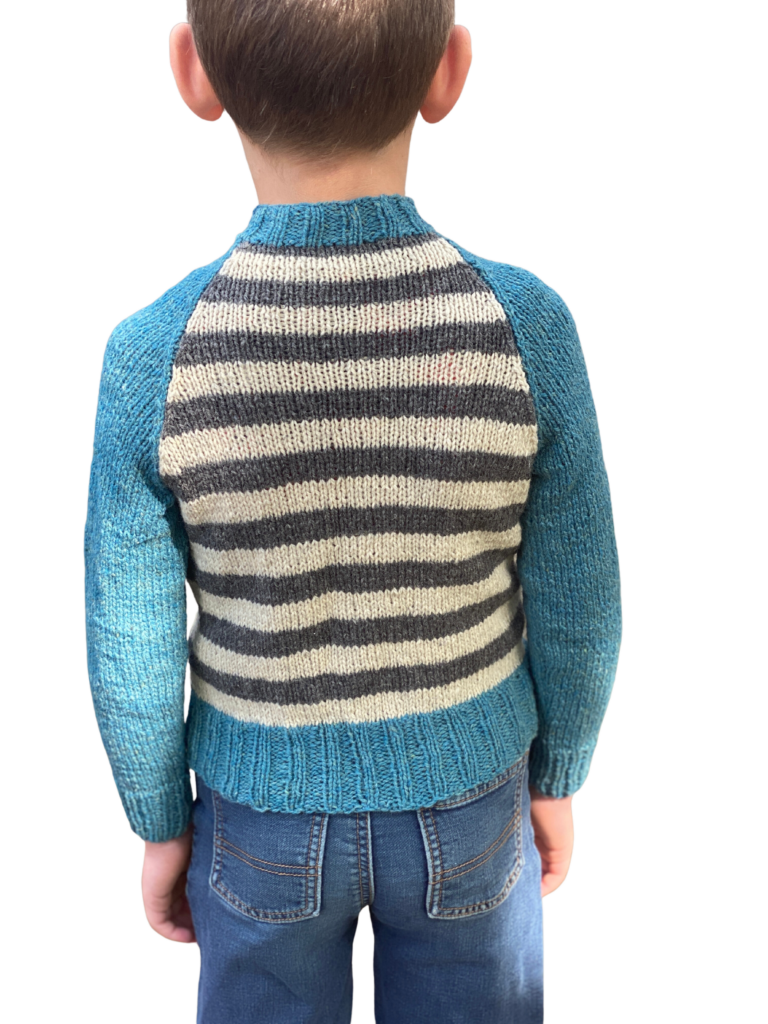
I love sweaters that take simple Stockinette st and turn it into something fun. That’s what I tried to do with this sweater, adding stripes, contrasting color sleeves and hem and adding a fun henley placket at the top. This placket works but you could easily make a faux placket if you like as well.
Yarn Options for This Simple Knit Sweater
I chose a DK yarn weight for this sweater (category #3) in a fun color combo that I picked up on a vacation to Gatlinburg, TN. I love how these colors worked up in this simple stitch pattern with the crew neck and henley placket.
This is more of a lighter DK weight yarn, some sources say sport weight, so be sure to make a gauge swatch, especially if substituting the yarn.
Use any yarn you have in your stash that gets gauge. I used one skein of each color for the size 6 and easily had more left over after making this henley style shirt.
How to Customize This Henley Collar Sweater Pattern
You can easily adjust most all knitting patterns and here are some ideas to adjust this one to make it your own:
1. Change the shirt length or sleeve lengths. Make it longer or shorter in length or change the sleeve length to whatever you like, such as short sleeves instead of long sleeves.
2. Adjust the stitch. As long as you are getting gauge you could experiment with simple textured stitches such as seed stitch or garter stitch. This will create a different fabric, so be sure to double and triple check your gauge on your knit fabric swatch.
3. Change the color. Make a solid color or have every stripe a different color. It’s totally up to you!
4. Modify the pattern to be worked on circular needles. If you are really good at working in the round, you might want to modify the pattern to be worked this way.
Buy the ad-free PDF of this pattern in my shop here!
Kid’s Henley
What You’ll Need
Yarn: Juniper Moon Farms Patagonia, DK weight, 1 (1, 1, 2, 2) skeins Teal (A), 1 skein each Cream (B) and Gray (C)
Needles: US Size 5 (3.75mm) and 6 (4.0mm) straight needles
Notions: Yarn needle, scissors, stitch holders or scrap yarn, stitch markers, three 5/8″ buttons
Gauge: 19 sts and 31 rows = 4” (10cm) in St st on larger needles
Finished Size: Size 2 (4, 6, 8, 10) with finished chest measurement 25 (27, 28.5, 30, 32)”.
Notes: Pattern is worked flat and seamed.
Stripe Pattern
6 rows B
6 rows C
Repeat for stripe pattern.

Buy the ad-free PDF of this pattern in my shop here!
Kids Henley Knitting Pattern
Back
With smaller needles and A, cast on 52 (56, 60, 64, 68) sts.
Work in k2p2 rib for 13 (17, 17, 17, 17) rows. Inc 8 sts evenly on next row – 60 (64, 68, 72, 76) sts.
Change to larger needles and stripe pattern.
Work in St st and stripe pattern until piece measures 7 (9, 9, 10.5, 12)” from beginning, ending with a RS row.
Shape Armholes
Beginning with WS row, bind off 6 sts at beg of next 2 rows – 48 (52, 56, 60, 64) sts.
Dec 1 st each side every RS row 10 (8, 9, 12, 14) times – 28 (36, 38, 36, 36) sts.
Dec 1 st each side every 4th row 4 (8, 8, 7, 7) times – 20 (20, 22, 22, 22) sts.
Place rem sts on holder.
Front
Work same as back to armholes.
Shape Armholes
Bind off 6 sts at beg of next 2 rows – 48 (52, 56, 60, 64) sts.
Dec 1 st each side every RS row 4 (7, 8, 8, 8) times – 40 (38, 40, 44, 48) sts.
Placket
(WS) P 16 (15, 16, 18, 20), attach another ball of yarn, bind off 8 sts, p 16 (15, 16, 18, 20). Work both sides at once for remainder of pattern.
Dec 1 st at armhole edge on next row – 15 (14, 15, 17, 19) sts each side.
Size 2 (-, -, 8, 10) Only
Dec 1 st at armhole edge every RS row 5 (x, x, 4, 5) times – 10 (x, x, 13, 14) sts each side.
All Sizes
Dec 1 st at armhole edge every 4th row 2 (5, 5, 4, 4) times – 8 (9, 10, 9, 10) sts each side.
Purl 1 row.
Shape Neck Sizes 2 (-, 6, -, 10) Only
Row 1 (RS): Bind off 3 sts at neck edge – 5 (x, 7, x, 7) sts.
Row 2: Work 1 row even in St st.
Row 3: Dec 1 st each side for both armhole and neck edge – 3 (x, 5, x, 5) sts each side.
Row 4: Purl.
Row 5: Dec 1 st at neck edge – 2 (x, 4, x, 4) sts each side.
Row 6: Purl.
Size 2 Only
Bind off remaining 2 sts.
Size 6 (10) Only
Row 7: Repeat row 3 – 2 sts each side.
Row 8: Purl.
Row 9: Knit.
Row 10: Purl.
Row 11: Dec 1 st at armhole edge – 1 st each side.
Bind off rem st.
Shape Neck Size 4 Only
Row 1: Bind off 3 sts at neck edge and also decrease 1 st at armhole edge – 5 sts.
Row 2: Work even in St st.
Row 3: Dec 1 st at neck edge – 4 sts.
Row 4: Purl.
Row 5: Dec 1 st each side – 2 sts.
Row 6: Purl.
Row 7: Dec 1 st at neck edge – 1 st.
Row 8: Purl.
Row 9: Bind off last st.
Shape Neck Size 8 Only
Row 1: Bind off 3 sts at neck edge – 6 sts.
Row 2: Work even in St st.
Row 3: Dec 1 st at neck edge – 5 sts.
Row 4: Dec 1 st at armhole edge – 4 sts.
Row 5: Dec 1 st at neck edge – 3 sts.
Row 6: Purl.
Row 7: Dec 1 st at neck edge – 2 sts.
Rows 8-11: Work even in St st.
Row 12: Dec – 1 st.
Bind off.
Sleeve (Make 2)
Ribbing
With smaller needles and A, cast on 28 (30, 32, 32, 36) sts.
Work in k2p2 rib for 13 (17, 17, 17, 17) rows. Inc 2 (4, 4, 6, 4) sts evenly on next row – 30 (34, 36, 38, 40) sts.
Change to larger needles.
Main Sleeve
Knit 1 row.
Inc 1 st each side every 9th (6th, 8th, 8th, 8th) row 4 (3, 5, 8, 2) times – 38 (40, 46, 54, 44) sts.
Inc 1 st each side every 0 (8th, 10th, 10th, 10th) row 0 (5, 3, 1, 7) times – 38 (50, 52, 56, 58) sts.
Work even in St st until sleeve measures 7 (10.5, 12, 12.5, 14)” from beg.
Shape Cap
Bind off 6 sts at beg of next 2 rows – 26 (38, 40, 44, 46) sts.
On next RS row, dec 1 st each side – 24 (36, 38, 42, 44) sts.
Dec 1 st each side every 4th (2nd, 3rd, 2nd, 2nd) row 9 (7, 16, 10, 10) times – 6 (22, 6, 22, 24) sts.
Dec 1 st each side every 0 (4th, 0, 4th, 4th) row 0 (8, 0, 8, 9) times – 6 sts.
Bind off.
Finishing
Sleeve Finishing
Seam sleeves to front and back with a blunt darning needle.
Seam sleeve and side seams.
Neck Finishing
With RS facing, color A and smaller needles, pick up and knit 3 bound off sts from front right neck edge, 9 (10, 12, 12, 14) sts up side neck, knit across 19 (20, 22, 22, 22) back sts, pick up and knit 9 (10, 12, 12, 14) sts down left side neck, 3 sts from left front neck edge – 43 (46, 52, 52, 56) sts.
Decrease 1 st if odd number.
Work in k2p2 rib for 1”.
Placket Construction
Right Placket Instructions
With RS facing, color A and smaller needles, pick up and knit 18 (24, 26, 26, 28) sts evenly along placket. Work in k2, p2 rib for 1”. Bind off. See buttons evenly spaced along placket.
Left Placket Instructions (Button Band with Button Holes)
With RS facing, color A and smaller needles, pick up and knit 18 (24, 26, 26, 28) sts evenly along placket. Work in k2, p2 rib for 3 rows.
Make buttonholes opposite buttons as follows:
Work in k2p2 pattern to where you would like buttonhole, turn and work back and forth in pattern for 4 rows. Place on waste yarn or holder.
Repeat for other buttonholes, breaking and joining yarn as needed to create buttonholes.
Work to end of placket in pattern for 4 rows.
Work k2p2 rib for 3 rows across all sts of placket. Bind off in rib.
Placket Finishing
Sew bottom of right and left placket to bound off edge of front with left placket on top. Slide buttons through buttonholes.
Weave in all ends.
Final Thoughts on Our Kids Henley Knitting Pattern
I hope you enjoy this classic style sweater pattern! I really. had fun designing it!
Gather your materials – medium weight yarn, knitting needles, yarn needle, buttons and a stitch holder. Work up a swatch to check gauge – using larger needles. Choose your size and work from this blog post or our digital downloads and get knitting! The download options are instant downloads, so you can be knitting ad-free in no time, or knit straight from this page. You can also print the ad-free PDF from your home printer if you prefer to work from paper.
Be sure to also see all of my free knitting patterns!
Happy Knitting!
Thank you for the pattern I will try it out because my nephew is now four years old but big for his age and by next winter it will fit him. We are now in spring, but it is still cold and windy.