
Many crochet projects can really benefit from the use of an easy single crochet ribbing technique. This adds texture, stretch and visual interest to your designs, and is an easy way to mimic the look of ribbing in knitting.

While there are different ways to create types of crochet ribbing, today we are going to look at the single crochet rib stitch, which is a great technique for beginners and experienced crocheters alike.
Today we are going to explain everything you need to know to confidently add single crochet ribbing to your projects, including step-by-step instructions and tips for achieving successful results. I’ve even included some fun projects to practice this technique at the bottom of post.
So, it doesn’t matter if you’re new or you’ve been crocheting for a long time, this technique is easy to learn and can be used in so many types of projects (garments, accessories, home decor and so much more!).
So grab your hook and yarn and let’s dive in!
Materials Needed for Crochet Ribbing
To work single crochet ribbing, you will need a few basic materials. Here’s what you need to get started:
Yarn
You can use any yarn weight you like for this stitch pattern. I’m using a worsted weight yarn from We Crochet called Heatherly Worsted. This technique works from crochet thread all the way to jumbo yarns.
If you are using a novelty yarn such as faux fur or eyelash yarn, you might not get the ribbing look because the vertical lines will be lost in the texture of the yarn, so stick to yarns with good stitch definition for the best results.
Crochet Hook
If you’re following a pattern, use the hook size that gets gauge for your pattern, otherwise check the yarn label for recommended hook size. For me, when I work ribbing, I go down a hook size or two from the hook size I’m making the body of the item with (so if I’m using a size J for the body of a sweater, I would use an H or I hook for the ribbing). This gives a tighter look and a better finished project.
Yarn Needle and Scissors
You will need scissors and a yarn needle (also called a tapestry needle) for weaving in ends and cutting loose ends.
Measuring Tape or Ruler
Most of the time in crochet patterns, you will see the exact number of rows mentioned when working a stitch pattern, but for crochet ribbing you will often see it written as “repeat until piece measures 14″ from beginning” or something similar.
Having something to measure with comes in handy, whether you are working the ribbed brim in the circumference for a hat or a ribbed hem of a sleeve or garment.
Once you have these materials ready to go, you’re ready to start on your single crochet ribbing for your project.
Single Crochet Ribbing Video Tutorial
Step By Step Tutorial – Single Crochet Ribbing Pattern
Step One – Foundation Chain
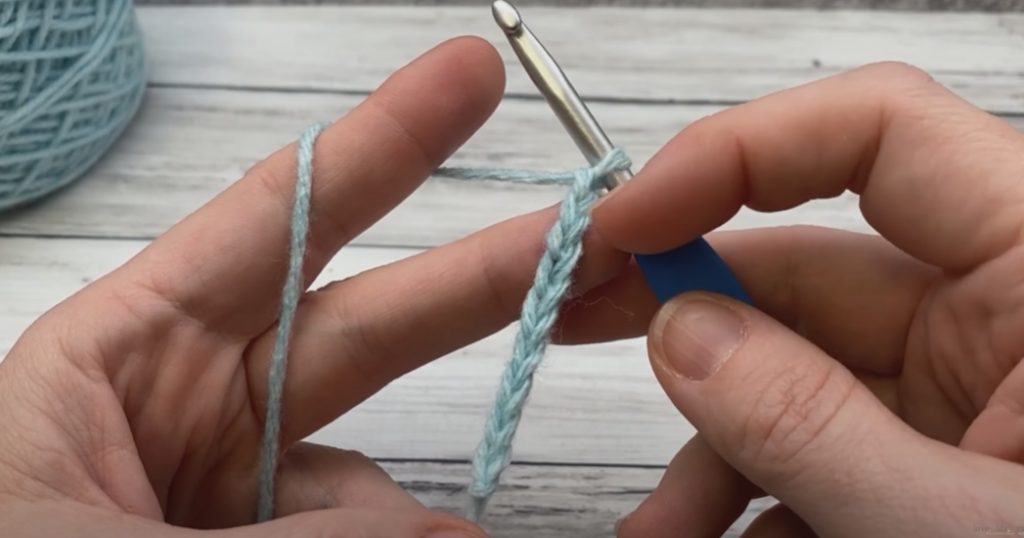
Chain desired number of stitches for ribbing, plus one for the turning chain. For example, if I want 8 ribbing stitches, I will chain 9.
Step Two – Single Crochet Stitches
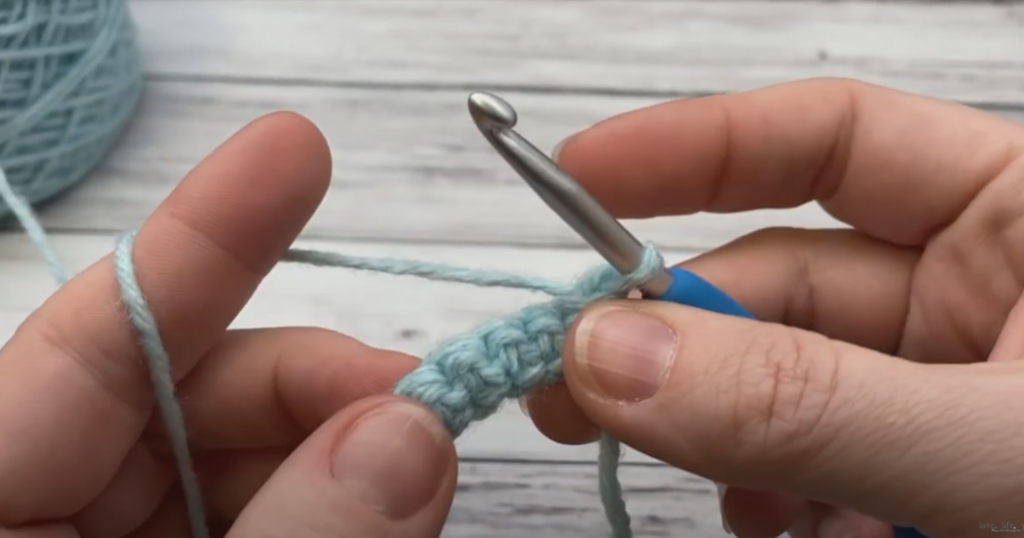
Single crochet in the second chain from hook and each chain across; turn.
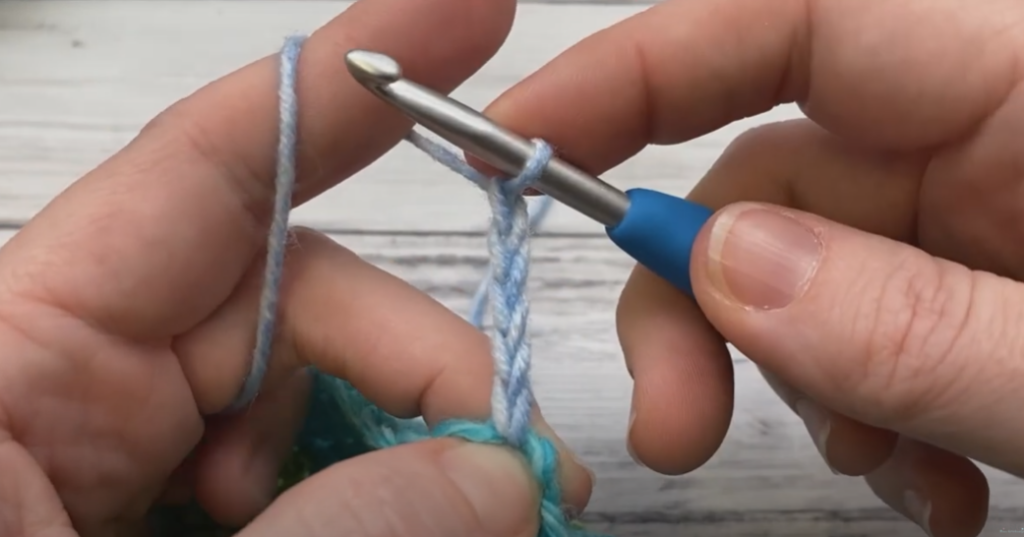
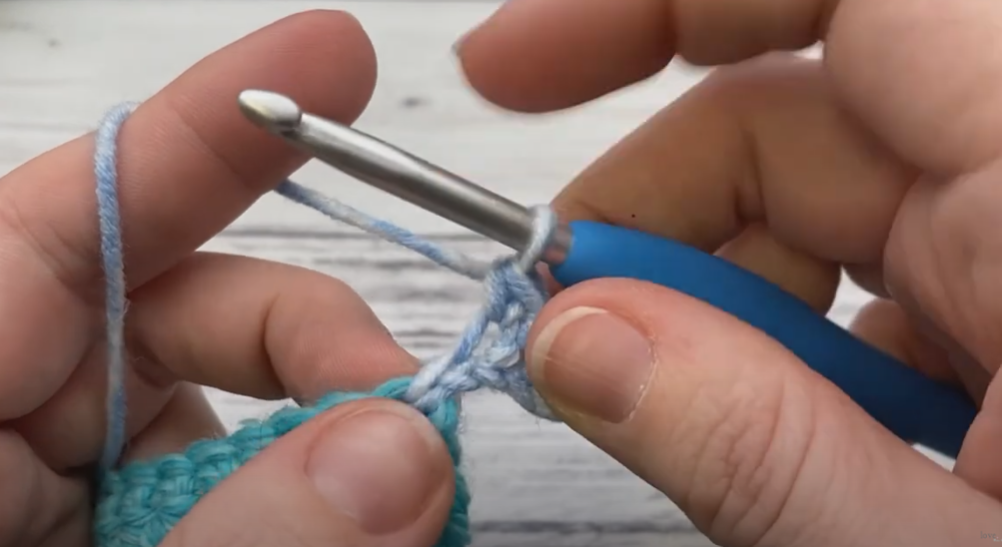
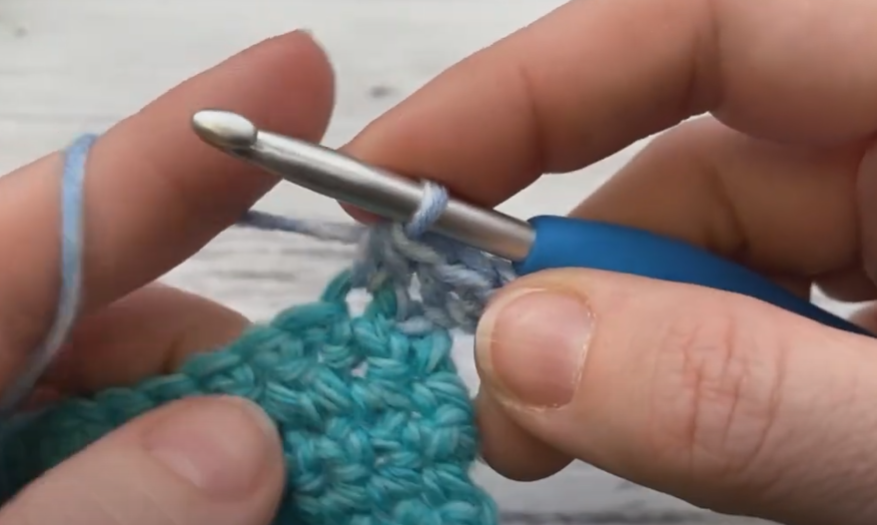
Step Three – Single Crochet Back Loop Only
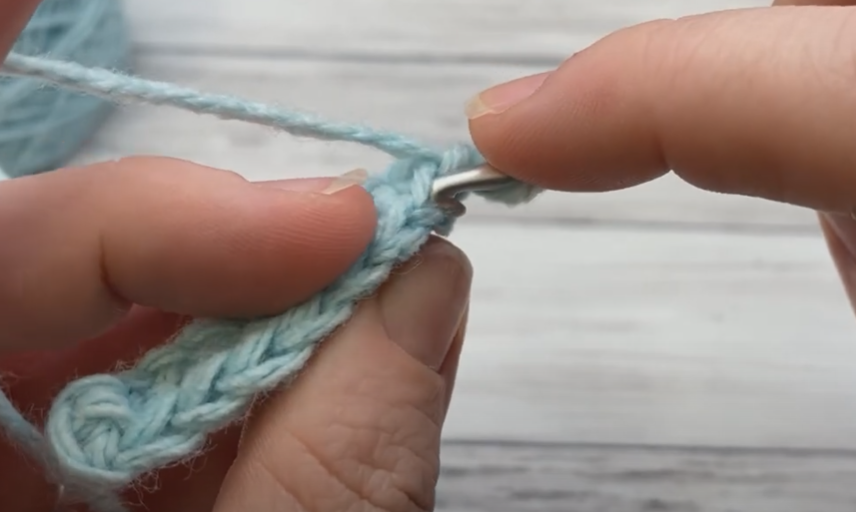
Chain 1. Single crochet in the back loop of the stitch for each stitch; turn. To work into the back loop, insert hook into the middle of the stitch and work new stitch into the back loop only, leaving the front loop unworked.
Step Four – Repeat
Repeat the last row (step three) until piece measures desired width or circumference (you will have to join the first and last rows to make a round ribbed piece.)
Attaching Single Crochet Ribbing to Finished Pieces
Most of the time you will work the ribbing section first, such as hat brims, sweater hems and sweater cuffs, but sometimes you will need to work the ribbing after the rest of the project, such as collars.
To do this, you will have to adjust your technique slightly so that you attach the ribbing as you go and don’t have to sew it on (because who wants an extra step??).
This is shown in the video above if you need video help.
Step One

Join yarn at desired start point for ribbing (you may already be here depending upon the pattern).
Step Two
Chain the desired number of ribbing stitches plus one.
Step Three
Single crochet in second chain from hook and all chains to last chain (don’t work the last one yet).
Step Four
Work a single crochet 2 together (sc2tog) in the last chain and the next stitch or row of the project (connects the ribbing to the project).
Step Five

Slip stitch (sl st) into next stitch or space of project and turn.
Step Six

Single crochet back loop only into each stitch (do NOT chain and be careful not to work into your slip stitch, just the ribbing stitches).
Step Seven
Ch 1, single crochet back loop only to last ribbing stitch, sc2tog last ribbing stitch and next stitch or row of project.
Step Eight
Repeat steps six and seven to desired length (such as around a neckline). Remember to watch the second part of the video if you need help!
Tips for Perfect Single Crochet Rib Stitches
It can take a bit of practice to get perfect ribbing, but with the right tips and techniques you can be on your way to creating beautiful texture with this stitch. Here are some tips to help you along your way:
- Maintain Consistent Tension – consistent tension is key to even ribbing. Be sure to maintain the same tension throughout the ribbing section so that your ribbing doesn’t appear looser or tighter in areas.
- Choose the Right Hook Size – the hook size you choose will depend upon the type of yarn you’re using and the desired drape of your finished project. Be sure to check the gauge of your yarn and adjust your hook size accordingly. Remember that crochet ribbing is often done on a smaller hook than the body of the project.
- Practice with Swatches – Before starting a larger project, it’s always a good idea to practice on a swatch, and the ribbing of the project is no exception. This will give you a chance to adjust your tension and hook size as needed.
- Use Stitch Markers – If you’re having trouble locating the first stitch of the previous row (sometimes it looks a bit smaller than the other stitches and is easy to leave out), place a stitch marker in the first stitch so you always know which is the last stitch of the current row and you won’t have to count every row.
Where to Use Single Crochet Ribbing
Garment edges – this ribbing technique is great for the bottom of sweaters, ponchos, pants, shorts (also for waistbands) or other garments.
Cuffs and Collars – the cuffs of sleeves, mittens and gloves are great with this type of ribbing.
Hat bands – the brim of hats is also a wonderful place to use this rib technique, and it doesn’t matter if the pattern is top-down or bottom-up
Other uses – while those are the most common places you’ll find crochet ribbing, don’t count out: crochet bags, rugs, edges of scarves, and more. I love to use ribbing at the top of my pockets as well.
Free Crochet Patterns that Use Single Crochet Rib
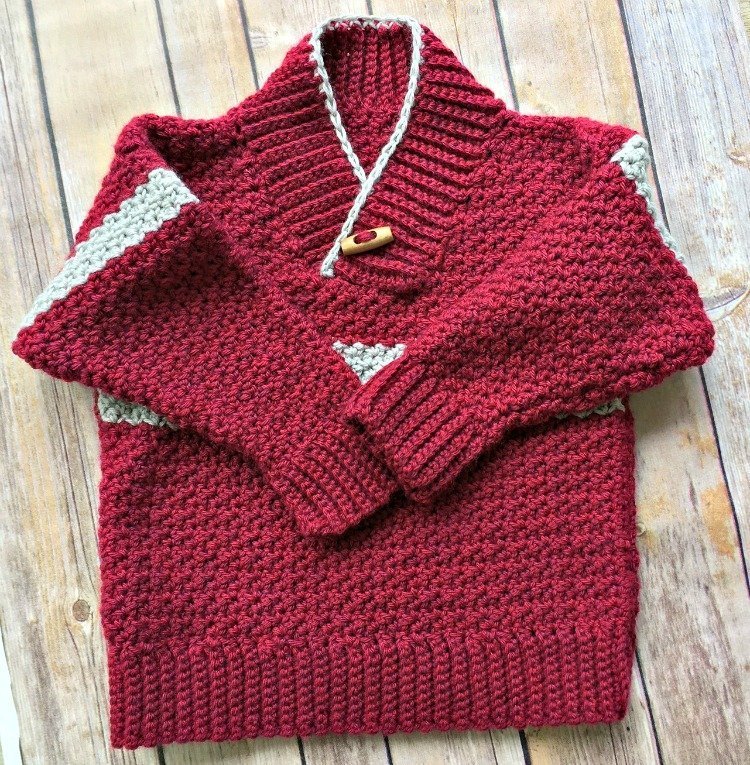
This sweater begins with a single crochet rib and the body of the sweater is worked in a textured crochet stitch. You’ll also find crochet ribbing on the sleeve cuffs and collar. You’ll use both methods of working single crochet ribbing for this pattern (starting the hem and cuffs with sc rib, and adding sc to the collar after the body is crocheted).
Find this free sweater pattern here.

This slouchy beanie pattern is worked from the ribbed brim to the top starting with single crochet ribbing and using a puff stitch for the body of the hat. Seam the ribbing as shown in the video.
Find the Puff Stitch Slouch Hat pattern here
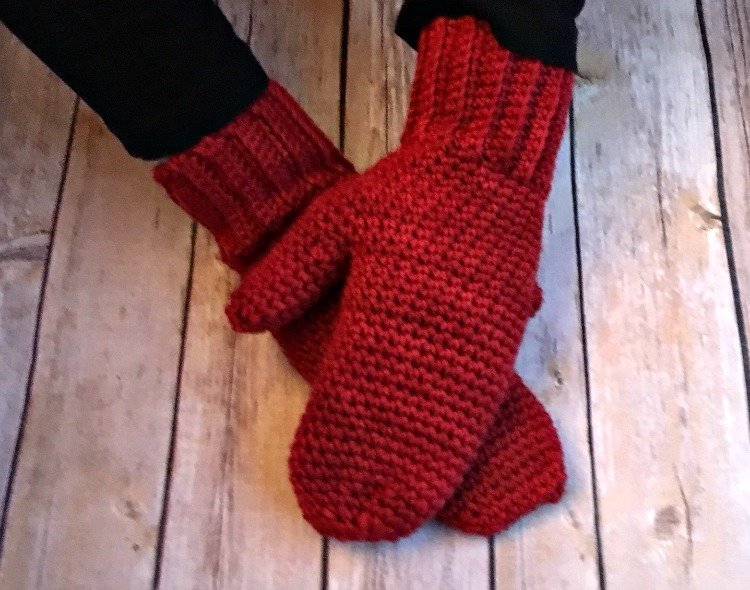
This free pattern for basic crochet mittens uses only single crochet. It starts with the ribbed cuff and then uses more sc for the rest of the mittens. Full video tutorial – and it’s very beginner-friendly!
Find the Basic Crochet Mittens pattern here
Final Thoughts on Single Crochet Ribbing
This crochet technique is useful in so many ways. I sure hope you’ll give it a try! You can also substitute half double crochet for the single crochet stitches. This makes a bit wider space between ribs if you want a bit different look.
I hope you’ve enjoyed this quick tutorial that uses only basic crochet stitches that gives you a rib with a knit stitch look. This creates a stretchy fabric with a rib effect that mimics the ribbing of knitting, but it is important to note that it’s not as elastic as knitted ribbing.
Happy Crocheting!
Amanda