

Oh where does the time go? It seems like just yesterday we brought this little guy home from the hospital and now he is nine months old!! I took these pictures over the summer when he was smaller but time has just flown by so fast.
Maybe it’s because I know this is our last baby (I mean, four boys keep us plenty busy!) but I remember my other boys growing up quickly on me, too. The oldest is almost 9!
I love designing baby things, though, and even when we don’t have a baby in the house I will still keep making baby items. I’ll just have to find someone else’s little one to model for me!
It’s still super hot here in TN but I’m already thinking fall and thinking about what the boys want to be for Halloween. Since the baby has already outgrown this I will have to find something else for him to wear this year but it’s a good excuse to crochet another cute costume. 😉
This was originally designed for I Like Crochet magazine and I really love designing for them. I regularly publish in the two Prime Publishing magazines and you should check them out!
We are back in school now and things are starting to settle into a routine (thankfully!!). I’m back at work as well and this is the best start to a semester I’ve ever had. I just hope it continues!
We had fun shooting the photos for this design. My oldest son took this pic:

I am starting to do more and more baby onesies and this is by far my favorite I’ve made to this point. I love how the little bat wings look attached to the body!
It also fits really well since I used a onesie as a guide (we sure do have enough of them!) and the snap tape makes it easy to get baby in and out – something that a lot of knit and crocheted baby items don’t think about!
I want to be able to easily change a diaper without having to undo a ton of buttons, and, let’s face it – two buttons at the crotch area is not going to stay closed very well so larger buttons don’t work that great. I wanted snaps like a regular onesie and thank goodness snap tape is out there.
I just went to my local JoAnn store to the ribbon section and bought it by the yard. It also sews in super easy, too, even if you aren’t good at sewing! It doesn’t take much – I even had some of the 1/4 yard left over.
You just want to be sure you have enough snaps to get the crotch area and the shoulder seam (two for the shoulder and three for the crotch) with enough area left around them to attach.
I used Malabrigo Worsted for this design and I can’t say enough about how much I love Malabrigo yarns!! The colors are always amazing and the yarn is a dream to work with. Any worsted weight yarn will do for this design if you can get gauge, but if you really want a costume to pass down to any other babies in your life, check out the Malabrigo. Enjoy!
I’d love to see pictures if you make this design! You can email them to [email protected], find me on Facebook or tag me on Instagram @love.life.yarn. (I share a lot of sneak peeks on my IG!)

To buy an ad-free, large print pdf of this pattern click the button at the bottom of this post! This pattern has more photos to help you construct the onesie.
Baby Bat Costume
What You’ll Need
Yarn: Malabrigo Yarn Merino Worsted (100% Merino Wool; 210 yards [192 meters]/100 grams): 508 Blue Graphite, 3 skeins
Hook:US size H/8 (5.0 mm); US size J/10 (6.0 mm)
Notions: Yarn needle; stitch markers; ¼ yard of black snap tape
Skill Level: Intermediate
Size: Onesie: 6 (12) months, 17 (18)” chest; Hat: Baby (Toddler), 14 (16)” head circumference
Shown in size 6 months.
Gauge: 16 sts and 20 rows = 4” [10 cm] in sc with larger hook
Notes:
Rounds are not joined unless noted. Place stitch marker in first st of each round to keep track. If only one number is given that number applies to both sizes.
Ch 3 at beginning of a row does not count as a dc.
PATTERN
Onesie
Back
With larger hook, ch 13 (17).
Row 1: Sc in 2nd ch and each ch across, turn – 12 (16) sts.
Row 2: Ch 1, sc in each st across, turn.
Row 3: Ch 1, 2 sc in first sc, sc to last st, 2 sc in last st, turn – 14 (18) sts.
Row 4: Ch 1, sc in each st across, turn.
Rows 5-6: Rep Rows 3-4 – 16 (20) sts.
Rows 7-8: Rep Rows 3-4 – 18 (22) sts.
Rows 9-10: Rep Rows 3-4 – 20 (24) sts.
Rows 11-12: Rep Rows 3-4 – 22 (26) sts.
Rows 13-14: Rep Rows 3-4 – 24 (28) sts.
Rows 15-16: Rep Rows 3-4 – 26 (30) sts.
Rows 17-18: Rep Rows 3-4 – 28 (32) sts.
Rows 19-20: Rep Rows 3-4 – 30 (34) sts.
Row 21: Rep Row 3 – 32 (36) sts.
Work even in sc for 40 (45) rows.
Armhole Shaping
Row 1: Sl st in first 2 sts, ch 1, sc in each st to last 2 sts, leave rem sts unworked, turn – 28 (32) sts.
Rows 2-11: Ch 1, sc in each st across, turn.
Row 12: Ch 1, sc in first 7 (9) sts, leave rem sts unworked, turn – 7 (9) sts.
Row 13: Ch 1, sc2tog, sc in each st to end, turn – 6 (8) sts.
Row 14: Ch 1, sc in each st across, turn.
Row 15: Rep Row 13 – 5 (7) sts.
Work even in sc for 3 (5) rows.
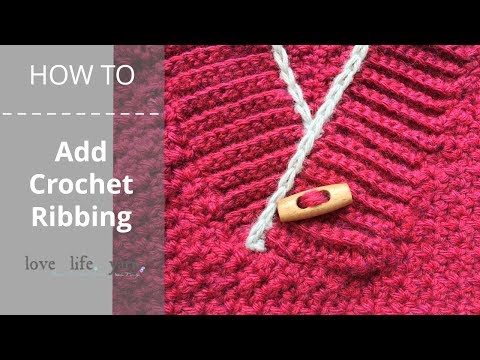
Ribbing
Change to smaller hook, ch 4.
Row 1: Sc in 2nd ch from hook and next ch, sc2tog last ch and first st of last row, turn – 3 sts.
Row 2: Ch 1, sc blo in each st across, turn.
Row 3: Ch 1, sc blo in first 2 sts, sc2tog blo last st and 2nd st of last row, turn.
Rep Rows 2-3 across 5 (7) sts of Shoulder.
Fasten off.
Join yarn at opposite side and repeat from Armhole Row 12.
**A lot of people have had questions about the ribbing – until I get the full video tutorial up here is a quick video showing how I attach my ribbing. You can find the FREE pattern for the red sweater here. The yellow one is coming later. 🙂
Front
With larger hook, ch 11 (15).
Row 1: Sc in 2nd ch from hook and each ch across, turn – 10 (14) sts.
Row 2: Work 2 sc in first st, sc in each st to last st, 2 sc in last st, turn – 12 (16) sts.
Row 3: Ch 1, sc in each st across, turn.
Rows 4-5: Rep Rows 2-3 – 14 (18) sts.
Rows 6-7: Rep Rows 2-3 – 16 (20) sts.
Rows 8-9: Rep Rows 2-3 – 18 (22) sts.
Rows 10-11: Rep Rows 2-3 – 20 (24) sts.
Rows 12-13: Rep Rows 2-3 – 22 (26) sts.
Row 14: Ch 6, sc in 2nd ch from hook and in each st across – 27 (31) sts.
Row 15: Rep Row 14 – 32 (36) sts.
Work even in sc for 40 (45) rows.
Armhole Shaping
Work same as Back to Ribbing. Fasten off.
Neckline
With smaller hook, join yarn at neck edge, ch 3.
Row 1: Sc in 2nd ch from hook, sc2tog last ch and first st of last row – 2 sts.
Row 2: Ch 1, sc blo in each st across, turn.
Row 3: Ch 1, sc blo in first st, sc2tog blo last st and 2nd st of last row, turn.
Rep Rows 2-3 around neck edge, working from one shoulder to another.
Fasten off.
Sew side seams.
Sew snap tape to Shoulder seams, overlapping ribbing. Tack Armhole edges.
Sleeve (make 2)
With larger hook, join yarn at underarm seam.
Rnd 1: Ch 1, sc 32 (34) sts evenly around, turn – 32 (34) sts.
Rnds 2-3: Ch 1, sc in each st around, turn.
Rnd 4: Ch 1, sc2tog, sc in each st to last 2 sts, sc2tog – 30 (32) sts.
Rnds 5-6: Ch 1, sc in each st around, turn.
Rnds 7-9: Rep Rnds 4-6 – 28 (30) sts.
Rnds 10-12: Rep Rnds 4-6 – 26 (28) sts.
Rnds 13-15: Rep Rnds 4-6 – 24 (26) sts.
Rnds 16-18: Rep Rnds 4-6 – 22 (24) sts.
Rnds 19-20: Ch 1, sc in each st around, turn.
Rnd 21: Rep Rnd 4 – 20 (22) sts.
Work even in sc for 14 (18) rnds, turning at each end.
Ribbing
Change to smaller hook, ch 3.
Row 1: Sc in 2nd ch from hook, sc2tog last ch and first st of last rnd – 2 sts.
Row 2: Ch 1, sc blo in each st across, turn.
Row 3: Ch 1, sc blo in first st, sc2tog blo last st and 2nd st of last rnd, turn.
Rep Rows 2-3 around Sleeve edge.
Fasten off.
Wing (Make 2)
With larger hook, ch 6.
Row 1: Dc in 4th ch from hook and in next 2 ch, turn – 3 sts.
Row 2: Ch 3, 2 dc in each st, turn – 6 sts.
Row 3: Ch 3, (dc in next st, 2 dc in next dc) 3 times, turn – 9 sts.
Row 4: Ch 3, (2 dc in next dc, dc in next 2 sts, ch 2) 3 times, turn – 12 sts.
Row 5: Ch 3, (dc in next 3 dc, 2 dc in next dc, ch 2) twice, dc in next 3 dc, 2 dc in next dc, turn – 15 sts.
Row 6: Ch 3, (2 dc in next dc, dc in next 4 dc, ch 2) twice, dc in next 4 dc, 2 dc in next dc, turn – 18 sts.
Row 7: Ch 3, (dc in next 5 dc, 2 dc in next dc, ch 2) twice, dc in next 5 dc, 2 dc in next dc, turn – 21 sts.
Row 8: Ch 3, (2 dc in next dc, dc in next 6 dc, ch 2) twice, dc in next 6 dc, 2 dc in next dc, turn – 24 sts.
Row 9: Ch 3, (dc in next 7 dc, 2 dc in next dc, ch 2) twice, dc in next 7 dc, 2 dc in next dc, turn – 27 sts.
Row 10: Ch 3, (2 dc in next dc, dc in next 8 dc, ch 2) twice, dc in next 8 dc, 2 dc in next dc, turn – 30 sts.
Row 11: Ch 3, (dc in next 9 dc, 2 dc in next dc, ch 2) twice, dc in next 9 dc, 2 dc in next dc, turn – 33 sts.
Row 12: Ch 1, sc in next 8 dc, hdc in next dc, dc in next dc, tr in next dc, (tr, ch-3 picot, tr) in ch-2 sp, tr in next dc, dc in next dc, hdc in next dc, sc in next 5 dc, hdc in next dc, dc in next dc, tr in next dc, (tr, ch-3 picot, tr) in ch-2 sp, tr in next dc, dc in next dc, hdc in next dc, sc in next 8 dc.
Fasten off.
Finishing
Sew Wing to underarm using photos as guide.
Leg Edging
Join yarn at left side seam of Leg opening.
Sc evenly around, working 3 sc in corners. Fasten off.
Sew snap tape to bottom of Front and Back, using photos as a guide.
Weave in ends.
That’s it! I really hope you have enjoyed this free crochet pattern as much as I enjoyed designing it! Please check out my other Free Baby Crochet Patterns.
Buy the ad-free PDF here!

After the original cast on, do I switch to the smaller needle?
The smaller hook is only for the ribbing – everything else is worked with the larger hook.
Great design, Amanda!
Your model is so adorable.🙂
Thanks so much!! 😀
I don’t understand the arm hole shaping?? Where am I putting these stitches to start it?? The top of the last row I crocheted? Thank you, Jamie
Hi Jamie! Yes, the armhole shaping is right above the last row you crocheted. You are just shaping where the sleeve will fit. 🙂
Hello! I’m stuck on the neckline ribbing. Do I just pick any of the 4 sides where the strap meets the ribbing?
Thank you!!
Hi Bethany,
Start at the top of one of the neck edges. You have to work the neck ribbing separately for the front and the back so that they can open at the sides with the snap tape. Just join to the top of one neck edge and work around to the other.
Awesome! So it starts by going down the side of the “strap” and then across the neckline?
This is such A GREAT costume/ pattern. Thank you SO MUCH!!
Yep! I’m working on a video tutorial for this pattern, sorry it can be confusing on that part! Just go down one side, work across where the corner of the neckline/”strap” meet and across the front to the other side 🙂
Hi! If I wanted to do this for newborn, how would I decrease my number of chains/ stitches? Thank you!
Hi Meaghan. I haven’t sized it down for a newborn but you could try making it with a smaller hook. 🙂
You can also change the amount of stitches for a newborn. It’s a bit complicated for the onesie but quite easy for the wings
I know this pattern is from last year, but did you ever get around to creating a video tutorial? I’m confused on the ribbing part. I have the BACK of the onesie completed up until the “ribbing” part. Is it suppose to be ribbing on the shoulder? I have no idea what to do next and i would really hate to frog it at this point
Hi Hallie! I have not made a video tutorial for this pattern yet. I’m trying to go back to add videos to my older patterns, but also keep creating videos for the new ones and it’s been a slow process. The ribbing is only on the shoulder and it should be exactly as wide as the shoulder. It’s just an extension of the shoulder that overlaps with the front (you know how onesies have an overlap at the shoulder a lot of times? I tried to make it like that). Let me know if you still have questions and I’ll see if I can clarify.
Good afternoon. I would love to make this for my grandson but I only knit. Do you have a pattern for a knitted version
The closest I have is a knitted kitty costume – but it’s also a onesie and could be adapted!
https://lovelifeyarn.com/baby-kitty-costume-free-knitting-pattern/
I have an 18 month old in 18 to 24 months sizes. Do you have any tips for making this larger? Thanks! It’s a great pattern!
Hi Marie!
When I designed these sizes I had onesies that I based them off of. You could try following the shaping guidelines and making the pieces as long as your onesie (so the crotch area to the side seam, then the torso, then work the armholes as long as the onesie, etc) and see how it goes. I need to create larger and smaller sizes for this because I get a lot of emails and requests. 🙂
I know this is an old pattern but asking anyway. I’m stuck on the neckline. I don’t understand where to start. I was reading another comment that said to go down the strap and across the neckline, but the directions don’t say that at all, they make it seem to just do the neckline and don’t touch the strap. This is confusing.
The neckline goes from one shoulder to the other, so start at the top of the ribbing (at the top of the shoulder) and work across to the other shoulder.
Hello! When working the back of the onesie, you say to work sc for 40 (45) rows, do you mean go until you get to get to row 40 (45) or do you mean to work an additional 40 (45) rows??
Hi Summer! You work an additional 40 (45) rows, depending upon the size you are making 🙂
Ok thank you. I figured it out. But now I’m on the neckline after completing both sides of the onesie and I cannot make sense of it. I paid for the pattern hoping there would be some pictures or something to better explain it. So I’m just kind of free styling hoping I’m doing it right.
The neckline is just ribbing that runs from one shoulder to the other – it should end up like the picture in that part of the pattern. Start at the top of one shoulder ribbing, go down the side of there neckline, across the front, and up the other side. Let me know if you have more questions! 🙂
Hello,
I’m allergic to wool but would like to make this got a friend. Do you have a suggestion got a different yarn?
Thanks!
Alexis
Hi! You can make this costume in any worsted weight yarn that gets gauge – a cotton, acrylic or polyester would work. I did the onesie in Lion Brand’s Feels Like Butta yarn and it worked really well as a substitute.
Thank you!
I’m having trouble finding the bat hat pattern to go with the onesie. Please advise
Hi Cheryl! The hat is in our free resource library. If you are a member of the (totally free!) library, just head there and download it. The password is in any email from me. If you’re not a member of the resource library yet, you can sign up using the form at the bottom of this post. 🙂
I am a member and had already gone to the library. All I can find is the pattern for the onesie. No bat hat pattern.
Hi Cheryl – it is under the “Subscriber Exclusive Pattern Downloads” and is the fourth one down – “Baby Bat Costume Hat”. Just click where it says Download. If you go to view the post you will see the onesie pattern. 🙂
Amanda,
My first great grandson will be born in mid-October and my granddaughter wants a bat outfit for him. I love your little onsie and so did she. To knit this in a newborn size, how and where would you adapt it? I am also thinking in terms of making it into a cocoon rather than as a onsie, so I plan to put a drawstring at the bottom rather than snaps.
Looking forward to hearing from you soon. Have my yarn on order but with Covid-19, it may take awhile to arrive.
Congratulations on the new great grandson!! I would try going down a hook size or two to make it smaller. Also, get a newborn onesie and use it as a guide for length. This is how I made my original sizes for this pattern. I had the onesies with me and made sure it matched in armhole depth, etc. Just be sure your onesie isn’t one of those teeny ones that stretch a ton. 🙂
Hello Amanda,
I adore the little bat costume and would love one for my new little Grandson. However I am not a crochet person at all, and my grandson is a tiny baby so I think the smaller size 6mnths would be far to large on him for this October. Could I ask to buy one from you please, already made up for a size up to 3 months.
Best wishes Jennie
Hi Amanda,
I am just beginning the sleeves to your bat pattern. The instructions say to work around, but after that say to turn. I’m confused. Are the sleeves worked in a round or back an forth? It doesn’t say anything about an underarm seam. Thanks Amanda.
Hi Mary! You can join at the end of each round if you like, but they are worked back and forth in rows and then the seam is closed up when you sew the wing on. 🙂
I have a color question. I see on the list of materials that there are 2 colors. I don’t see any instructions for color changes though. Do you work with both colors at once or are parts of the costume made from each color? Thank you for the help.
Hi Robin! There is only one color, it’s just called Blue Graphite. 🙂
The arm spacing is down the side right? Can’t figure out the 34 stitch count
Hi! The armhole stitches go all the way around the opening. A lot of people have made this and I haven’t heard of any problems.
Hi,
I love this costume. I am about to order the yarn. I will be making the smaller size. Is one 100gm ball of yarn sufficient for the entire project please? The hat, wings included.
Or will I need more?
-TIA
You will need more than one ball of yarn to complete this. Instructions call for 3 balls at 100g each.
Hey Amanda I am just wondering how big your little cute was when this picture was taken as in weight I made the back of the larger size and it seemed quite big compared to his onsie now im hesitant to restart because I don’t want it to be too small!!
When this picture was taken he was almost a year old. Keep in mind that a lot of those onesies are super stretchy and crochet isn’t. 🙂 That’s one thing I have to keep in mind when using onesies as guides for baby clothes.
I’m running so late with crocheting this. Was I supposed to continue crocheting the front side from the 2nd shoulder ribbing? I finished off the 2nd shoulder ribbing and started new for the front but at Row 14 it says: Ch 6, sc in 2nd ch from hook and in each st across – 27 (31) sts.
Won’t that leave yarn hanging out from the side of the onesie?
Thank you, Maria.
Hi Maria,
This adds width to the onesie and you chain, then crochet into the chains and across the stitches that are already there.
Where is the pattern for the hat?
I’ve finished the onesies, and it looks amazing, but want to complete the outfit please. X
Hi Anya! It’s in the subscriber resource library. If you are an email subscriber you can find the instructions for how to access the library at the bottom of every email. If you aren’t subscribed yet you can join on the form in this post. 🙂