
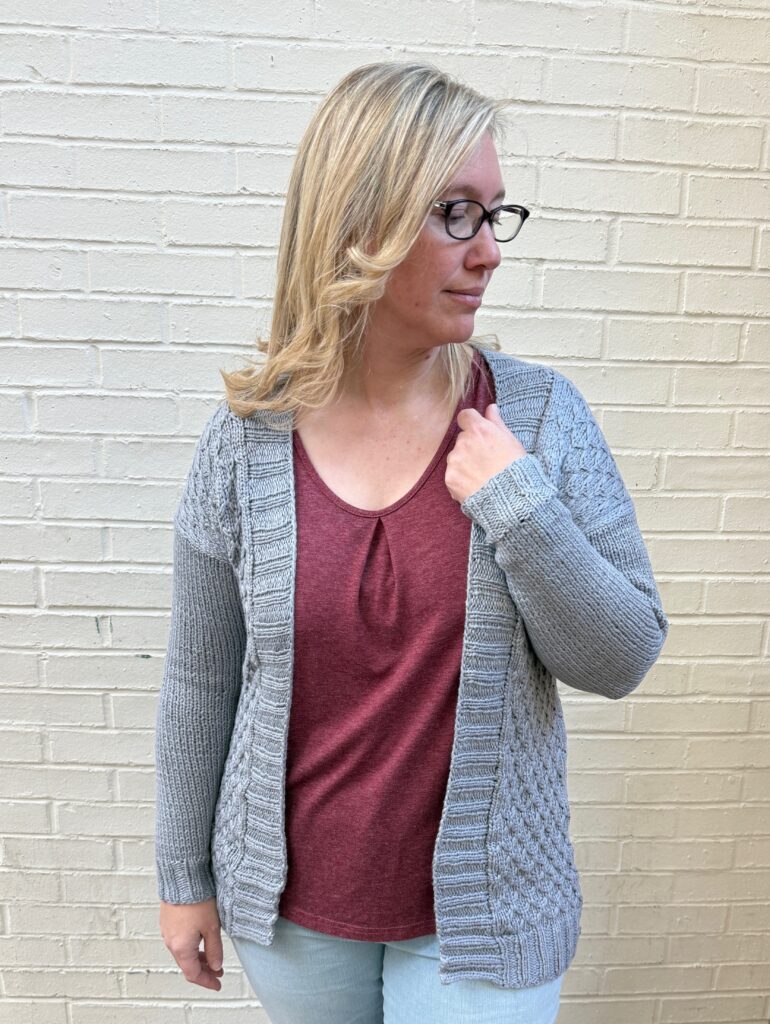
Knit a wonderfully textured cardigan with this pattern for a simple Drop Shoulder Cardigan!
Design Story and Inspiration for this Drop Shoulder Cardigan
I love cardigans and wear them all the time – and I think a lot of you do, too! Cardigan patterns are always SO popular here on the blog, so I decided it was time to knit another.
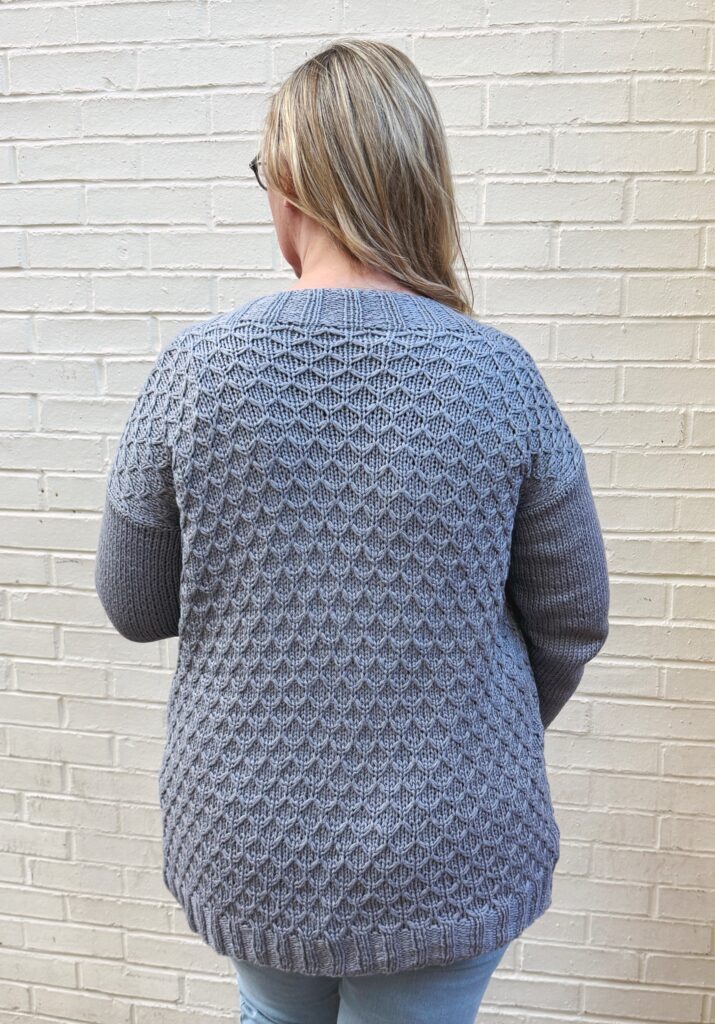
This sweater is knit in four pieces: back, right front, left front, right sleeve and left sleeve. Then, it is seamed at the shoulders using the mattress stitch and the sleeves are set in and seamed at the underarms and side seams. Finally, the wide collar is picked up and knit.
The lace pattern is an easy lace mesh that uses knit stitches, slipped stitches and purl stitches. If you know how to do these and k3tog, then you can knit this cute cardi!
Yarn Options for this Textured Knit Cardigan
I chose Juniper Moon Farms Cumulus for this project, and it is SO soft! I wanted a soft worsted weight yarn and since I’d used this before for the Touch of Lace Pullover, I knew just how wonderful it is!
You can use any yarn that gets gauge, even holding a couple of DK yarn strands together. Feel free to experiment and use up that stash – but be sure to check your gauge!
Pattern Notes
This sweater is a bit on the longer side, the way I like them. Feel free to adjust the length of the fronts and back however you like – there is no side or shoulder shaping so it won’t mess up any math!
Click here to buy the ad-free PDF with schematic for all 9 sizes in my shop!
OR Join the all-access Knitting Academy and get ALL of my patterns for one low price!
Textured Drop Shoulder Cardigan
What You’ll Need
Yarn: Juniper Moon Farms Cumulus, worsted weight (category #4), 94% cotton/6% Nylon, 251yd/100g) – 4 (5, 5, 6, 6, 7, 7, 8, 8) skeins in Stone
Knitting Needles: US Size 8 (5.00mm) and 9 (5.50mm) straight needles
Notions: Yarn needle, scissors, stitch holders or waste yarn
Gauge: 15 sts and 23 rows = 4” in Stockinette st after blocking
Finished Size: Finished Chest Size 33.5 (38, 42, 44, 48.5, 53, 56, 61, 65.5)” to fit XS (S, M, L, XL, 2X, 3X, 4X, 5X)
Stitch Abbreviations
Knit (k)
Purl (p)
Knit 3 Together (k3tog)
Stitch Pattern
Set up row (row 0): P across
1st and 3rd rows: K2, *bring the yarn forward, slip 3 stitches purlwise, bring the yarn to the back, K1*. Repeat from * to * to last st, K1.
2nd and every even row: P across.
5th row: K3, *lift 2 bars onto left-hand needle from back-to-front, knit next st with the 2 strands as if it were k3tog, k3*. Repeat from * to * to end.
7th and 9th rows: K3, *K1, bring the yarn forward, slip 3 stitches purlwise, bring the yarn to the back*. Repeat from * to * to last 4 st, K4.
11th row: K2 *k3, k3tog using the 2 strands or bars from the previous rows, along with the next st*. Repeat from * to * to last 5 sts, K5.
12th row: P across.
Mermaid Stitch Video Tutorial

Note: For the front band, it will be easier to work the required number of stitches on a longer circular needle (size 8).
Click here to buy the ad-free PDF with schematic for all 9 sizes in my shop!
OR Join the all-access Knitting Academy and get ALL of my patterns for one low price!
Textured Drop Shoulder Cardigan Pattern
Back
With smaller needles, cast on 62 (70, 78, 82, 90, 98, 104, 114, 122) sts.
Work in K2P2 rib for 2.5”.
Increase 1 st on last row 63 (71, 79, 83, 91, 99, 105, 115, 123) sts.
Change to larger needles.
Work in pattern stitch until back measures 23 (24, 24.5, 26, 26, 26, 26, 26.5, 27)” from beginning, ending with a RS row. Bind off 23 (23, 27, 27, 33, 33, 37, 41, 43) sts for shoulder purlwise, place middle 17 (25, 25, 29, 25, 33, 31, 33, 37) sts on holder, bind off remaining 23 (23, 27, 27, 33, 33, 37, 41, 43) sts for shoulder purlwise.
Front (Make 2)
With smaller needles, cast on 22 (22, 26, 26, 32, 32, 36, 40, 42) sts.
Work in K2P2 rib for 2.5”.
Increase 1 st on last row 23 (23, 27, 27, 33, 33, 37, 41, 43) sts.
Change to larger needles.
Work in pattern stitch until piece measures 23 (24, 24.5, 26, 26, 26, 26, 26.5, 27)” from beginning, ending with a RS row. Bind off purlwise.
Sleeves
With smaller needles, cast on 26 (30, 30, 32, 36, 40, 44, 46, 48) sts.
Work in K2P2 rib for 2.5”.
Increase 4 (2, 4, 4, 4, 4, 4, 4, 4) sts evenly on last row 30 (32, 34, 36, 40, 44, 48, 50, 52) sts).
Change to larger needles and Stockinette st.
Increase 1 st on each side every 4 (4, 4, 4, 4, -, 6, 6, 4)th row 8 (5, 5, 6, 5, -, 8, 11, 2) times, then every 6 (6, 6, 6, 6, 6, 8, 8, 6)th row 7 (10, 10, 10, 11, 15, 6, 4, 15) times – 60 (62, 64, 68, 72, 74, 76, 80, 86) sts.
Continue in St st until sleeve measures 16.5 (17.5, 17.5, 18, 18.5, 19, 20, 20.5, 20.5)” from beginning. Bind off.
Finishing
Block to measurements.
Using the mattress stitch, sew shoulder seams. Sew sleeves in place, matching center of sleeve with shoulder seam. Sew side and underarm seams.
Front Band
Using smaller circular needles, with RS facing and beginning at bottom right corner of front, pick up and knit 86 (90, 92, 96, 96, 96, 96, 98, 100) sts along right front, knit across 8 (12, 12, 14, 12, 16, 15, 16, 18) sts of back, k2tog, knit across remaining 7 (11, 11, 13, 11, 15, 14, 15, 17) sts of back, pick up and knit 86 (90, 92, 96, 96, 96, 96, 98, 100) sts along left front – 188 (204, 208, 220, 216, 224, 222, 228, 236) sts.
Work in K2P2 ribbing for 2.5”. Bind off in rib.
Weave in ends.
Final Thoughts on the Textured Drop Shoulder Cardigan
Wow, I hope you’ve enjoyed this sweater pattern as much as I enjoyed designing it!
Happy Knitting!
Amanda