

If you read my post about the Velvet Mittens, you will know that I was determined not to jump on the velvet yarn bandwagon. I decided it was a trend that would go out and I wasn’t going to even bother.
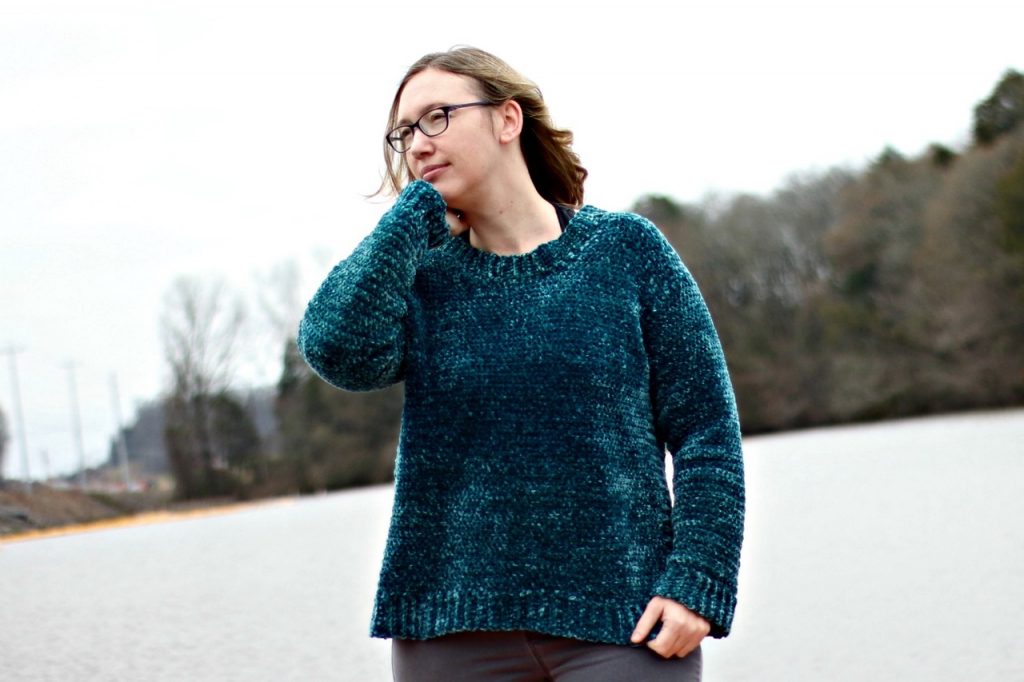
When my son and I went to our local JoAnn to pick up some Red Heart Hygge, we found out they were out of every color that I might want to make a sweater in. And I was determined to make a sweater for me! You see, I’ve made a lot of sweaters over the years. Long sleeve, short sleeve, pullovers and cardigans. Thick yarn, thin yarn, pretty much anything. But I always made those sweaters for publication and even if I got them back they were usually a size small (which I’m not!). So I was determined that this time I would make a sweater just for me. I’m super excited with how the Velveteal Sweater has turned out!
I wasn’t really sure what size I was now that I’m done having kids, so I made this really oversized – I ended up with 6″ ease!! But I really like it this way. I think a velvet cardigan is in order soon.
My son picked up this yarn and said “Mom, it’s so soft!” and when I saw it was in teal, well, I was sold! I bought enough for my sweater (on sale even!!) and off we went. The rest is history.
This sweater can and has been made in other bulky weight yarns – it’s not just for velvet!! I found that I could get gauge with Lion Brand Color Made Easy and I’m sure other bulky weight yarns would be the same. If you like the design but don’t think velvet yarn is for you – just try a bulky weight yarn and you’re good to go!
Purchase the ad-free PDF of this pattern in my shop here!
The Velveteal Sweater
What You’ll Need
Yarn: Bernat Velvet: 670 (780, 830, 930, 1000, 1040, 1080) yards
Hook: US size K/10.5 (6.50 mm)
Notions: Yarn needle
Skill Level: Easy
Size: Finished Chest Size 36 (40, 42, 44, 46, 50, 54)” to fit women’s size XS (S, M, L, XL, 2XL, 3XL).
2-6” positive ease recommended. Shown in size XL on a model with a 40” bust.
Gauge: 12 sts and 16 rows = 4” [10 cm] in sc
PATTERN NOTES
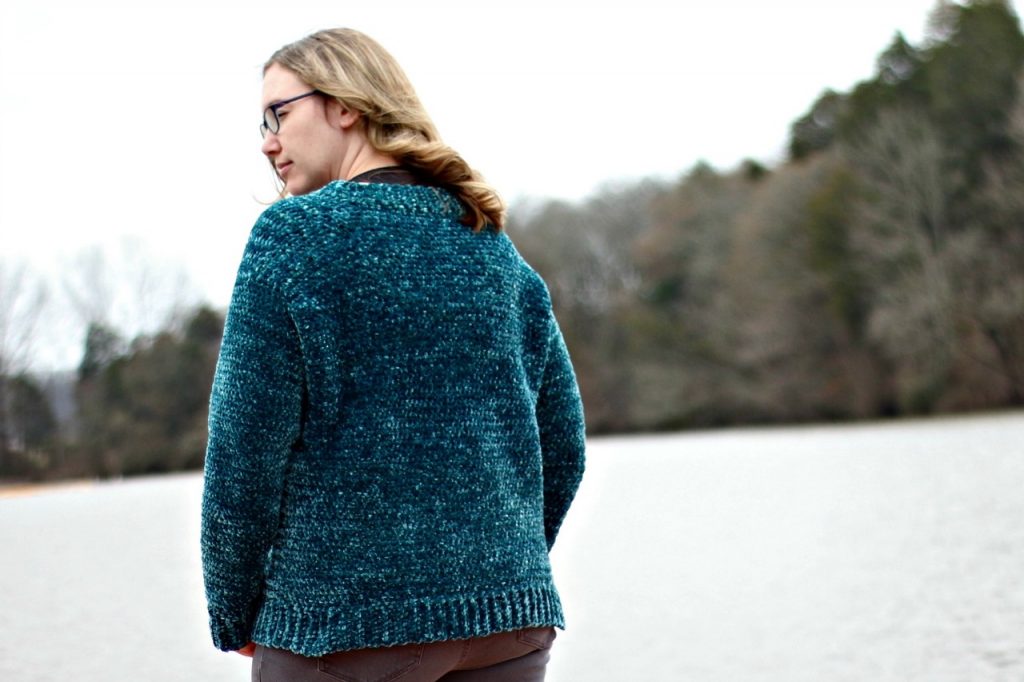
Sweater is crocheted from the top down, starting with the ribbed saddles. The back is worked across the saddles to the armholes, then the front is worked to the armholes and the pieces are joined. Sleeves are crocheted around armhole edges, leaving only the ribbing to be seamed. Alternatively, you can slip st the ribbed edges together going through one loop of each side.
Special Stitches:
Blo: Work into the back loop only of the indicated stitch.

Buy the ad-free PDF and crochet on the go!
PATTERN
Saddle (make 2)
Ch 11 (11, 11, 11, 11, 11, 13).
Row 1 (RS): Sc in 2nd ch from hook and in each ch across, turn – 10 (10, 10, 10, 10, 10, 12) sts.
Row 2: Ch 1, sc blo in each sc across.
Rep Row 2 until Saddle measures 3 ½ (4, 4 ½,4 ¾, 5, 5, 5 ¼)” from beginning, ending with WS row. Do not turn at end of last row. Fasten off at end of first saddle. At end of second saddle, continue working back.
Back
Turn second saddle and continue across long side as follows:
Row 1: Ch 1, sc 10 (12, 14, 14, 15, 15, 16) evenly across second saddle, ch 20 (20, 20, 20, 22, 24, 26) for back neck, sc 10 (12, 14, 15, 15, 15, 16) sts evenly across long side of first saddle; turn – 40 (44, 48, 48, 52, 54, 58) total sts.
Row 2: Ch 1, sc across each st and ch; turn.
Work even in sc until piece measures 4 ¾ (5, 5, 5, 5, 5, 5)” from edge of saddle (joining row).
Shape Armholes
Row 1: Ch 1, 2 sc in first st, sc to last st, 2 sc in last st; turn – 42 (46, 50, 50, 54, 56, 60) sts.
Row 2: Ch 1, sc evenly across; turn.
Repeat rows 1-2 1 (2, 2, 3, 3, 4, 4) more times – 44 (50, 54, 56, 60, 64, 68) sts.
Row 7: Ch 3, sc in 2nd ch from hook and next ch, sc across; turn – 46 (52, 56, 58, 62, 66, 70) sts.
Row 8: Repeat row 7. Fasten off – 48 (54, 58, 60, 64, 68, 72) sts.
Purchase the ad-free PDF in my shop here.
Right Front
Row 1: With RS facing, sc 10 (12, 14, 14, 15, 15, 16) sts across right saddle edge opposite back, beginning at armhole edge, turn – 10 (12, 14, 14, 15, 15, 16) sts.
Row 2: Ch 1, sc evenly across, turn.
Row 3: Ch 1, sc to last st, 2 st in last st – 11 (13, 15, 15, 16, 16, 17) sts.
Repeat rows 2-3 4 (4, 4, 3, 4, 4, 5) more times – 15 (17, 19, 18, 20, 20, 22) sts.
Fasten off. Work left front.
Left Front
Row 1: With RS facing, sc 10 (12, 14, 14, 15, 15, 16) sts across left saddle edge opposite back, beginning at neck edge; turn – 10 (12, 14, 14, 15, 15, 16) sts.
Row 2: Ch 1, sc evenly across; turn.
Row 3: Ch 1, 2 sc in first st, sc to end; turn – 11 (13, 15, 15, 16, 16, 17) sts.
Repeat rows 2-3 4 (4, 4, 3, 4, 4, 5) more times – 15 (17, 19, 18, 20, 20, 22) sts.
Do not fasten off. Turn and continue working front joining row.
Front Joining Row:
Row 5: Ch 1, sc across left front, ch 10 (10, 10, 12, 12, 14, 14) for front neck, sc across right front; turn – 40 (44, 48, 48, 52, 54, 58) sts.
Work even in sc until same length as back before armhole shaping.
Shape Armholes
Row 1: Ch 1, 2 sc in first st, sc to last st, 2 sc in last st; turn – 42 (46, 50, 50, 54, 56, 60) sts.
Row 2: Ch 1, sc evenly across; turn.
Repeat rows 1-2 1 (2, 2, 3, 3, 4, 4) more times – 44 (50, 54, 56, 60, 64, 68) sts.
Row 7: Ch 3, sc in 2nd ch from hook and next ch, sc across; turn – 46 (52, 56, 58, 62, 66, 70) sts.
Row 8: Repeat row 7. Do not fasten off. Turn and work lower body section – 48 (54, 58, 60, 64, 68, 72) sts.
Lower Body:
Round 1: Ch 1, work 48 (54, 58, 60, 64, 68, 72) sts across front, ch 6 (6, 6, 6, 6, 8, 10), work 48 (54, 58, 60, 64, 68, 72) sts across back, ch 6 (6, 6, 6, 6, 8, 10), join to first sc with slip st, turn – 108 (120, 128, 132, 140, 152, 164) sts.
Round 2: Ch 1, work even in sc, join to first sc with slip st, turn.
Repeat round 2 until lower body measures 12 (12 ½, 12 ½, 13, 13, 14, 14 ¾)” from joining round.
Ribbing:
Ch 9 (9, 9, 9, 11, 11, 11).
Row 1: Sc in 2nd ch from hook and next 6 (6, 6, 6, 8, 8, 8) ch, sc2tog next ch and next sc of body, slip st in next st of body, turn – 8 (8, 8, 8, 10, 10, 10) sts.
Row 2: Ch 1, sc blo in each st, turn.
Row 3: Ch 2, sc blo to last st, sc2tog blo of next sc and next st of body, slip st in next st of body, turn.
Repeat rows 2-3, working row 3 into every other sc of body (the sts that you do not slip st into). If ribbing seems to flare out, you have made your rows too close together.
Fasten off.

Sleeve
With RS facing, join yarn at center underarm stitch.
Round 1: Ch 1, sc 40 (42, 44, 44, 44, 46, 48) sts evenly around armhole edge, join with sl st to first sc; turn – 40 (42, 44, 44, 44, 46, 48) total sts.
Round 2: Ch 1, work even in sc, join with slip st to first sc, turn.
Rounds 3-6: Repeat round 2.
Round 4: Ch 1, sc2tog, sc to last 2 sts, sc2tog – 38 (40, 42, 42, 42, 44, 46) sts.
Sizes XS (M, L, 2XL) ONLY
Rounds 1-8: Repeat round 2.
Round 9: Ch 1, sc2tog, sc to last 2 sts, sc2tog – 36 (40, 40, 42) sts.
Repeat rows 1-9 4 (5, 5, 5) more times – 28 (30, 30, 32) sts.
Sizes S (XL, 3XL) Only
Rounds 1-9: Repeat round 2.
Round 10: Ch 1, sc2tog, sc to last 2 sts, sc2tog – 38 (40, 44) sts.
Repeat rounds 1-10 4 (4, 5) more times – 30 (32, 34) sts.
All Sizes
Work even if needed until sleeve measures 13 ½ (14 ¼, 14 ½,15, 15 ¼, 16 ¼, 16 ¼)” from first round of sleeve.
Sleeve Ribbing:
Work same as body ribbing.
Fasten off.
Buy the inexpensive ad-free PDf of this pattern from my shop!
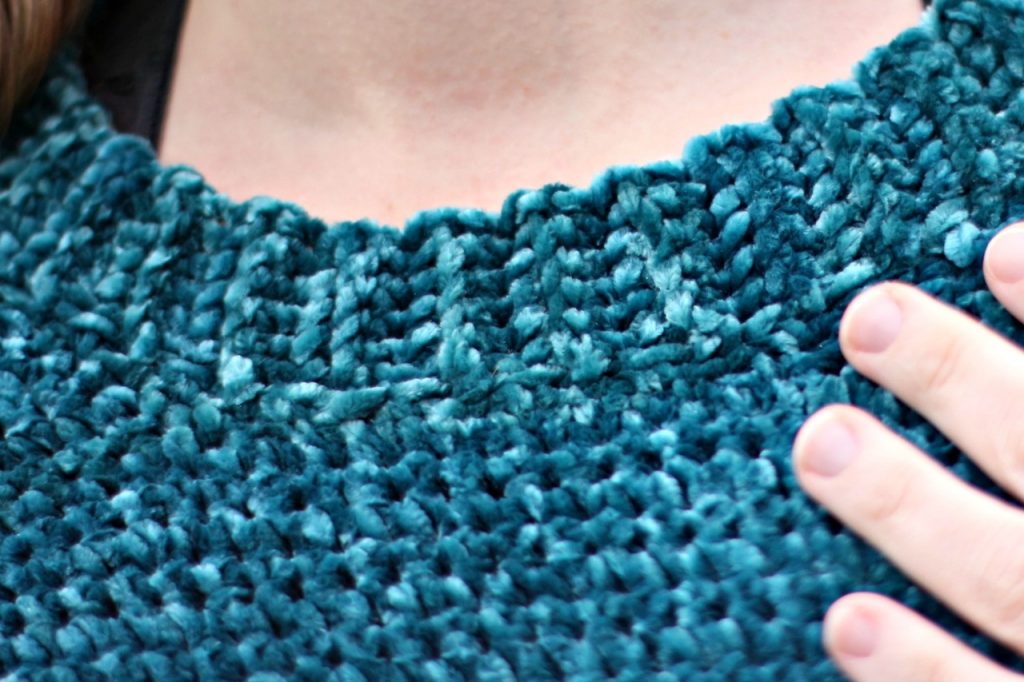
Collar
With RS facing, join yarn with sl st at right back, directly behind saddle.
Ch 1, sc evenly around neck edge.
Ribbing
Ch 7.
Row 1: Sc in 2nd ch from hook and next 4 ch, sc2tog next ch and next sc of body, slip st in next st of body, turn – 6 sts.
Row 2: Ch 1, sc blo in each st, turn.
Row 3: Ch 2, sc blo to last st, sc2tog blo of next sc and next st of body, slip st in next st of body, turn.
Repeat rows 2-3, working row 3 into every other sc of body (the sts that you do not slip st into). If ribbing seems to flare out, you have made your rows too close together. If this happens, take out the collar and make your first row of sc more evenly spaced apart, then try the ribbing again.
Fasten off.
Finishing
Sew ribbing seams at sleeves, collar and hem.
Weave in ends.

Awww, you did name it Velveteal!! First time anyone took my suggestion. Thank you! I love the sweater!
I did!! It’s on my list of things to do to email you the pdf 🙂
I love your design, I am planning. To do it
Thank you and happy new year
That’s awesome! Happy New Year!
This sweater is so cute! I’m having trouble understanding what the saddle is (I think it’s the shoulder, but not sure). Also not sure if I start the back by turning the saddle on the side and stitch in the ends instead of on the row I just finished. I’m sure there will be more questions but that is as far as I have gotten so far.
Thanks!
Hi Lisa! Yes, the saddle part is the shoulder. You make it first, then turn the saddle to the side and work along the side of your rows. 🙂
I am making this sweater and was wondering if there is a video to help,me out. I have never made a sweater before so not familiar with some of terminology and stitch amounts are not adding up right
I do not have a tutorial for this exact sweater, but it uses the same technique as this kid’s version that might help you out. The kid’s sweater has a video. 🙂