
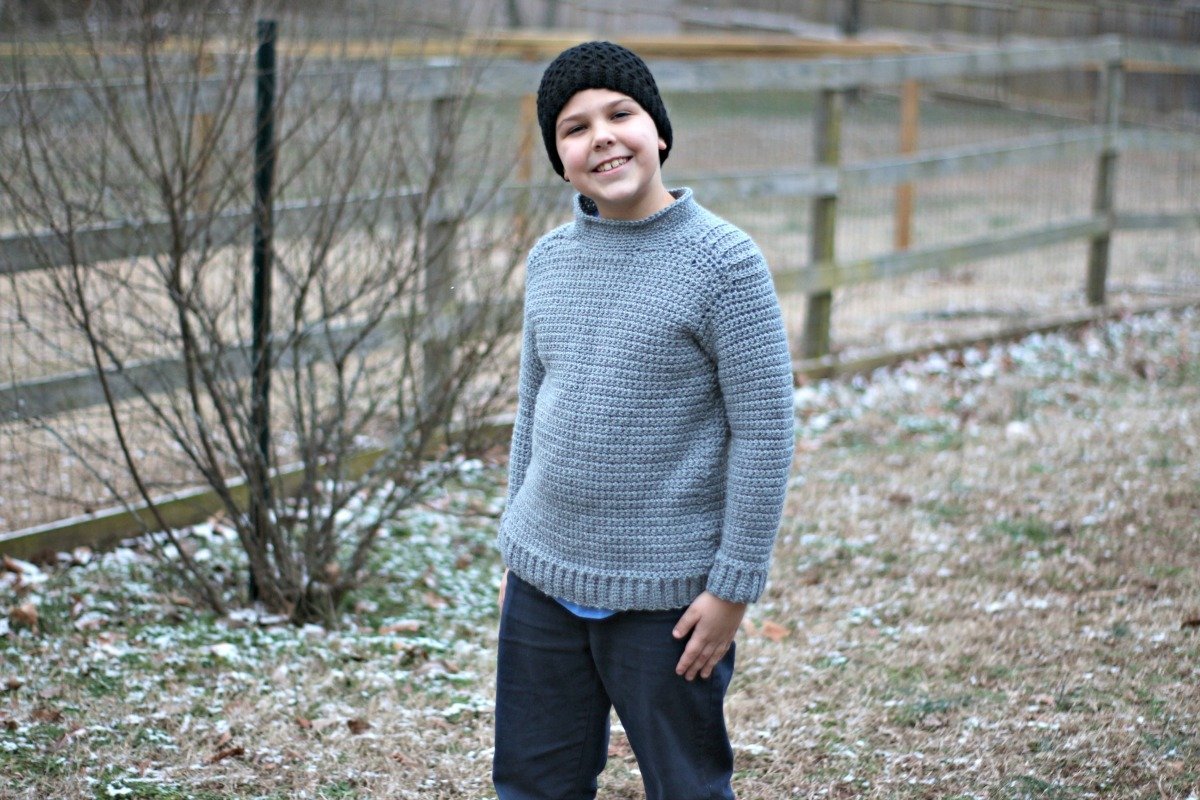
I’m so excited that I met my big crochet goal for the season! I really wanted to make all four boys a sweater this winter and this is the last one – and there is still plenty of cold weather left for them to wear them!! I started out making the youngest a Cabled Hoodie, then I made the three-year-old a V-Neck version of this sweater, then the six-year-old got a Crew Neck version of this sweater, and now my oldest wanted his all in one color with a funnel neck. Whew!! It’s been busy but I love all of these. I’m going to try to get some pictures of all four of them together in their sweaters.
This sweater uses Lion Brand yarn’s Pound of Love, which retails at Michael’s for $9.99. I had a 50% off coupon and made this entire sweater (with a good amount left over) for only $5!! And this is the largest size!! I’m working on an adult version now that is almost done and I made it in the velvet yarn…. I’m so in love. And making all these sweaters has rekindled my love of making sweaters, so be on the lookout for more sweaters really soon!
My oldest son absolutely loves this sweater and has worn it several times already. That definitely makes a maker mama’s heart proud. 😀

Buy the ad-free PDF of this pattern in my shop here!
What You’ll Need
Yarn: Lion Brand Pound of Love: 1 skein Oxford Gray
Hook: US size L/11 (8.0 mm); US size I/9 (5.5mm)
Notions: Yarn needle
Skill Level: Easy
Size: Finished Chest Size 26 (28, 30, 32, 34)” to fit kid’s size 4 (6, 8, 10, 12). 2” positive ease recommended. Shown in size 12.
Gauge: 12 sts and 16 rows = 4” [10 cm] in sc with larger hook
Note: stitch gauge is more important than row gauge
PATTERN NOTES
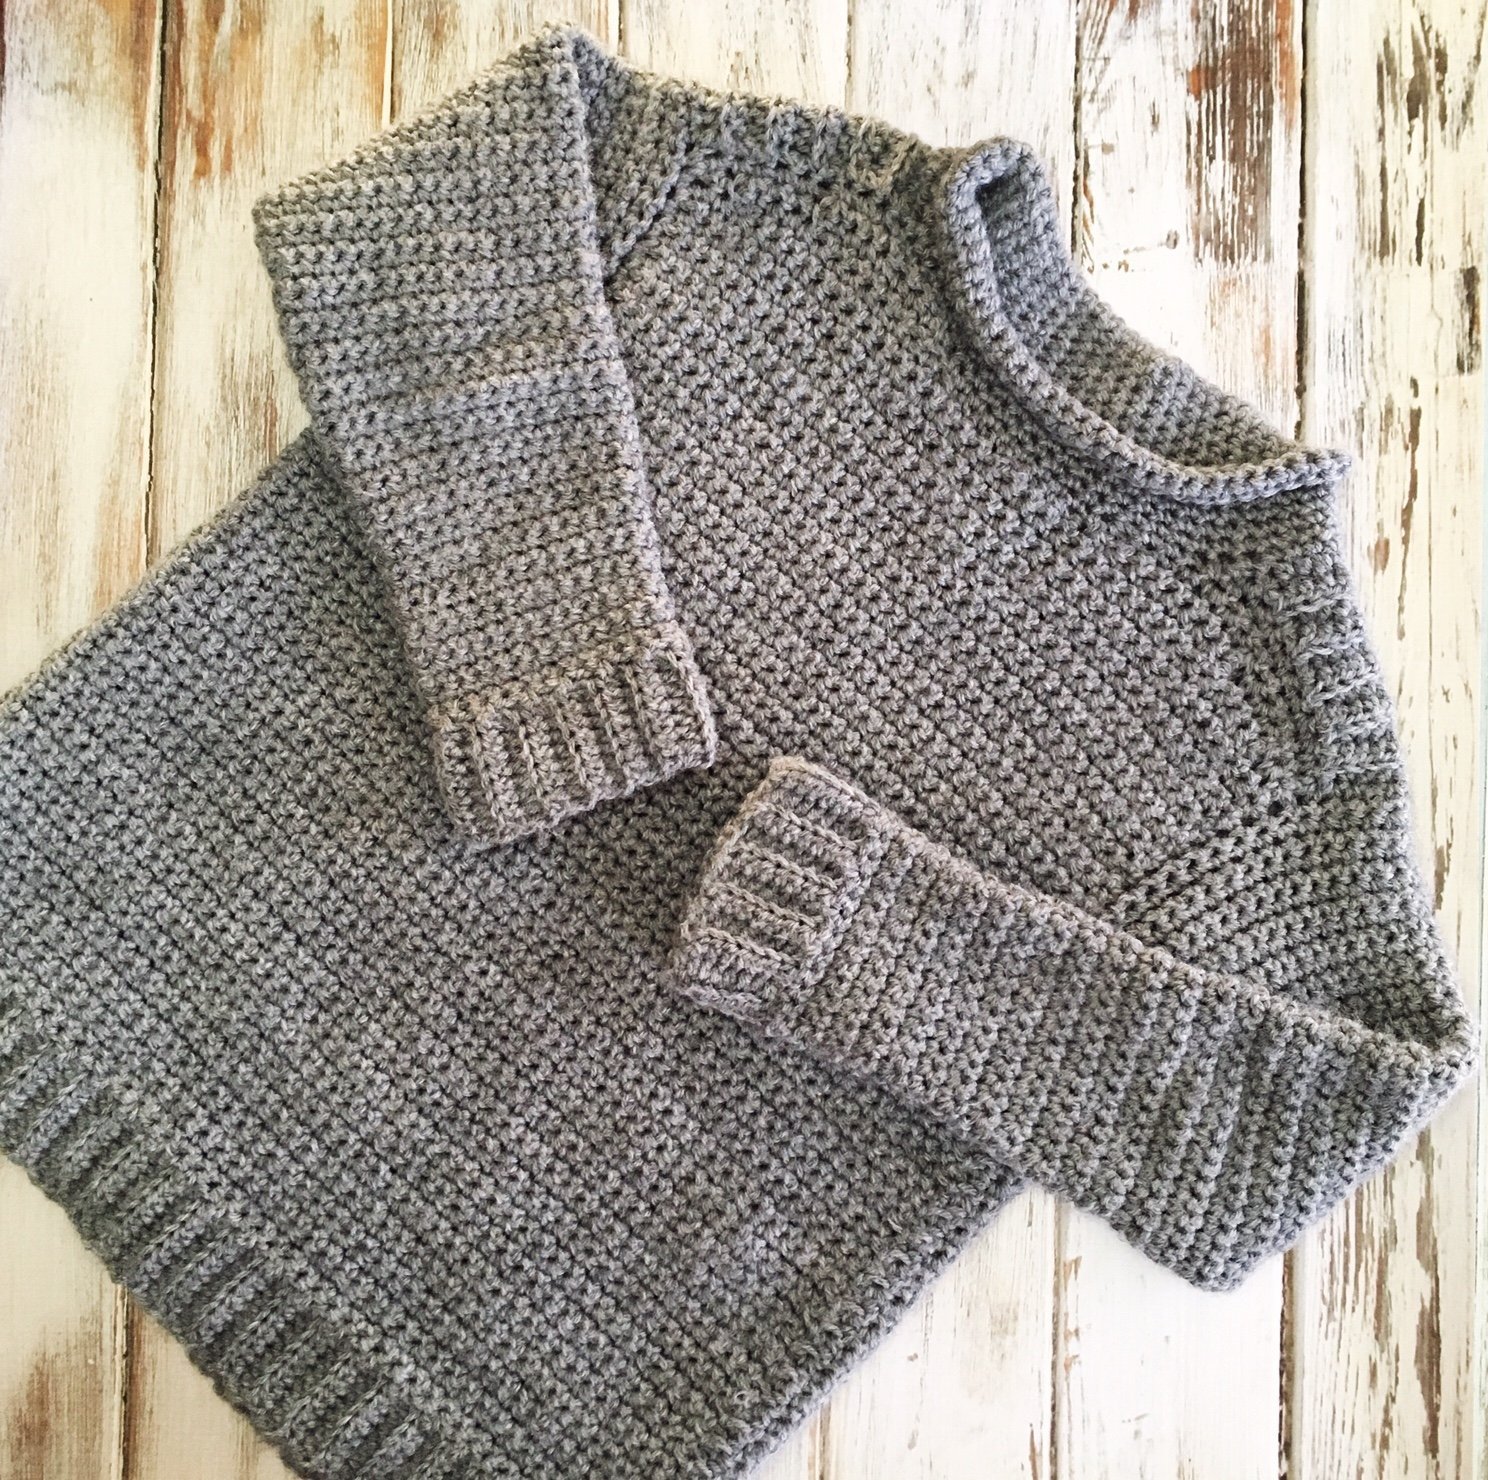
Sweater is crocheted from the top down, starting with the ribbed saddles. The back is worked across the saddles to the armholes, then the front is worked to the armholes and the pieces are joined. Sleeves are crocheted around armhole edges, leaving only the ribbing to be seamed.
Shoulder shaping is achieved using short rows. When working back across the row, sc in the next st as usual. After a few more rows it should lie relatively flat.
Ch 2 at beginning of a row counts as hdc.
Construction of this sweater is very similar to the Varsity Sweater – which also includes a video tutorial.
Special Stitches:
Blo: Work into the back loop only of the indicated stitch.
Buy the ad-free PDF and crochet on the go! (I brought this project on a cruise!)
PATTERN
Saddle (make 2)
With smaller hook, ch 7 (9, 9, 11, 11).
Row 1 (RS): Hdc in 3rd ch from hook and in each ch across, turn – 6 (8, 8, 10, 10) sc.
Row 2: Ch 2, hdc blo in each hdc across, working last st into ch-2, turn.
Rep Row 2 until Saddle measures 2 ½ (2 ¾, 2 ¾, 3, 3 ½)” from beginning, ending with WS row. Do not turn at end of last row. Fasten off at end of first saddle. At end of second saddle, change to larger hook.
Back
Turn second saddle and continue across long side as follows:
Row 1: Ch 1, sc 8 (8, 9, 9, 10) evenly across second saddle, ch 14 (16, 18, 18, 18) for back neck, sc 8 (8, 9, 9, 10) sts evenly across long side of first saddle, turn – 30 (32, 36, 36, 38) total sts.
Row 2: Ch 1, work even in sc.
Row 3 (Begin shoulder shaping): Ch 1, sc 25 (27, 31, 31, 32), turn, leaving remaining sts unworked.
Row 4: Ch 1, sc 20 (22, 26, 26, 26), turn, leaving remaining sts unworked.
Row 5: Ch 1, sc 23 (25, 29, 29, 30), turn, leaving remaining sts unworked.
Row 6: Ch 1, sc 26 (28, 32, 32, 34), turn, leaving remaining sts unworked.
Row 7: Ch 1, sc 28 (32, 34, 34, 36), turn, leaving remaining sts unworked.
Row 8: Ch 1, sc to end, turn.
Work even in sc until piece measures 4 ¼ (5 ¼, 5 ¾, 6, 6)” from center of saddle – NOT center back.
In the photo below, you can see here I am measuring the size 8. Start at the center of the saddle (you can see the brown saddle to the left). I need to work just a little longer to reach the 5 3/4″ measurement before starting the armhole shaping.

Shape Armholes
Row 1: Ch 1, 2 sc in first st, sc to last st, 2 sc in last st – 32 (34, 38, 38, 40) sts.
Sizes 10 & 12 ONLY
Work one row even.
Repeat row 1 – 32 (34, 38, 40, 42) sts.
All Sizes
Row 2: Ch 3, sc in 2nd ch from hook and next ch, sc to end – 34 (36, 40, 42, 44) sts.
Row 3: Repeat row 2 – 36 (38, 42, 44, 46) sts.
Fasten off.
Left Front
Row 1: With RS facing and larger hook, sc 8 (8, 9, 9, 10) sts across left saddle edge opposite back, beginning at neck edge, turn – 8 (8, 9, 9, 10) sts.
Row 2: Ch 1, sc evenly across, ch 5, turn.
Row 3: Sc in 2nd ch from hook and next 3 ch, sc 3 (3, 4, 4, 4), turn, leaving remaining sts unworked.
Row 4: Ch 1, sc 7 (7, 8, 8, 8), turn.
Fasten off. Work right front.
Right Front
Row 1: With RS facing and larger hook, sc 8 (8, 9, 9, 10) sts across right saddle edge opposite back, beginning at armhole edge, turn – 8 (8, 9, 9, 10) sts.
Row 2: Ch 1, sc evenly across, turn.
Row 3: Ch 1, sc evenly across, ch 5, turn.
Row 4: Sc in 2nd ch from hook and next 3 ch, sc 3 (3, 4, 4, 4), turn, leaving remaining sts unworked.
Front Joining Row:
Row 5: Ch 1, sc 7 (7, 8, 8, 8), ch 6 (8, 10, 10, 10) for front neck, sc 10 (10, 11, 11, 12), turn, leaving remaining sts unworked.
Row 6: Ch 1, sc 26 (28, 32, 32, 34) sts, turn, leaving remaining sts unworked.
Row 7: Ch 1, sc 28 (30, 34, 34, 36) sts, turn.
Row 8: Ch 1, sc 30 (32, 36, 36, 38) sts; turn.
Work even in sc until same length as back before armhole shaping.
Work armhole shaping same as back. Do NOT fasten off front.
Lower Body:
Round 1: Ch 1, work 36 (38, 42, 44, 46) sts across front, ch 4 (4, 4, 4, 6), work 36 (38, 42, 44, 46) sts across back, ch 4 (4, 4, 4, 6), join to first sc with slip st, turn – 80 (84, 92, 96, 104) sts.
Round 2: Ch 1, work even in sc, join to first sc with slip st, turn.
Repeat round 2 until lower body measures 6 ¼ (7 ¼, 8 ¾, 9 ¾, 11 ¼)” from joining round. Change to smaller hook.
Ribbing:
Ch 9 (9, 9, 11, 11).
Row 1: Hdc in 3rd ch from hook and next 5 (5, 5, 7, 7), hdc2tog next ch and next sc of body, slip st in next st of body, turn.
Row 2: Ch 1, hdc blo in each st, turn.
Row 3: Ch 2, hdc blo to last st, hdc2tog blo of next hdc and body, slip st in next st of body, turn.
Repeat rows 2-3, working row 3 into every other sc of body (the sts that you do not slip st into). If ribbing seems to flare out, you have made your rows too close together.
Fasten off.
Sleeve
With RS facing and larger hook, join yarn at center underarm stitch.
Round 1: Ch 1, sc 2 (2, 2, 2, 3) sts along underarm, 9 (11, 13, 13, 12) sts to saddle edge, 6 (8, 8, 10, 10) sts of saddle, 9 (11, 13, 13, 12) sts down to base of armhole, 2 (2, 2, 2, 3) sts along underarm, join with slip st to first sc, turn – 28 (34, 38, 40, 40) total sts.
Round 2: Ch 1, work even in sc, join with slip st to first sc, turn.
Rounds 3-5: Repeat round 2.
Size 4 ONLY
Rows 6-12: Repeat round 2.
Round 13 (Dec round): Ch 1, sc2tog, sc to last 2 sts, sc2tog – 26 sts.
Rounds 14-21: Repeat rounds 6-13 – 24 sts.
All Sizes
Rounds 6-10: Repeat round 2.
Round 11: Ch 1, sc2tog, sc to last 2 sts, sc2tog – 22 (32, 36, 38, 38) sts.
Repeat rounds 6-11 2 (4, 5, 6, 5) times -18 (24, 26, 26, 28) sts.
Sizes – (6, 8, 10, 12) ONLY
Rounds 1-3: Repeat round 2.
Round 4: Ch 1, sc2tog, sc to last 2 sts, sc2tog – – (22, 24, 24, 26) sts.
All Sizes
Work even if needed until sleeve measures 9 ½ (10 ¼, 11 ½, 12 ½, 13)” from first round of sleeve. Change to smaller hook.
Sleeve Ribbing:
Work same as body ribbing.
Fasten off.
Collar
With RS facing and larger hook, join yarn with sl st at right back, directly behind saddle.
Round 1: Ch 1, sc evenly around neck edge.
Work even in sc for 9 more rows. Work in continuous rounds, do not join with slip st.
Fasten off.
Finishing
Sew ribbing seams at sleeves, collar and hem.
Weave in ends.
Final Thoughts on the Kid’s Ribbed Shoulder Sweater
I hope you’ve enjoyed this free pattern as much as I enjoyed designing it! Remember to check out the video for the Varsity Sweater if you need help!
Happy Crocheting!
Amanda
KID’S RIBBED SHOULDER SWEATER – FREE CROCHET PATTERN
I really want to try this pattern. I think my tall skinny grandson would look good in it. I was reading size 8mm hook? does that make it have more drape? is that why a big hook?
Hi! Yes, the larger hook gives it a much better drape. I tried designing it at first with a smaller hook and did not like how tight it was so I went up a couple of sizes and I love the way it turned out. I made a version of this for all of my sons this past winter and they all love them. 🙂
I will give it a go!! thankyou
I’m confused, on Row 2 for the back it says to work even in sc, what exactly does this mean?
Hi Lindsey! When a pattern says to work even in a certain stitch, that just means you work the same number of stitches. So, in this case, you will just ch 1 and sc across the same number of sts as the last row. 🙂
The beginning says use a smaller hook. When do you transition and how much smaller?
Hi! Use the smaller hook from the materials list. You will use that until you come to the “change to larger hook” instructions – then just switch to the larger hook in the materials list. 🙂
Help I’m at the left front and confused. On row 1 please explain what you mean to work the left saddle edge opposite back. And when I get to the neck edge am I supposed to turn the work? Thanks for your help.
By opposite back, I mean the saddle edge directly across from the back. I made a kid’s version very similar to this and it has a video – you can view that here and maybe it will help.
Yes, you will turn the work once you work across the saddle. You will work the left and right fronts separately at first to shape the neckline, then you will join them and work in the round, turning after each row to keep the stitches consistent.
Could you make a tutorial on this sweater?
Thank you
Hi Melanie,
Except for the collar this sweater is constructed the same as the Varsity Sweater. That one has a full video tutorial. 🙂
This looks like a great pattern but I need to print it off and I don’t see a way to do that. Is there a way that I am not seeing?
Hi Nancy, all the patterns here are free to view on the blog. I sell inexpensive ad-free pdf’s as a service to my readers who want to print without ads. You can find this pattern on Ravelry if you would like to print it.
I’m excited to crochet this for my 2 boys. I’m confused when starting the back from row 5. If I’ve decreased from 31 (size 8) to 26 how do I think increase to 29? Do I pick up the stitches in the previous row?
Thanks 🙂
Hi Belinda! Yes, you will work across stitches that were unworked on another row. I made a similar sweater for one of my other sons that only differs in the neckline and I made a video for it. You can check it out here – it should help! 🙂 The video is in the post. Working across this way gives the shoulders just a bit more room. It’s regularly done in knitting, but not much in crochet.
I’m at the part to shape the armhole. Row 2 doesn’t give me the correct stitch count. After row 1 I have my 38 stitches. Row 2 as written only gives a 2 stitch increase (40 stitches )not 4 which is needed to get to 42 stitches. Please advise if there is a corrected pattern or how to correct to move forward.
Hi! Which size are you making? I see that I left out a size on row 2 which should be another 40 sts before the 42. Somehow that is a typing error.
How do l obtain a pdf of this pattern .l don’t mind paying for it
Hi! This pattern is available on Ravelry if you’d like. You can find it here. Thanks!
Hello! Im trying to make the smallest size and it says the saddle should be 2.5 inches long ending on WS. Will it be a problem if it’s too bigger than that? (2.75 inches).
This will make the shoulder area wider and could affect the finished size of the sweater depending upon your gauge for the rest of the stitches.