Who doesn’t love a baby in a handmade costume?? I designed this Baby Butterfly Costume for The Hook Nook Life blog, and now I’m so excited to be able to share it here with you!
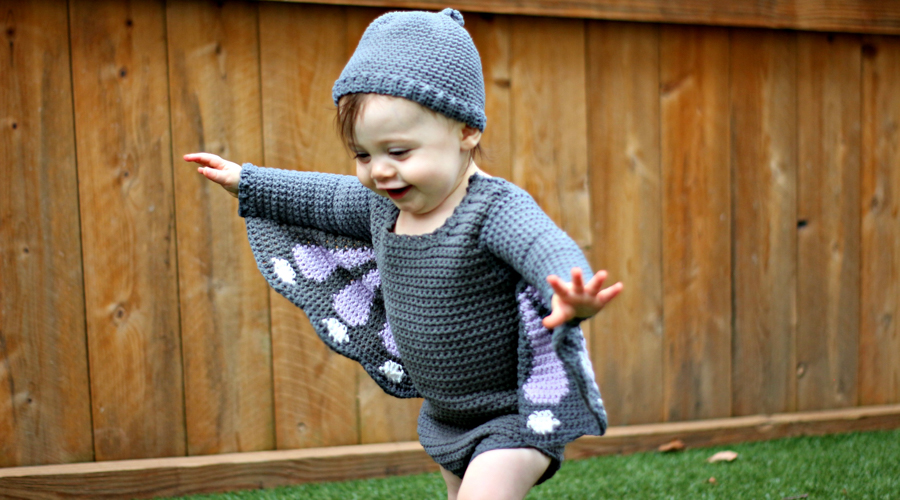
This outfit shares the same onesie and hat base as the Baby Bat Costume that I released last year, and now I’m really wanting to create more baby costumes. If you’re a knitter as well, you might be interested in the Baby Kitty Costume. Babies are just SO cute in these!
This little model is my youngest son’s best friend (if you are new here – hi! – I have four little boys under age 10 so no girls to model for me!). She and my guy love hanging out and we had a blast getting these pictures. He is off running around in the background and I was trying to get shots without him in them!
You will need to do some seaming for this costume, as well as sew in some snap tape (you can get it at any local craft store, usually near the elastic and they sell it by the yard). It’s not hard, though!
The front and back are crocheted flat, then seamed at the sides and the snap tape goes in the crotch and shoulders. You could also do buttons if you don’t want to do snap tape.
Want more help constructing this onesie? You can purchase an ad-free pdf of this pattern with more pictures on Ravelry here!
What You’ll Need
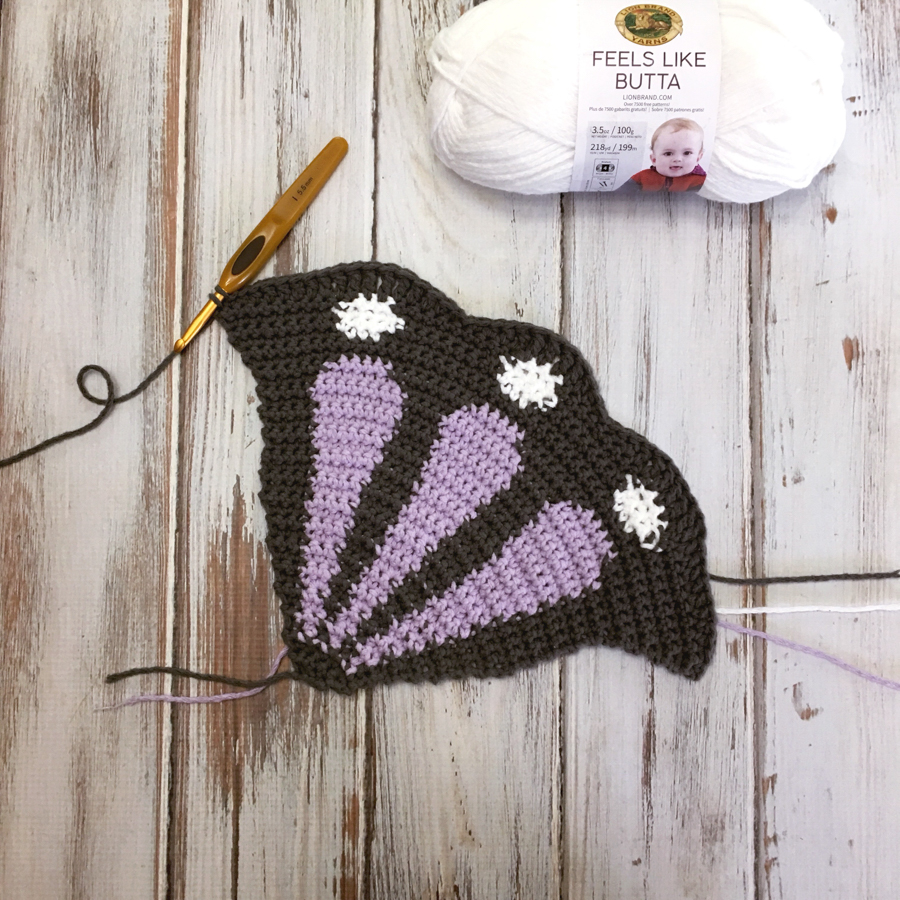
Yarn: Lion Brand Feels Like Butta (100% polyester, 3.5oz/100g, 218 yd/199m): Charcoal (MC) 2 (3) skeins, 1 skein each Lilac (CC1), White (CC2)
Hook: US size H/8 (5.0 mm); US size I/9 (5.5 mm)
Notions: Yarn needle; stitch markers; ¼ yard of black snap tape
Skill Level
Intermediate
Sizes
Onesie: 6 (12) months, 17 (18)” chest; Hat: Baby (Toddler), 14 (16)” head circumference
Shown in size 12 months
Gauge
16 sts and 20 rows = 4” [10 cm] in sc with larger hook
Notes
Rounds are not joined unless noted. Place stitch marker in first st of each round to keep track. If only one number is given that number applies to both sizes.
Ch 3 at beginning of a row does not count as a dc.
Onesie
Back
With larger hook, ch 13 (17).
Row 1: Sc in 2nd ch and each ch across, turn – 12 (16) sts.
Row 2: Ch 1, sc in each st across, turn.
Row 3 (Inc Row): Ch 1, 2 sc in first sc, sc to last st, 2 sc in last st, turn – 14 (18) sts.
Row 4: Ch 1, sc in each st across, turn.
Rows 5-6: Rep Rows 3-4 – 16 (20) sts.
Rows 7-8: Rep Rows 3-4 – 18 (22) sts.
Rows 9-10: Rep Rows 3-4 – 20 (24) sts.
Rows 11-12: Rep Rows 3-4 – 22 (26) sts.
Rows 13-14: Rep Rows 3-4 – 24 (28) sts.
Rows 15-16: Rep Rows 3-4 – 26 (30) sts.
Rows 17-18: Rep Rows 3-4 – 28 (32) sts.
Rows 19-20: Rep Rows 3-4 – 30 (34) sts.
Row 21: Rep Row 3 – 32 (36) sts.
Work even in sc for 40 (45) rows.
Armhole Shaping
Row 1: Sl st in first 2 sts, ch 1, sc in each st to last 2 sts, leave rem sts unworked, turn – 28 (32) sts.
Rows 2-11: Ch 1, sc in each st across, turn.
Row 12: Ch 1, sc in first 7 (9) sts, leave rem sts unworked, turn – 7 (9) sts.
Row 13: Ch 1, sc2tog, sc in each st to end, turn – 6 (8) sts.
Row 14: Ch 1, sc in each st across, turn.
Row 15: Rep Row 13 – 5 (7) sts.
Work even in sc for 3 (5) rows.
Want more help constructing this onesie? You can purchase an ad-free pdf of this pattern with more pictures for just $2.99 on Etsy here!
Ribbing
Change to smaller hook, ch 4.
Row 1: Sc in 2nd ch from hook and next ch, sc2tog last ch and first st of last row, turn – 3 sts.
Row 2: Ch 1, sc blo in each st across, turn.
Row 3: Ch 1, sc blo in first 2 sts, sc2tog blo last st and 2nd st of last row, turn.
Rep Rows 2-3 across 5 (7) sts of Shoulder.
Fasten off.
Join yarn at opposite side and repeat from Armhole Row 12.
Front
With larger hook, ch 11 (15).
Row 1: Sc in 2nd ch from hook and each ch across, turn – 10 (14) sts.
Row 2: Work 2 sc in first st, sc in each st to last st, 2 sc in last st, turn – 12 (16) sts.
Row 3: Ch 1, sc in each st across, turn.
Rows 4-5: Rep Rows 2-3 – 14 (18) sts.
Rows 6-7: Rep Rows 2-3 – 16 (20) sts.
Rows 8-9: Rep Rows 2-3 – 18 (22) sts.
Rows 10-11: Rep Rows 2-3 – 20 (24) sts.
Rows 12-13: Rep Rows 2-3 – 22 (26) sts.
Row 14: Ch 6, sc in 2nd ch from hook and in each st across – 27 (31) sts.
Row 15: Rep Row 14 – 32 (36) sts.
Work even in sc for 40 (45) rows.
Armhole Shaping
Work same as Back to Ribbing. Fasten off.
Neckline
With smaller hook, join yarn at neck edge, ch 3.
Row 1: Sc in 2nd ch from hook, sc2tog last ch and first st of last row – 2 sts.
Row 2: Ch 1, sc blo in each st across, turn.
Row 3: Ch 1, sc blo in first st, sc2tog blo last st and 2nd st of last row, turn.
Rep Rows 2-3 around neck edge, working from one shoulder to another.
Fasten off.
Sew side seams.
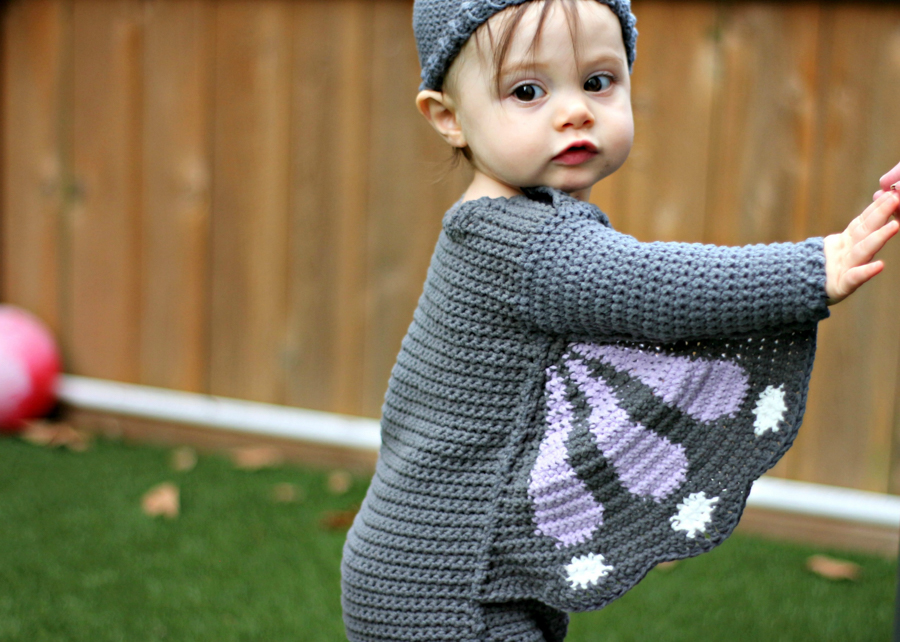
Sew snap tape to Shoulder seams, overlapping ribbing. Tack Armhole edges. Sew snap tape to bottom of Front and Back, using photos as a guide. Snap tape should be on the RS of front and WS of back.
Sleeves
With larger hook, join yarn at underarm seam.
Rnd 1: Ch 1, sc 32 (34) sts evenly around, turn – 32 (34) sts.
Rnds 2-3: Ch 1, sc in each st around, turn.
Rnd 4: Ch 1, sc2tog, sc in each st to last 2 sts, sc2tog – 30 (32) sts.
Rnds 5-6: Ch 1, sc in each st around, turn.
Rnds 7-9: Rep Rnds 4-6 – 28 (30) sts.
Rnds 10-12: Rep Rnds 4-6 – 26 (28) sts.
Rnds 13-15: Rep Rnds 4-6 – 24 (26) sts.
Rnds 16-18: Rep Rnds 4-6 – 22 (24) sts.
Rnds 19-20: Ch 1, sc in each st around, turn.
Rnd 21: Rep Rnd 4 – 20 (22) sts.
Work even in sc for 14 (18) rnds, turning at each end.
Ribbing
Change to smaller hook, ch 3.
Row 1: Sc in 2nd ch from hook, sc2tog last ch and first st of last rnd – 2 sts.
Row 2: Ch 1, sc blo in each st across, turn.
Row 3: Ch 1, sc blo in first st, sc2tog blo last st and 2nd st of last rnd, turn.
Rep Rows 2-3 around Sleeve edge.
Fasten off.
Wing (Make 2)
With larger hook and MC, ch 4.
Row 1: Sc in 2nd ch from hook and each ch across; turn – 3 sts.
Row 2: Ch 1, 2 sc in first st, sc, 2 sc in last st; turn – 5 sts.
Row 3: Ch 1, 2 sc in first st, sc 3, 2 sc in last st; turn – 7 sts.
Row 4: Ch 1, sc MC in first st, (sc CC, sc MC) three times; turn.
Row 5: Ch 1, sc MC, (2 CC1 sc in next st, sc MC) three times; turn – 10 sts.
Row 6: Ch 1, work even in colors as established; turn.
Row 7: Ch 1, 2 sc MC in first st, sc 2 CC1, (sc MC, sc 2 CC1) twice, 2 MC sc in last st; turn – 12 sts.
Row 8: Ch 1, sc 2 MC, (sc 2 CC1, sc 2 MC in next st) twice, sc 2 CC1, sc 2 MC; turn – 14 sts.
Row 9: Ch 1, sc 2 MC (sc 2 CC1 in next st, sc CC1, sc 2 MC) three times; turn – 17 sts.
Row 10: Ch 1, work even in colors as established; turn.
Row 11: Ch 1, sc 2 MC in first st, work in colors as established to last st, sc 2 MC in last st; turn – 19 sts.
Row 12: Ch 1, sc 3 MC, (sc 3 CC1, sc 2 MC in next st, sc MC) twice, sc 3 CC1, sc 3 MC; turn – 21 sts.
Row 13: Ch 1, sc 3 MC, (sc 2 CC1 in next st, sc 2 CC1, sc 3 MC) three times; turn – 24 sts.
Row 14: Ch 1, work even in colors as established; turn.
Row 15: Repeat row 11 – 26 sts.
Row 16: Ch 1, sc 4 MC, (sc 4 CC1, sc 2 MC in next st, sc 2 MC) twice, sc 4 CC1, sc 4 MC; turn – 28 sts.
Row 17: Ch 1, sc 4 MC, (sc 2 CC1 in next st, sc 3 CC1, sc 4 MC) three times; turn – 31 sts.
Row 18: Ch 1, work even in colors as established; turn.
Row 19: Ch 1, sc 4 MC, (sc 2 CC1 in next st, sc 4 CC1, sc 4 MC) three times; turn – 34 sts.
Row 20: Ch 1, work even in colors as established; turn.
Row 21: Ch 1, sc 4 MC, (sc 5 CC1, sc 2 CC1 in next st, sc 4 MC) three times; turn – 37 sts.
Row 22: Ch 1, work even in colors as established; turn.
Row 23: Ch 1, sc 4 MC, (sc 2 CC1 in next st, sc 6 CC1, sc 4 MC) three times; turn – 40 sts.
Row 24: Ch 1, work even in colors as established; turn.
Row 25: Ch 1, sc 4 MC, (sc 7 CC1, sc 2 CC1 in next st, sc 4 MC) three times; turn – 43 sts.
Row 26: Ch 1, work even in colors as established; turn.
Row 27: Ch 1, sc 2 MC in first st, sc 4 MC, (sc 7 CC1, 6 MC) twice, 7 CC1, 4 MC, sc 2 MC in last st – 45 sts.
Row 28: Ch 1, sc 7 MC, (sc 5 CC1, sc 8 MC) twice, sc 5 CC1, sc 7 MC; turn. Cut CC1.
Row 29: Ch 1, 2 sc MC in first st, sc MC to last st, 2 sc MC in last st – 47 sts.
Row 30: Ch 1, sc even in MC; turn.
Row 31: Ch 1, sc 2 MC in first st, sc 8 MC, (sc 3 CC2, sc 10 MC) twice, sc 3 CC2, sc 8 MC, sc 2 MC in last st; turn – 49 sts.
Row 32: Ch 1, sc 9 MC, (sc 5 CC2, sc 8 MC) twice, sc 5 CC2, sc 9 MC; turn.
Row 33: Ch 1, sc 2 MC in first st, sc 8 MC, (sc 5 CC2, sc 8 MC) twice, sc 5 CC2, sc 8 MC, sc 2 MC in last st; turn – 51 sts.
Row 34: Ch 1, sc 11 MC, (sc 3 CC2, sc 10 MC) twice, sc 3 CC2, sc 11 MC; turn.
Row 35: With MC, ch 1, sc 2, hdc 2, dc 6, tr 5, dc 2, hdc, sc, sl st in next st, sc, hdc, dc, tr 5, dc, hdc, sc, sl st in next st, sc, hdc, dc 2, tr 5, dc 6, hdc 2, sc 2.
Fasten off.
Sew wings to underarms and side of body as shown.
Leg Edging
Join yarn at left side seam of Leg opening.
Sc evenly around, working 3 sc in corners. Fasten off.
Weave in ends.
Hat
With larger hook, make a magic ring.
Rnd 1: Work 6 sc in magic ring, pull tight to close, join with sl st to first sc – 6 sts.
Rnd 2: Work 2 sc in each st around – 12 sts.
Rnd 3: *Sc in next st, 2 sc in next st; rep from * around – 18 sts.
Rnd 4: *Sc in next 2 sts, 2 sc in next st; rep from * around – 24 sts.
Rnd 5: *Sc in next 3 sts, 2 sc in next st; rep from * around – 30 sts.
Rnd 6: *Sc in next 4 sts, 2 sc in next st; rep from * around – 36 sts.
Rnd 7: *Sc in next 5 sts, 2 sc in next st; rep from * around – 42 sts.
Rnd 8: *Sc in next 6 sts, 2 sc in next st; rep from * around – 48 sts.
Rnd 9: *Sc in next 7 sts, 2 sc in next st; rep from * around – 54 sts.
Rnd 10: *Sc in next 8 sts, 2 sc in next st; rep from * around – 60 sts.
Size Toddler Only
Rnd 11: *Sc in next 9 sts, 2 sc in next st; rep from * around – 66 sts.
All Sizes
Work 15 (18) rnds even – 60 (66) sts.
Ribbing
Change to smaller hook, ch 5.
Row 1: Sc in 2nd ch from hook and in next 2 ch, sc2tog last ch and first st of last rnd, turn – 4 sts.
Row 2: Ch 1, sc blo in each st across, turn.
Row 3: Ch 1, sc blo in first 3 sts, sc2tog blo last st and 2nd st of last rnd, turn.
Rep Rows 2-3 around.
Fasten off.
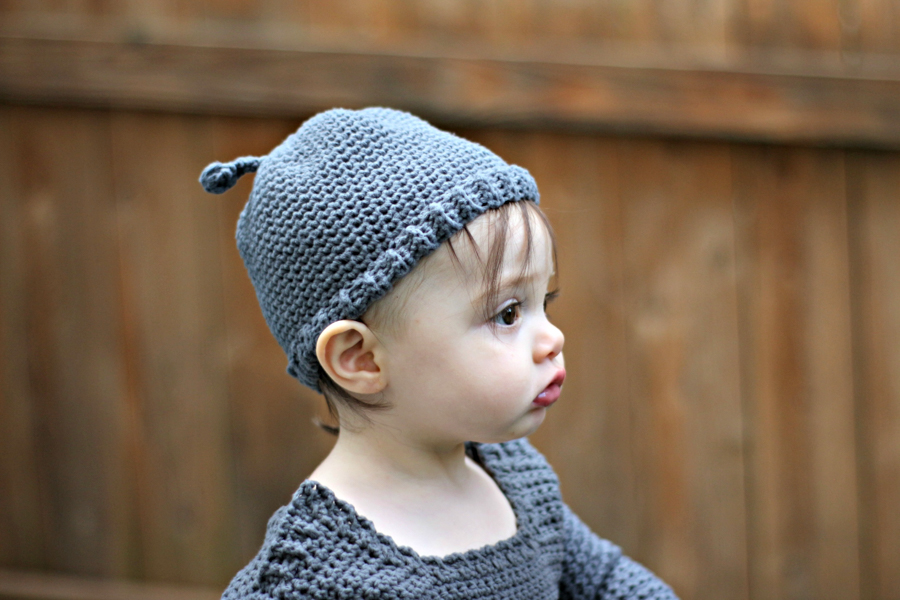
Antennae
With RS facing and MC, join yarn to hat where you want the antennae.
Ch 5. Sc in 2nd ch from hook and next 2 ch, sc2tog last ch and same st as join. (4 sts)
Fasten off.
Antennae Top
Ch 4.
Rnd 1: 9 dc in 4th ch from hook, join with sl st in t-ch. Fasten off, leaving a long tail for sewing.
Weave the tail through the tops of the 9 dc and top of t-ch. Pull tight to form a ball.
To make top of antennae, sew gathered spot to top of stem.
Repeat on opposite side for second antennae.
Weave in ends.

Need more help constructing this onesie? Be sure to visit the links above to snag the ad-free pdf of this pattern with more photos on either Etsy or Ravelry.
I hope you have enjoyed this free crochet pattern! I can’t wait to see little baby butterflies very soon. 🙂
Happy Crocheting!
Amanda


Just so adorable!!! Thank you for the pattern!
You are so welcome!
Amanda im having trouble understanding how you did the sleves you talk about crocheting around and turning but the only way i can crochet around is by connecting the shoulders do you happen to have a video to show me what your doing. I bought the pattern and love it other wise. My email is. [email protected] thank you. Dorothy
Hi Dorothy! You have to connect the shoulders just at the edge where the sleeves go. Then you can crochet in the round around this. I also sent you an email 🙂
Your website and photos are beautiful and this free pattern is so clever! Thanks for sharing!,
Thank you so much! 🙂