
Everything you need to know to about the crochet magic ring, also called the crochet magic circle, magic loop or adjustable loop!

When working in the round on a project such as amigurumi or certain granny squares, you may have come across this term. Instructions may say “work 6 sc in magic ring” – but how do you do that??
I know when I first started out crocheting it took me forever to get the hang of this technique! Every time I needed to use it I found myself having to look up another tutorial.
Finally I found a way to make the crochet magic ring easy and I’m going to share that with you today!
Okay, so those are the most common questions I’ve seen for the crochet magic circle technique. Let’s dive into the instructions!
Crochet Magic Ring Tutorial

Step One: Wrap the yarn around your finger
Wrap the yarn around your index finger like you are making an “X”, holding the working yarn in the back.

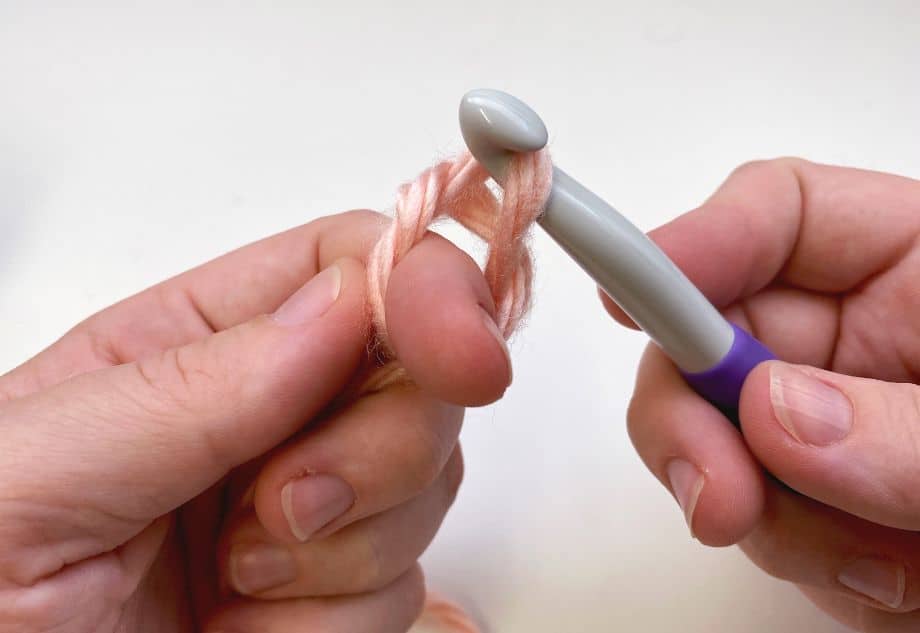
Step Two: Insert hook under first loop
Slip your hook between the first loop and your finger and get ready to pull the second loop through.
Step Three: Pull up second loop
Pull up the second loop on your finger, which is the working yarn. Be sure you don’t pull up the tail end!

Step Four: Chain required number of stitches
Most of the time when you use a magic ring, you will use single crochet, so for this example I have chained one. Hdc chain 2, dc chain 3, etc, just like a turning chain. This brings the yarn up to the height of the stitch. See below for more information about working a magic loop with double crochet.

Step Five: Work first round of stitches into ring
Work the number of stitches called for in your pattern, usually 6 or 8, but it can be as few as 3 and more than 12! The great thing about the ring being adjustable is you can work any number of stitches into it. Be sure you are working over the yarn tail or it won’t close!

Step Six: Pull tail tightly to close
Grab the yarn tail and pull down. You will need to hold your stitches still to get the ring to close. I often will pull mine tight again after another round or two just to make sure it’s closed tightly.
Video Tutorial
Buy the ad-free PDF here!
Magic Ring Left Handed Tutorial
If you hover the mouse above any of the images in the tutorials on this page, you will see them in the left handed view!
How to Double Crochet in a Magic Circle
Step One: Wrap the yarn around your finger
Wrap the yarn around your index finger like you are making an “X”, holding the working yarn in the back, just like instructions above.
Step Two: Insert hook under first loop
Slip your hook between the first loop and your finger and get ready to pull the second loop through.
Step Three: Pull up a loop
Pull up the second loop on your finger, which is the working yarn. Be sure you don’t pull up the tail end!

Step Four: Chain three
Chaining three will get you to the height of a double crochet stitch.

Step Five: Work required number of double crochet stitches into ring
Follow the pattern to work as many dc as necessary in the ring, making sure to work over the tail end.

Step Six: Pull tightly on yarn tail to close
Grasp the yarn tail and gently but firmly close the circle. Hold your dc stitches in place while doing this. I often will pull mine tight again after the next round or two.

Step Seven: Join with slip stitch
Join to your turning chain with a slip stitch at the top of the chain 3 we began the round with. You can’t work in a continuous spiral with dc the way you can with sc, so each round will most likely end with a slip st join.
Answers to common magic circle problems
- Why is my magic ring too tight?
If you are using thicker yarn, you may find that the circle created by your index finger isn’t large enough. If this is the case, try wrapping the yarn around two or three fingers to give it a larger circle. Pull the yarn through the same way as if you used just your index finger. - My magic ring doesn’t close when I pull the tail.
This is often due to not working over the yarn tail when working your stitches. Make sure that each stitch works over two strands of yarn. The video tutorial shows this is more detail if you need help. - Why do I keep pulling up the tail end of the yarn?
It’s important when you wrap your yarn around your finger that you make the “X” shape and that the working yarn ends up in the back, otherwise you are picking up the wrong part of the yarn.
You might like these projects that use the crochet magic ring


Thank you
I found these instructions and pictures very helpful, this is a problem I have had repeatedly. Thank you!
So glad I could help! I had the hardest time with this myself and once I got it I wanted to share the way that helped me. 🙂
Youe instructions are great, I just wish I could make a copy for furture reference,
I am far to stupid to figure this out. I tried, but forget it. I am not smart enough
Appreciate the directions and video for the sc. The details about the end of the row and setting up for the next row and how to keep the edges straight are very good.
But I need that level of detail and pictures for doing a spiral past the first 6 sc’s in the starting ring. And then how to keep the spiral going while not getting into trouble with 1 too many or too few stitches in the round as it grows from 6 to 12 to 18 to 24, etc.
Help!
Thank you for making the Magic Ring so easy to learn! I’ve struggled with this technique, coming across several different ways to accomplish the same thing. I was always frustrated because of having to start over and over before I got it right. I know that sounds a little crazy to those who make rings every day, but I personally am happy to find a can-do system for this starting point of many patterns. Way to go, Amanda! Smart lady. ☺️
Yay!! I’m so glad you found this helpful. I had SO much trouble learning the magic ring myself – I always wondered why it seemed so easy to most everyone and one day it “clicked” for me this way and this is how I teach it. 😀