
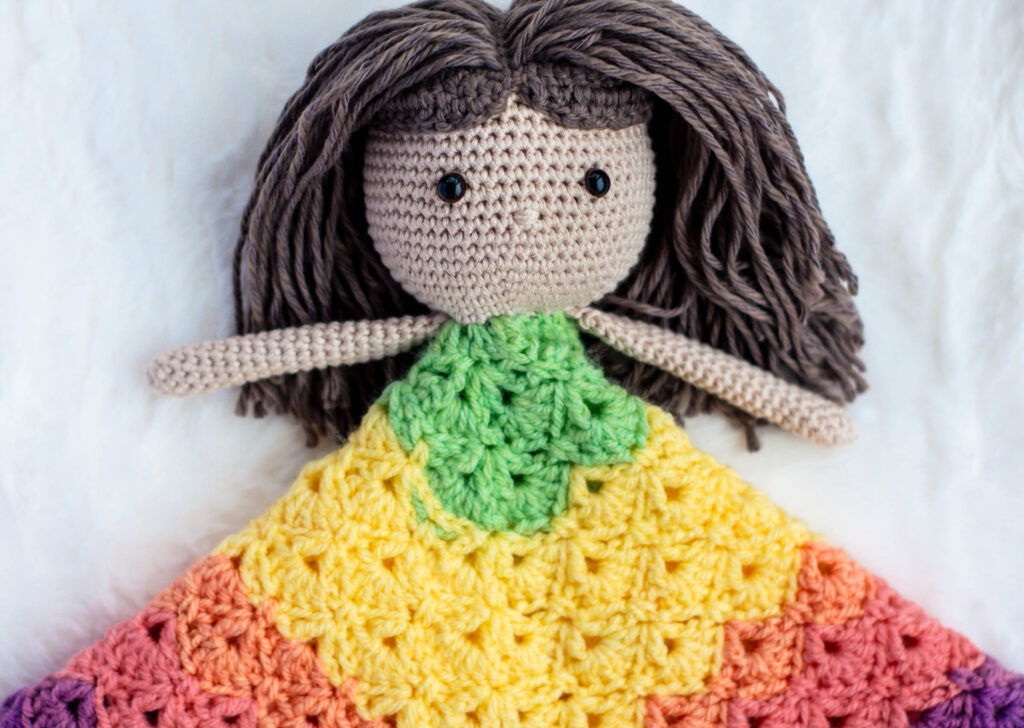
Crochet an adorable doll lovey with this free crochet lovey pattern. Based off the free popular doll pattern, Morgan!

Design Story and Inspiration for this Free Crochet Pattern
After publishing a wonderful collection of crochet lovey patterns on the blog, I realized that a baby lovey was something I had never designed. I’ve thought for a long time about turning my popular free pattern for Morgan into a lovey, but finally decided to sit down and actually make one!
I started with the blanket pattern (which I am planning on turning into a crochet baby blanket pattern very soon!) and created the same doll head and arms as Morgan. I love the way she turned out and I hope you do, too!
Lovey blankets make wonderful baby shower gifts and they are easy to create. Please note that you should embroider eyes on a lovey if you are using it for a baby. The lovey shown uses safety eyes, but these are not appropriate for children under 3 so please embroider some soft, safe eyes for a little one.
Yarn Options for This Doll Lovey Baby Blanket Pattern
This cute lovey was made with yarns from Lion Brand Yarn in DK and worsted weights, but the orignal Morgan pattern has been created in lots of different weight yarns, so the choice is really up to you!
If you want your lovey to turn out the same size as mine, use DK yarn for the body and blanket and a worsted weight yarn for the hair. I used Lion Brand Coboo for the body, Mandala for the blanket (love the bright colors in this skein!), and Comfy Cotton Blend for the hair. You can use any yarn that gets gauge.
This is a great project for scrap yarn as you don’t need much of any color, and the blanket also looks great with simple yarn color swaps every round or every other round, so use up those scraps!
Pattern Details for This Cuddly Crochet Lovey
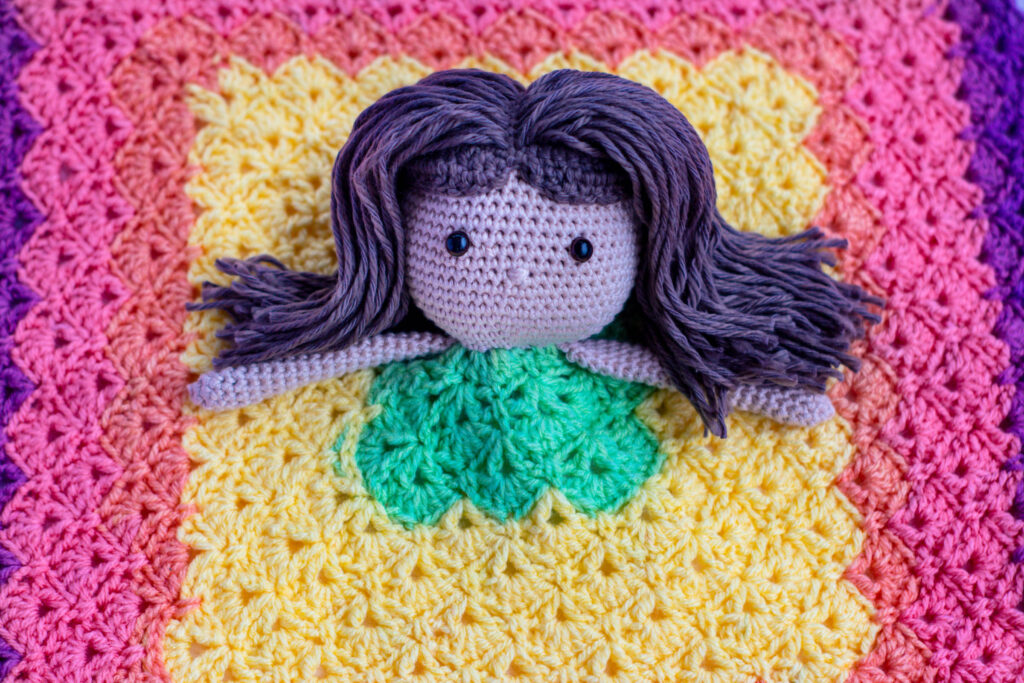
This square blanket pattern is worked from the center out, beginning with the magic ring. It uses basic crochet stitches to create a wonderfully textured blanket that little hands will enjoy cuddling.
Next, you create the doll head and arms and stitch them to the center of the small security blanket. Finally, you make a wig cap and pull strands of yarn through the cap to create the hair, use fabric glue to secure those strands and stitch to the head. This makes for firmly attached hair.
If you’ve been looking for a crochet doll lovey patttern, this is the perfect lovey for you! Includes easy to follow video tutorials for the different steps (a video for the first 5 rounds of the blanket, the doll and arms from the Morgan doll pattern, and the wig cap.)

Crochet Doll Lovey
WHAT YOU’LL NEED
Yarn: 1 skein Lion Brand Mandala in Nifflers (DK for blanket), 1 skein Lion Brand Coboo in beige (DK for doll), worsted weight yarn in hair color (this is Comfy Cotton Blend)
Crochet Hook: US Size I (5.50mm) for blanket and size D (3.00mm) for doll head, arms and wig cap
Notions: Yarn needle/tapestry needle, scissors, safety eyes, small amount of fiberfill, stitch marker
Finished Size: Blanket is 15” square
Gauge: 5 rounds = 4″ square
Stitch Abbreviations
Chain Stitch (ch)
Slip Stitch (sl st)
Single Crochet (sc)
Double Crochet (dc)
Increase (Inc): 2 sc in next st
Invisible Decrease (Dec): insert hook in front loop only of next 2 sts, yarn over, draw up a loop, yarn over, draw through two loops
Notes
Ch 4 at beginning of round counts as dc, ch 1.
Ch 3 at beginning of round counts as dc.
Use stitch marker in first stitch of rounds on head and body to keep track of rounds.

Free Crochet Lovey Pattern
Blanket
With larger hook, make magic ring
Round 1: Ch 4, (dc, ch 1) seven times in ring, join to 3rd ch of starting ch with sl st, pull tightly to close.
Round 2: Ch 1, sc in first ch-1 sp, 5 dc in next ch-1 sp, (sc in next ch-1 sp, 5 dc in next ch-1 sp) 3 times. Join with sl st to first sc.
Round 3: Ch 4, (dc, ch 3, dc, ch 1, dc) all in same sc as sl st. *Ch 3. Skip next 5-dc, (dc, ch 1, dc, ch 3, dc, ch 1, dc) all in next sc. Rep from * twice more. Ch 3. Skip next 5-dc. Join with sl st to 3rd ch of beg ch.
Round 4: Sl st in next ch-1 sp, ch 3, 4 dc in same ch-1 sp as sl st, sc in next ch-3 sp, 5 dc in next ch-1 sp, *sc in 3rd dc of 5-dc in 2nd rnd while working sc over ch-3 of previous rnd, 5 dc in next ch-1 sp, sc in next ch-3 sp, 5-dc in next ch-1 sp; Rep from * twice more. Sc in 3rd dc of 5-dc in 2nd rnd while working sc over ch-3 of previous rnd. Join with sl st to top of beg ch-3.
Round 5: Sl st to next sc, ch 4, (dc, ch 3, dc, ch 1, dc) all in same sc as sl st. *Ch 3, skip next 5-dc, (dc, ch 1, dc) in next sc, ch 3, skip next 5-dc, (dc, ch 1, dc, ch 3, dc, ch 1, dc) all in next sc (corner made). Rep from * twice more. Ch 3, skip next 5-dc, (dc, ch 1, dc) in next sc, ch 3, skip next 5-dc. Join with sl st to 3rd ch of beg ch-4.
The blanket is the same pattern as this square, just don’t change colors if you are using Mandala yarn (but feel free to change colors like this if you like!):
Round 6: Sl st in next ch-1 sp, ch 3, 4 dc in same ch-1 sp as sl st, sc in next ch-3 sp, 5 dc in next ch-1 sp, [*sc in 3rd dc of 5-dc 2 rows below, 5 dc in ch-1 sp; rep to last ch-3 sp before corner, sc in 3rd dc of 5-dc 2 rows below, 5 dc in next ch-1 sp, sc in ch-3 sp, 5 dc in ch-1 sp] 3 times, *sc in 3rd dc of 5-dc 2 rows below, 5 dc in ch-1 sp; rep to last ch-3, sc in 3rd ch of 5-dc 2 rows below. Join with sl st to top of beg ch-3.
Round 7: Sl st to next sc, ch 4, (dc, ch 3, dc, ch 1, dc) all in same sc as sl st. [*Ch 3, skip next 5-dc, (dc, ch 1, dc) in next sc; rep to last 5-dc, ch 3, skip next 5-dc, (dc, ch 1, dc, ch 3, dc, ch 1, dc) all in next sc] 3 times, *ch 3, skip next 5-dc, (dc, ch 1, dc) in next sc; rep to last 5-dc, ch 3, skip 5-dc. Join with sl st to 3rd ch of beg ch-4.
Rounds 8-23: Repeat rounds 6-7.
Round 24: Repeat round 6.
Fasten off.
DOLL HEAD
With smaller hook and yarn for doll body, make magic ring.
Round 1: 6 sc in magic ring. Pull ring tightly to close.
Round 2: 2 sc in each st (12 sts).
Round 3: (Sc, inc) 6 times (18 sts).
Round 4: (Sc 2, inc) 6 times (24 sts).
Round 5: (Sc 3, inc) 6 times (30 sts).
Round 6: (Sc 4, inc) 6 times (36 sts).
Round 7: (Sc 5, inc) 6 times (42 sts).
Round 8: (Sc 6, inc) 6 times (48 sts).
Round 9: (Sc 7, inc) 6 times (54 sts).
Rounds 10-21: Work even in sc.
Place safety eyes between rows 15-16, 9 sts apart.
Embroider nose 2 rows lower with MC as shown in photos.
Round 22: (Sc 7, dec) 6 times (48 sts).
Round 23: (Sc 6, dec) 6 times (42 sts).
Round 24: (Sc 5, dec) 6 times (36 sts).
Round 25: (Sc 4, dec) 6 times (30 sts).
Stuff head firmly.
Round 26: (Sc 3, dec) 6 times (24 sts).
Round 27: (Sc 2, dec) 6 times (18 sts).
Round 28: (Sc, dec) 6 times (12 sts).
Round 29: (Dec) 6 times (6 sts).
Cut yarn, leaving a long tail. Finish stuffing head.
Weave yarn tail through remaining 6 sts and pull tightly to close.
See video tutorial for head here, but start with magic ring and stitch counts from this pattern. The first few rounds are different due to not having a body.
WIG CAP
With smaller hook and yarn used for hair, work same as head to round 8.
Round 9: Sl st in first st, sc, hdc, dc to last 3 sts, hdc, sc, sl st.
Fasten off.
Cut strands of yarn for hair twice as long as desired hair length.
Using hook, pull yarn strands through wig cap where both ends of the strand hang out to form hair.
Use fabric glue inside wig cap to secure hair in place.
Stitch onto head with sl sts at center front.
DOLL ARMS
With smaller hook and yarn for doll body, make magic ring.
Round 1: 4 sc in magic ring (4 sts). Pull ring tightly to close.
Round 2: 2 sc in each st (8 sts).
Rounds 3-25: Work even in sc.
Fold in half and work 4 sc across flattening upper arm and closing tube.
Do NOT stuff arms.
See video tutorial above for help with arms (skip past the part for the head) if you need help.
Finishing
Place arms to the side of head and stitch head and arms to center of blanket, placing arms at the bottom of the head.
Embroider eyebrows, mouth and eyelashes if desired.
Weave in all ends.
Final Thoughts on Our Free Crochet Lovey Pattern
This pattern would be so much fun to create in a nursery color scheme to match the decor! It’s a perfect baby shower gift idea (with embroidered eyes, of course!) and would be wonderful for a new baby. You could crochet it in gender-neutral colors and change the hair if you aren’t sure of the gender of the baby (we have a friend who is waiting to be surprised!).
This cute pattern is great for baby girls and they love to play with the long hair, especially babies that are older and can hold and love on a plush toy. I hope you enjoy this pattern as much as I’ve enjoyed designing it!
Happy Crocheting!
Amanda