
Create your own adorable Hank with this free crochet boy doll pattern. Uses basic single crochet and is a free downloadable pdf pattern! Scroll to the bottom of the post for the download, always free on the blog in honor of Hank.

I have to admit, I’ve been having a blast designing crochet dolls. First it was my girl dolls Morgan (she really started it all), then Maddie and now my first little cute crochet boy doll, Hank!
Design Story and Inspiration for Hank
I’ve been thinking about creating this little guy for a long time. Last year at this time I read the story of Ashton Zager’s little boy Hank. He passed away in a tragic accident and the story touched my heart so much.
She has been so open about what all she is going through and she shares it in wonderful words on her Instagram account. She has amazing strength and faith and I really wanted to do something to honor her little guy.
I created my first crochet doll pattern a few months ago and I thought it would be awesome to make a Hank doll. So I set to work.
Here are a few things that are special about this one:
1. I chose overalls for his outfit because Ashton has an amazingly adorable picture of her two sons together and Hank is wearing overalls looking up at his older brother in adoration.
2. His older brother talks about wanting to see “big Hank” so I decided I didn’t want to make him a baby, but a big boy.
3. I modeled the hair and eye color after Hank, but boy hair was a lot harder than I thought!! It is a bit fluffier than the real Hank’s, but I think it turned out cute.
If you want to read her story, you can start with this post.
If you make a Hank doll, it would be amazing if you could tag Ashton and me on Instagram! We would love to see your progress photos and finished dolls!
About the Yarn
I love using Lion Brand Yarns for dolls. I fell in love with the Coboo for the doll body and I’ve tried several yarns for different parts of the hair, clothes, etc. Cotton yarn would work amazingly for every part of this project as well.
Coboo is a DK yarn that is a cotton bamboo blend. Lots of people have made Morgan and used varying weights, colors, and fibers and they have all turned out great! We Crochet Brava Worsted is another popular choice.
If you substitute the yarn, just be sure to go down a hook size or two from the recommendation on the yarn label to get a sturdier fabric that doesn’t show the stuffing. Plus, this cute crochet doll pattern is a great way to use up stash yarn!
Check out all the colors of Coboo here!
Note that Coboo is a DK weight yarn (Category 3) and the Jeans yarn and Basic Stitch are both worsted weight yarn (category 4) but since they are both a lighter worsted weight they worked well for this pattern.

Pattern Details
Hank is made very similarly to Morgan, which has full video tutorials, so I did not create a tutorial just for his pattern. I’ve included the first video tutorial below.
It doesn’t take any special stitches to crochet this doll, just the single crochet stitch for the body of the doll with simple increasing (working 2 sc in the same stitch) and decreasing (working an invisible decrease using sc as described below. It has minimal sewing to attach the arms.
The legs of the overalls are crocheted into the body, and the front loops are left free when changing colors to the shirt portion. The shirt is crocheted into the body as well. Later, the overalls are worked into the front loops previously left open.
If you don’t want overalls and instead just want a shirt and pants, feel free to crochet in both loops where the overalls would be worked, or work the entire round in the back loop only, leaving the front loops as the top of the pants.
Hank’s hair is worked just as the other dolls I have made, but I did make it a lot shorter and split the strands of yarn into plies. I really like the look this gives as boy hair was a lot harder than I thought!
Free Amigurumi Doll Pattern for Hank
WHAT YOU’LL NEED
Yarn: Lion Brand Coboo or other similar tan or skin colour yarn, 1 skein for doll (MC)
Lion Brand Jeans, 1 skein Classic for pants (CC1)
Lion Brand Basic Stitch, 1 skein white for shirt (CC2)
Lion Brand Fisherman’s Wool, 1 skein Nature’s Brown for hair
Crochet Hook: US Size D (3.25mm)
Notions: Safety eyes (embroider eyes for a small child), small amount of polyester fiberfill, yarn needle, stitch marker, scissors
Finished Size: Approximately 13″ tall
Gauge: 24 sts and 24 rows = 4″ in sc
CROCHET PATTERN NOTES
This amigurumi project is worked in typical amigurumi style in continuous rounds without joining. Use a stitch marker to mark first st of each round.
Stuff legs, body and head as you go. I found that when I waited to stuff at the end of a section it was lumpy. About every inch or so I will stop to stuff.
Stitch Descriptions and Abbreviations:
Single Crochet (sc)
Double Crochet (dc)
Increase (Inc): 2 sc in next st
Invisible Decrease (Dec): insert hook in front loop only of next 2 sts, yarn over, draw up a loop, yarn over, draw through two loops
Amigurumi Boy Doll Pattern
Leg (Make 2)
With MC, make magic ring.
Round 1: 6 sc in magic ring (6 sts).
Round 2: 2 sc in each st (12 sts).
Rounds 3-6: Work even in sc.
Change to CC1 (blue yarn) for pants.
Rounds 7-30: Work even in sc.
Fasten off first leg. Do not fasten off second leg. Continue to body.
BODY
Round 1: Ch 3, sc around 12 sts of first leg, sc flo in ch-3, sc 12 sts of second leg, sc flo in ch-3 (30 sts).
Round 2: (Sc 4, inc) 6 times (36 sts).
Round 3: (Sc 5, inc) 6 times (42 sts).
Rounds 4-11: Work even in sc.
Change to CC2.
Round 12: Sc 10 in back loop only, dec (front loops), sc 19 in back loops only, dec (front loops), sc 9 in back loops only (40 sts).
Round 13: Work even in sc.
Round 14: Sc 10, dec, sc 18, dec, sc 8 (38 sts).
Round 15: Work even in sc.
Round 16: Sc 10, dec, sc 17, dec, sc7 (36 sts).
Round 17: Work even in sc.
Round 18: (Sc 4, dec) 6 times (30 sts).
Round 19: Work even in sc.
Round 20: Sc 8, dec, sc 13, dec, sc 5 (28 sts).
Round 21: Sc 8, dec, sc 12, dec, sc 4 (26 sts).
Round 22: Work even in sc.
Round 23: Sc 8, dec, sc 11, dec, sc 3 (24 sts).
Round 24: Sc 8, dec, sc 10, dec, sc 2 (22 sts).
Round 25: Sc 8, dec, sc 8, dec, sc 2 (20 sts).
Round 26: Sc 7, dec, sc 7, dec, sc 2 (18 sts).
Round 27: (Sc, dec) 6 times (12 sts).
Change to MC.
Rounds 28-29: Work even in sc.
Head
Round 1: 2 sc in each st (24 sts).
Round 2: (Sc 3, inc) 6 times (30 sts).
Round 3: (Sc 4, inc) 6 times (36 sts).
Round 4: (Sc 5, inc) 6 times (42 sts).
Round 5: (Sc 6, inc) 6 times (48 sts).
Rounds 6-16: Work even in sc.
Place safety eyes between rows 11-12, 9 sts apart.
Embroider nose 2 rows lower with MC as shown in photos.
Be sure to stuff neck firmly at this point.
Embroider eyebrows and mouth if desired, using photos as guide.
Round 17: (Sc 6, dec) 6 times (42 sts).
Round 18: (Sc 5, dec) 6 times (36 sts).
Round 19: (Sc 4, dec) 6 times (30 sts).
Round 20: (Sc 3, dec) 6 times (24 sts).
Round 21: (Sc 2, dec) 6 times (18 sts).
Round 22: (Sc, dec) 6 times (12 sts).
Round 23: (Dec) 6 times (6 sts).
Cut yarn, leaving a long tail for sewing. Finish stuffing head.
Weave yarn tail through remaining 6 sts and pull tightly to close.
Arm (Make 2)
With MC, make magic ring.
Round 1: 4 sc in magic ring (4 sts). Pull tightly to close.
Round 2: 2 sc in each st (8 sts).
Rounds 3-20: Work even in sc.
Change to CC2.
Rows 21-25: Work even in sc.
Fold in half and work 4 sc across, closing tube.
Do NOT stuff arms.
Attach arms as shown in photo.
The body of this doll is crocheted just like my crochet girl doll, only with color changes. You can view the video tutorial for the basic amigurumi doll body here:
CROCHET DOLL HAIR
Cut yarn strands twice as long as desired hair length.
The easiest way to do a lot of these is to wrap the yarn around something. I used my first three fingers since I wanted his hair to be long enough to sweep to the side, but not too long. Then, cut across one side of the wrapped yarn.
Hair is attached in the latch hook style. Insert hook from front to back where you would like strands. Fold strand in half, catch in hook and pull through about 1/2″. Yarn over with both strands and pull through loop. (Same as if you were attaching fringe to a project).
Repeat for everywhere you want hair. After I attached each piece I separated the plies of yarn. This is a 4 ply yarn that I split apart into 2 sections (2 plies each).
Changing hair color, skin color and outfit color is a great way to make a custom crochet doll for a huggable companion for a little one in your life.

Overalls Front
Join CC1 in front loop of first sc of front (sides were worked into the front loop. You should have 19 unworked front loops in front of body).
Row 1: Ch 1, sc in 19 unworked front loops, turn (19 sts).
Row 2: Ch 1, sc in each st; turn.
Row 3: Ch 1, sc2tog, sc to last 2 sts, sc2tog; turn (17 sts).
Rows 4-5: Repeat rows 2-3 (15 sts).
Rows 6-7: Repeat rows 2-3 (13 sts).
Rows 8-9: Repeat rows 2-3 (11 sts).
Rows 10-11: Repeat rows 2-3 (9 sts).
Rows 12-13: Repeat rows 2-3 (7 sts).
Rows 14-17: Repeat row 2.
Fasten off.
Overalls Pocket
With CC1, ch 5.
Row 1: Sc in 2nd ch from hook and next 3 ch; turn (4 sts).
Row 2: Ch 1, sc in each st; turn.
Row 3: Ch 1, inc, sc to last st, inc; turn (6 sts).
Row 4: Ch 1, sc in each st; turn.
Rows 5-6: Repeat rows 3-4 (8 sts).
Row 7: Ch 1, sc2tog, sc to last 2 sts, sc2tog; turn (6 sts).
Fasten off.
Sew pocket to front of overalls as seen in photos. Pocket is worked top down, so first 4 sts of row 1 are the top.
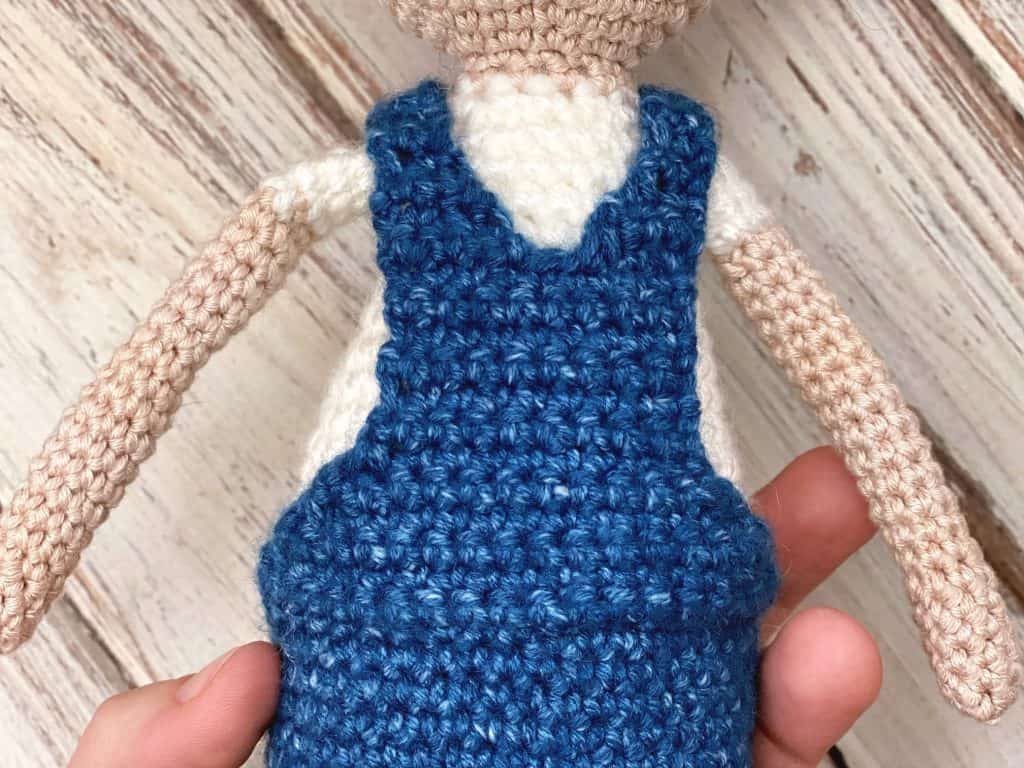
Overalls Back
Join CC1 in front loop of first sc of back (sides were worked into the front loop. You should have 19 unworked front loops in back of body).
Note: Even if there is a noticeable jump from where you change colors, just work into the front loops. It will even out.
Row 1: Ch 1, sc in each front loop; turn (19 sts).
Row 2: Ch 1, sc in each st; turn.
Row 3: Ch 1, sc2tog, sc to last 2 sts, sc2tog; turn (17 sts).
Row 4: Repeat row 3 (15 sts).
Row 5: Repeat row 3 (13 sts).
Row 6: Repeat row 3 (11 sts).
Row 7: Repeat row 3 (9 sts).
Rows 8-13: Ch 1, sc in each st; turn.
Straps
Row 1: Ch 1, Inc in first st, sc, sc2tog; turn, leaving remaining sts unworked (4 sts).
Row 2: Ch 1, sc2tog, sc 2; turn (3 sts).
Row 3: Ch 1, sc, sc2tog; turn (2 sts).
Rows 4-13: Ch 1, sc in each st; turn.
Fasten off.
For second strap, join yarn at right edge of row 13 of overalls back.
Repeat rows 1-13 for strap.
Sew straps to front. Weave in ends.
CROCHET DOLL BOOTS
With scrap yarn (mine was Lion Brand Mandala), make magic ring.
Round 1: 6 sts in magic ring (6 sts). Pull tightly to close.
Round 2: 2 sts in each st (12 sts).
Rounds 3-5: Work even in sc, turn at end of round 5.
HEEL FLAP:
Row 6: Ch 1, sc 6; turn (6 sts).
Row 7: Repeat row 6.
Row 8: Ch 1, sc2tog, sc 2, sc2tog; turn (4 sts).
Row 9: Ch 1, (sc2tog) twice; turn (2 sts).
Row 10: Ch 1, sc2tog (1 st).
Place marker in st.
BOOT SHAFT
Round 11: Sc 4 sts down side of heel flap, sc 6 sts from front, sc 4 sts up other side of heel flap, sc in marked st (15 sts.)
Rounds 12-20: Sc evenly on 15 sts. Can make the boots as short or tall as you wish by adjusting this number.
Fasten off. Weave in ends.

Today we have seen how to crochet the Hank boy crochet doll pattern. This sweet little guy was such a joy to make and I really hope he honors the little one he is named after.
Want even more adorable crochet dolls? Check out these amazing crochet dolls, all free patterns!
You can always view all of my free crochet patterns here!
Happy Crocheting!
Amanda
Amanda is there any way to change the light color into a dark one (lettering)? It’s almost invisible to me, an older person also with vision issues! thanks so much for your support and help in this matter!
Hi Cindy, are you having trouble viewing the blog post or the downloadable pattern?