
Looking for a crochet bunny pattern to brighten your day? Check out Maisey – she’s an easy free crochet pattern that is sure to delight!

Design Story and Inspiration for This Adorable Crochet Bunny
After designing my first doll Morgan, I always wanted to make some similar critters, but somehow it got put on the back burner and forgotten.
With Easter just around the corner, I decided it was the perfect time to design a spring bunny that could be great for gift giving!
_________________
Yarn Options for Your Crochet Bunny
I chose to use yarn from my stash, so I ended up with a DK (category 3) yarn that’s been discontinued. It’s Lion Brand Touch of Angora, but don’t worry – any DK yarn will work for this pattern!
I really love to design amigurumi with cotton yarns, but this yarn with just a touch of animal fibers worked well, too. I’m really in love with how this turned out!
So, grab some DK yarn and a 3.00mm hook and let’s get going!
_________________
Before we begin… let’s get Social!
I would love for you to come follow me on
Instagram (get sneak peeks of what’s coming up!)
My Facebook Page (come join the fun!)
Follow me on Pinterest (I pin tons of free patterns to my boards!)
Join my Facebook group (lots of awesome crochet talk there)
Also, you can find me on Ravelry or join my subscribers on YouTube.
_________________
Amigurumi Bunny Pattern Details
This pattern is made very similarly to my Morgan doll for the body, which is why I did not make a separate video tutorial for her.
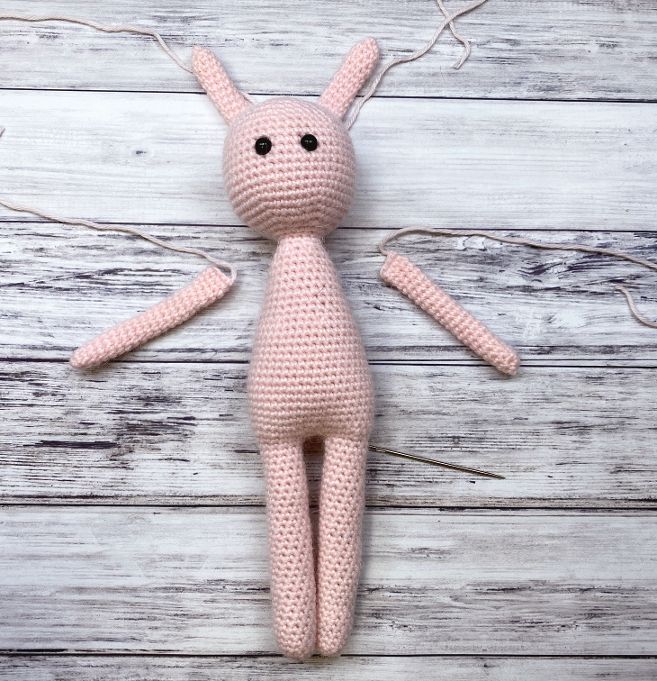
There is just a little sewing with this pattern – you will have to attach the arms and ears and a tail (if you choose to make one). You will also sew the collar and flower in place. (Don’t worry, the second video below shows you the method for sewing on the arms, which is the same for the bunny ears).
If you’d like a video, follow along with these.
Work the body exactly like the one in this video:
Then, work the head and arms from this video, but PLEASE NOTE that the head is not as large as Morgan’s so you will not work it exactly the same but very, very similarly. Ears are made same as arms but shorter.

How to Customize this Amigurumi Pattern
This pattern is easy to customize! Use any weight yarn you like for a smaller or larger rabbit (just make sure you are using a hook a few sizes smaller than the one recommended on the label). Make it furry, make it colorful – it’s totally up to you!
More Free Amigurumi Patterns


Get the Ad-Free PDF
Want to crochet on the go? Get the ad-free PDF to crochet from your tablet or print and take with you

_________________
Maisey the Crochet Bunny
What You’ll Need
Yarn: DK weight (category #3) for bunny, size 3 crochet thread for collar and flower
Hook: US Size D (3.00mm) for bunny, size 6 (1.60mm) for collar and flower
Notions: Safety eyes (embroider eyes for a small child), small amount of polyester fiberfill, yarn needle/tapestry needle, stitch marker, scissors
Gauge: 28 sts and 28 rows = 4″ in sc
Finished Size: Approximately 11″ tall including ears
Notes
This adorable bunny is worked in continuous rounds without joining. Use a stitch marker to mark first st of each round.
Stuff legs, body and head as you go. I found that when I waited to stuff at the end of a section it was lumpy. About every inch or so I will stop to stuff.
Abbreviations:
Chain (ch)
Slip Stitch (sl st)
Single Crochet (sc)
Half Double Crochet (hdc)
Increase (Inc): 2 sc in next st
Invisible Decrease (Dec): insert hook in front loop only of next 2 sts, yarn over, draw up a loop, yarn over, draw through two loops
Bunny Amigurumi Pattern
Leg (Make 2)
With MC and larger hook, make magic ring.
.Round 1: 6 sc in magic ring (6 sts). Pull tightly to close.
Round 2: 2 sc in each st (12 sts).
Rounds 3-32: Work even in sc.
Fasten off first leg. Do not fasten off second leg. Continue to body.
Body
Round 1: Ch 3, sc around 12 sts of first leg, sc flo in ch-3, sc 12 sts of second leg, sc flo in ch-3 (30 sts).
Round 2: (Sc 4, inc) 6 times (36 sts).
Round 3: (Sc 5, inc) 6 times (42 sts).
Rounds 4-11: Work even in sc.
Round 12: Sc 10, dec, sc 19, dec, sc 9 (40 sts).
Round 13: Work even in sc.
Round 14: Sc 10, dec, sc 18, dec, sc 8 (38 sts).
Round 15: Work even in sc.
Round 16: Sc 10, dec, sc 17, dec, sc7 (36 sts).
Round 17: Work even in sc.
Round 18: (Sc 4, dec) 6 times (30 sts).
Round 19: Work even in sc.
Round 20: Sc 8, dec, sc 13, dec, sc 5 (28 sts).
Round 21: Sc 8, dec, sc 12, dec, sc 4 (26 sts).
Round 22: Work even in sc.
Round 23: Sc 8, dec, sc 11, dec, sc 3 (24 sts).
Round 24: Sc 8, dec, sc 10, dec, sc 2 (22 sts).
Round 25: Sc 8, dec, sc 8, dec, sc 2 (20 sts).
Round 26: Sc 7, dec, sc 7, dec, sc 2 (18 sts).
Round 27: (Sc, dec) 6 times (12 sts).
Rounds 28-29: Work even in sc.
Head
Round 1: 2 sc in each st (24 sts).
Round 2: (Sc 3, inc) 6 times (30 sts).
Round 3: (Sc 4, inc) 6 times (36 sts).
Round 4: (Sc 5, inc) 6 times (42 sts).
Round 5: (Sc 6, inc) 6 times (48 sts).
Rounds 6-15: Work even in sc.
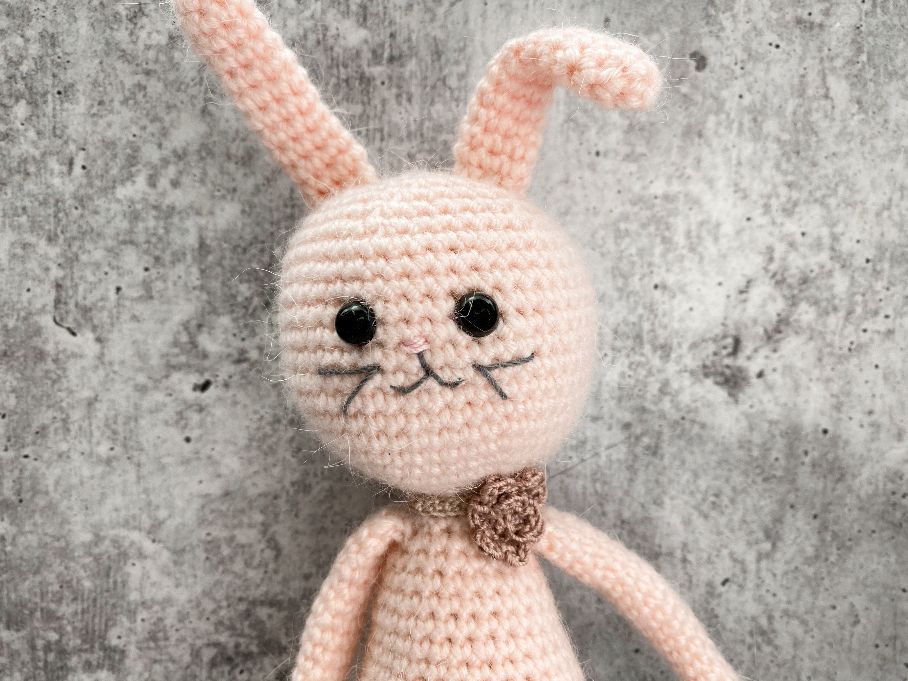
Place safety eyes between rows 11-12, 4 sts apart.
Embroider nose 1 row lower with embroidery floss or crochet thread as shown in photos.
Embroider whiskers and mouth as desired.
Be sure to stuff neck firmly at this point.
Round 16: (Sc 6, dec) 6 times (42 sts).
Round 17: (Sc 5, dec) 6 times (36 sts).
Round 18: (Sc 4, dec) 6 times (30 sts).
Round 19: (Sc 3, dec) 6 times (24 sts).
Round 20: (Sc 2, dec) 6 times (18 sts).
Round 21: (Sc, dec) 6 times (12 sts).
Round 22: (Dec) 6 times (6 sts).
Cut yarn, leaving a long tail. Finish stuffing head.
Weave yarn tail through remaining 6 sts and pull tightly to close.
Arm (Make 2)
With MC and larger hook, make magic circle.
Round 1: 4 sc in magic ring (4 sts). Pull tightly to close.
Round 2: 2 sc in each st (8 sts).
Rounds 3-20: Work even in sc.
Fold in half and work 4 sc across, closing tube.
Do NOT stuff arms.
Attach arms as shown in photo.
Bunny Ear (Make 2)
Work same as arms to round 12, then fold in half and sc across same as arms.
Attach ears as shown in photo.
Using crochet thread in colors of choice with smaller hook, work the following accessories:
Collar
Ch 26.
Row 1: Sc in 2nd ch from hook, *ch 1, skip next ch, sc in next ch; repeat from * to end.
Fasten off.
Stitch in place around neck.
Flower
Ch 20.
Row 1: Sc in 2nd ch from hook, *ch 1, sk next ch, sc in next ch; repeat from * to end; turn – 19 sts.
Row 2: Ch 1, (3 hdc, ch 1, slip st) in fist sc, *slip st in next sc, (ch 1, 3 hdc, ch 1, slip st) in next sc; repeat from * to end.
Fasten off.
Finishing
Roll flower into flower shape and stitch together on back side.
Stitch to collar as desired.
You can also make a larger “flower” and use it for the tail! Either use the MC and larger hook and ch 20 or use crochet thread and ch 32. Then follow rows 1-2 for flower.
_________________
That’s it! I hope you love this darling crochet bunny pattern as much as I enjoyed designing it!
Happy Crocheting!
Amanda