
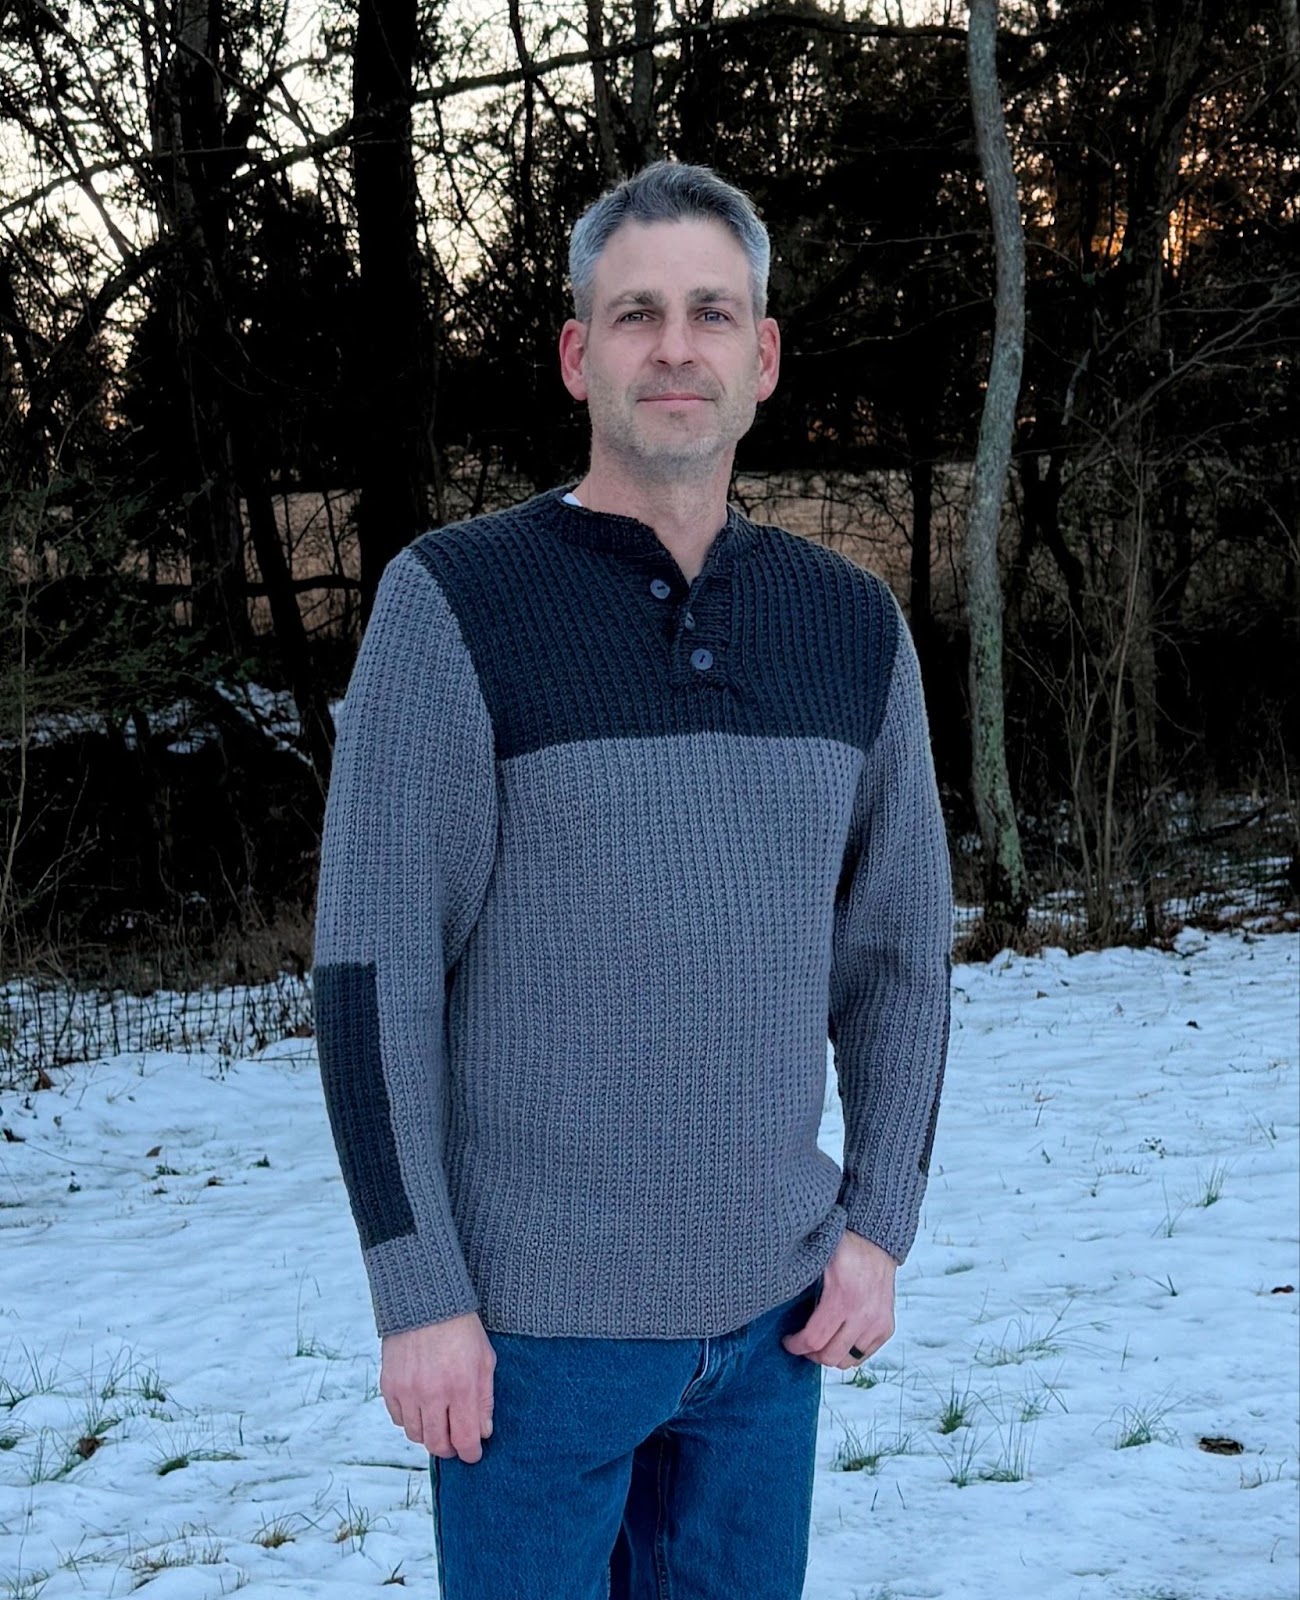
Inspired by the commando sweaters worn by soldiers in World War 2, this henley pullover has a broken rib texture, and contrasting yarn simulating shoulder and elbow patches.
Buy the ad-free PDF of this pattern on Etsy here!
Design Story and Inspiration for This Vintage Style Sweater Pattern
I have a son who is obsessed with World War 2. Especially aviation of that era, but he’s also into all things WW2. He was in a wax museum at school and had to dress up from that era, and when I did some research I saw the Commando Sweaters worn by soldiers at the time and fell in love with the styling.
When I saw that LL Bean had this commando sweater, I knew I had to make my own version. First I made an adult one for the hubs and now I’m working on a kid’s version for my son!
Yarn Options for The Commando Sweater
For this design, I contacted Knit Picks and asked for yarn support, as I knew it was going to be a larger project. They graciously agreed and the Commando Sweater was born! I had the design knit up by a wonderful sample knitter (thanks Cami!) and finished the placket and collar once the body of the sweater was knit.
High Desert Worsted is a wonderful wool yarn. I wanted wool because the original sweaters were wool for the soldiers, and this wool did not disappoint! It’s a worsted weight yarn (category #4) and was a joy to work with.
Feel free to use any worsted weight yarn that gets the same gauge.
Pattern Details for This Men’s Sweater Knitting Pattern
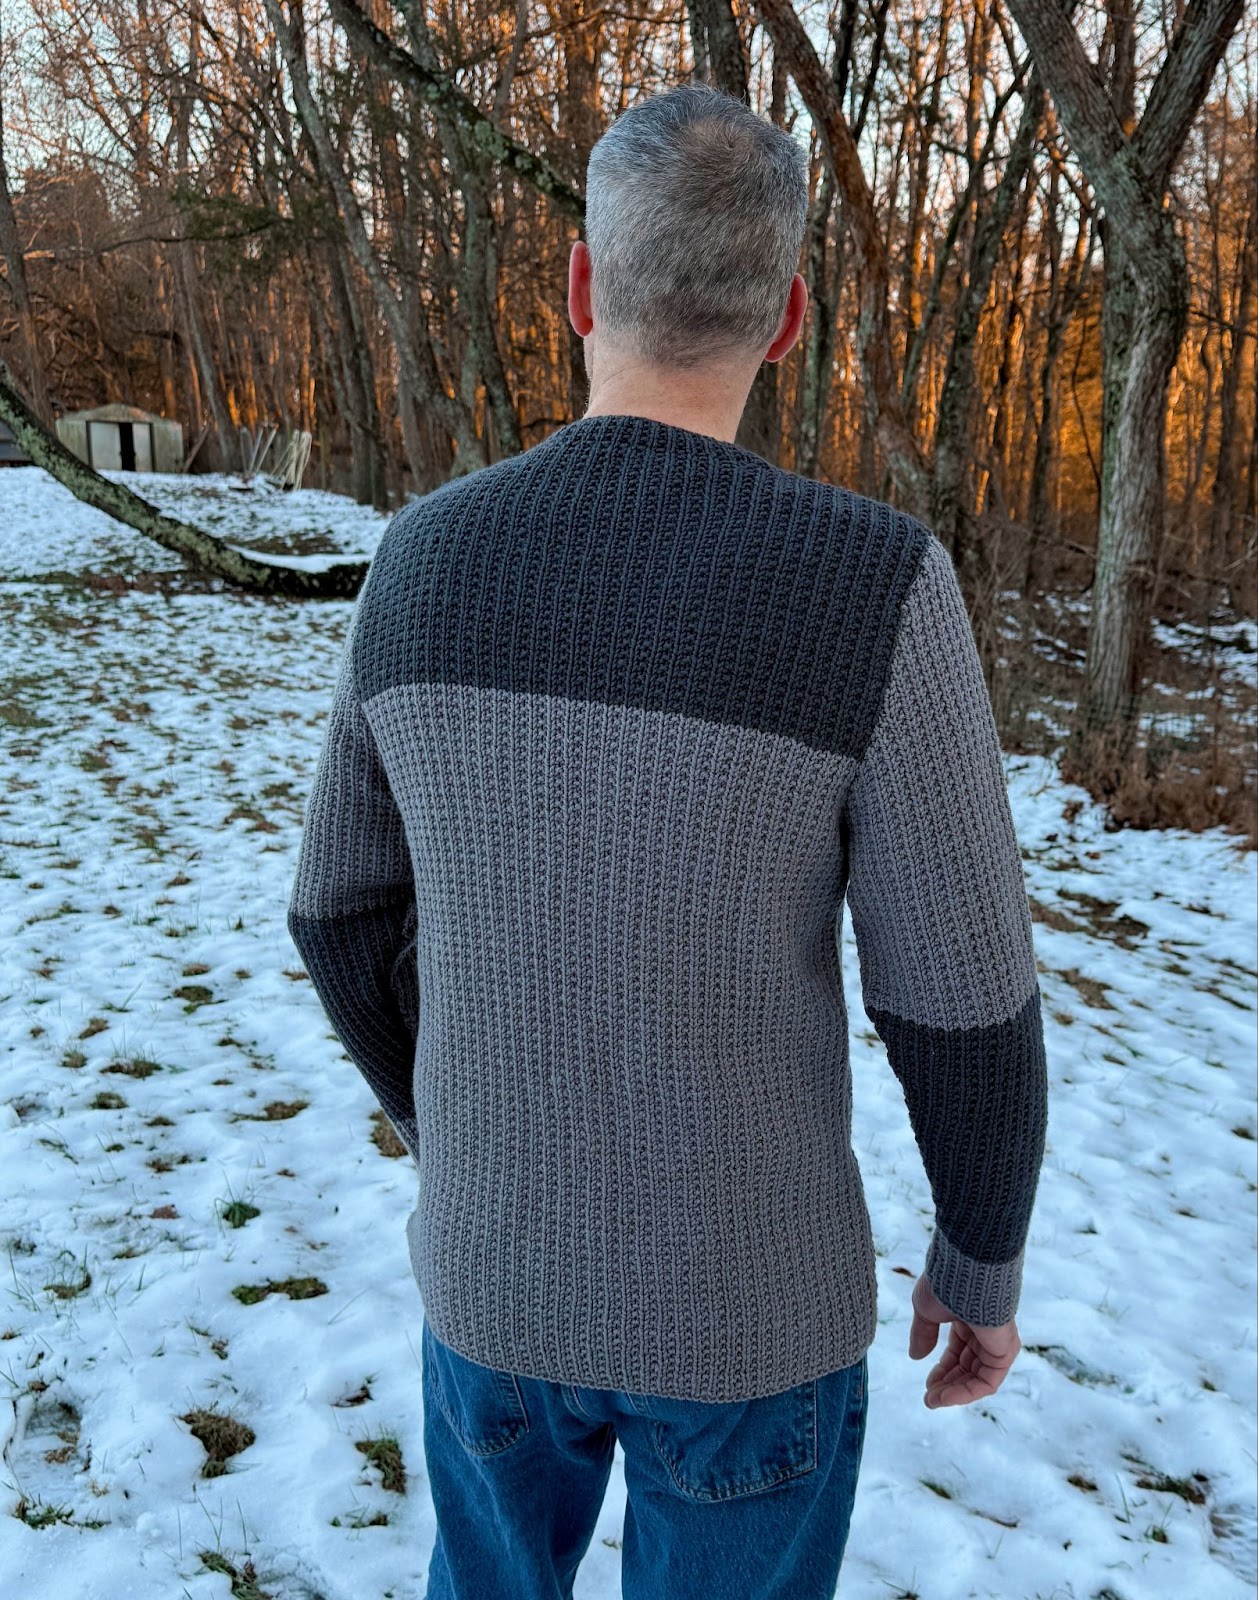
The elbow and shoulder details of my sweater design are not sewn on, they are simulated with a darker yarn choice.
Honestly, while I love the look of elbow patches, I really hate sewing them on! I can’t tell you how many times I’ve accidentally sewn the sleeves shut. 🤦♀️ So, for this design there is no extra sewing required!! Just a change of color.
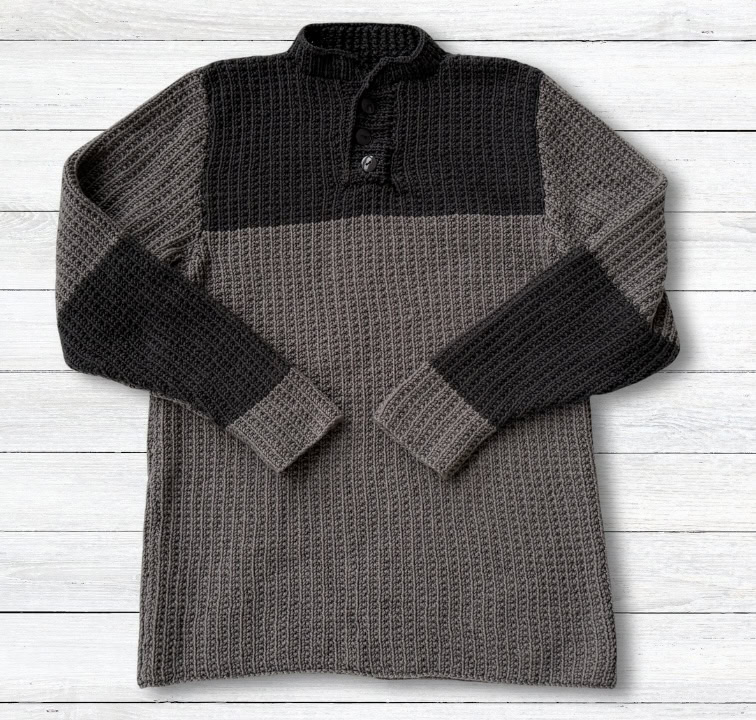
It is created by knitting 4 pieces (front, back and 2 sleeves) and then assembling. Once assembled, you work the button placket and collar.
Buy the ad-free PDF of this pattern and knit on the go!
Knit Commando Sweater
What You’ll Need
Yarn: Knit Picks High Desert Worsted (100% wool, 217yds/100g) – 4 (4, 4, 5, 5, 7, 7, 8) skeins Quail (MC), and 2 (2, 2, 2, 3, 3, 3, 3) skeins Forge (CC)
Knitting Needles: US Size 9 (5.50mm)
Notions: 3 (3, 3, 3, 3, 4, 4, 4) ⅝” buttons, yarn needle, scissors
Gauge: 16 sts and 25 rows = 4” (10cm) in pattern stitch
Finished Size: S (M, L, XL, 2X, 3X, 4X, 5X) to fit chest size 34 (36, 40, 44, 48, 52, 56, 60)”
Stitch Abbreviations
Knit (k)
Purl (p)
Pattern Stitch:
Row 1 (RS): Knit.
Row 2 (WS): (k1, p1) to end
Repeat rows 1-2 for pattern.
Mens Commando Sweater Knitting Pattern
Back
With MC, cast on 74 (82, 90, 98, 106, 114, 122, 130) sts.
Work even in pattern st until piece measures 17 (17, 17, 17, 16.5, 16, 16, 15)” from beginning.
Armhole Shaping
Bind off 3 (5, 6, 7, 8, 9, 10, 11) sts at beginning of next 2 rows – 68 (72, 78, 84, 90, 96, 102, 108) sts.
Decrease 1 st each side every other row 3 (4, 5, 6, 7, 8, 9, 10) times – 62 (64, 68, 72, 76, 80, 84, 88) sts.
Change to CC.
Work even in pattern st until 26 (26, 26.5, 27.5, 28, 29.5, 30.5, 30.5)” from beginning.
Shoulders
Bind off 18 (18, 19, 20, 21, 22, 24, 26) sts, place 26 (28, 30, 32, 34, 36, 36, 36) back neck sts on holder or waste yarn, bind off remaining 18 (18, 19, 20, 21, 22, 24, 26) sts.
Front
Work same as back to armhole shaping.
Armhole Shaping
Bind off 3 (5, 6, 7, 8, 9, 10, 11) sts at beginning of next 2 rows – 68 (72, 78, 84, 90, 96, 102, 108) sts.
Decrease 1 st each side every other row 3 (4, 5, 6, 7, 8, 9, 10) times – 62 (64, 68, 72, 76, 80, 84, 88) sts.
Change to CC.
Work even in pattern st until 20 (20, 20.25, 20.5, 20.25, 20.5, 20.75, 20.25)” from beginning, ending with a WS row.
Placket
Knit 28 (28, 30, 32, 34, 36, 37, 39), bind off 6 (8, 8, 8, 8, 8, 10, 10) sts, attach another ball of yarn, knit 28 (28, 30, 32, 34, 36, 37, 39) – 28 (28, 30, 32, 34, 36, 37, 39) sts each side.
Working both sides at once, continue working in pattern stitch as established until front measures 24.5 (24.5, 25, 25.75, 26.25, 27.5, 28.5, 28.5)” from beginning.
Neck Shaping
Working both sides at once, bind off 7 (7, 8, 8, 9, 8, 8, 8) sts at neck edge – 21 (21, 22, 24, 25, 28, 29, 31) sts each side.
Decrease 1 st at neck edge every other row 3 (3, 3, 4, 4, 5, 5, 5) times – 18 (18, 19, 20, 21, 23, 24, 26) sts each side.
Work even in pattern stitch until 26 (26, 26.5, 27.5, 28, 29.5, 30.5, 30.5)” from beginning.
Shoulders
Bind off remaining stitches.
Buy the ad-free PDF of this pattern on Etsy here!
Left Sleeve
With MC, cast on 36 (38, 40, 44, 48, 50, 54, 56) sts.
Work even in pattern stitch for 2.5 (2.5, 3, 3, 3, 3, 3, 3)”, ending with a WS row.
Begin color pattern for sleeve: With MC, knit 14 (15, 15, 17, 19, 20, 21, 22) sts in pattern st, work remaining stitches in CC. Continue working this color pattern, changing colors at the same point and adding sts on sides in working color.
Work 60 (60, 60, 66, 70, 74, 74, 78) rows with two colors, increasing according to instructions below, then change to MC and continue increases.
Increase 1 st each side every 4th (4th, 4th, 4th, 4th, 2nd, 2nd, 2nd) row with color changes until stitch count reaches 52 (58, 70, 70, 80, 66, 78, 88) sts.
Increase 1 st each side every 6th (6th, 6th, 6th, 6th, 4th, 4th, 4th) row 10 (7, 3, 7, 6, 21, 19, 18) times – 72 (72, 76, 84, 92, 108, 116, 124) sts.
Continue working in pattern stitch and MC until sleeve measures 18 (18, 18.5, 19, 20, 20, 20, 20.5)” from beginning.
Shape Cap
Bind off 3 (5, 6, 7, 8, 9, 10, 11) sts at beginning of next 2 rows – 66 (62, 64, 70, 76, 90, 96, 102) sts.
Decrease 1 sts each side every other row 3 (4, 5, 6, 7, 8, 9, 10) times – 60 (54, 54, 58, 62, 74, 78, 82) sts.
Decrease 1 st each side every row 4 (0, 0, 0, 0, 0, 0, 0) times – 52 (54, 54, 58, 62, 74, 78, 82) sts.
Decrease 1 st each side every other row 14 (15, 15, 16, 17, 20, 21, 18) times – 24 (24, 24, 26, 28, 34, 36, 46) sts.
Size 5X ONLY
Decrease 1 st each side every 3rd row 3 times – 40 sts.
All Sizes
Bind off 3 (3, 3, 3, 3, 4, 4, 5) sts at beginning of next 4 rows – 12 (12, 12, 14, 16, 18, 20, 20) sts.
Bind off remaining 12 (12, 12, 14, 16, 18, 20, 20) sts.
Right Sleeve
Work as for left sleeve in MC to color pattern for sleeve. With CC, knit 22 (23, 25, 27, 29, 30, 33, 34) sts in pattern st, work remaining stitches in MC. Continue working this color pattern, changing colors at the same point and adding sts on sides in working color.
Work as for left sleeve. CC elbow patch should be on opposite side of sleeve.
Finishing
Block to measurements.
Sew shoulder seams.
Sew in sleeves to armhole.
Sew sleeve and side seams.
Weave in ends.
Button Band
With RS facing and CC, starting at bottom corner of the right side of placket, pick up and knit 24 (24, 26, 26, 30, 36, 40, 46) sts along placket opening.
Beginning with row 2, work in pattern stitch for 9 (11, 11, 11, 11, 11, 13, 13) rows. 10 (12, 12, 12, 12, 12, 14, 14) total rows worked)
Bind off knitwise.
Buttonhole Band
With RS facing and CC, on left hand side of placket, beginning at neck edge, pick up and knit 24 (24, 26, 26, 30, 36, 40, 46) sts evenly across.
Beginning with row 2, work in pattern stitch for 3 (5, 5, 5, 5, 5, 7, 7) rows.
Sizes S (M, L, XL, 2X) ONLY
Buttonhole Row 1 (RS): K 2 (2, 3, 3, 4), bind off 3, k 5 (5, 5, 5, 6), bind off 3, k 5 (5, 5, 5, 6), bind off 3, k 3 (3, 4, 4, 5).
Buttonhole Row 2: Working in k1, p1 pattern as established, [work to buttonhole, cast on 3 sts] three times, work to end.
Remaining rows: Work in stitch pattern until 10 (12, 12, 12, 12) rows are complete.
Bind off knitwise.
Sizes 3X (4X, 5X) ONLY
Buttonhole Row 1 (RS): K 5 (5, 7), [bind off 3, knit 5 (6, 7)] three times, bind off 3, knit 4 (5, 6).
Buttonhole Row 2: Working in k1, p1 pattern as established, [work to buttonhole, cast on 3 sts] four times, work to end.
Remaining rows: Work in stitch pattern until 12 (14, 14) rows are complete.
Bind off knitwise.
Collar
Row 1: With RS facing and CC, begin at right button band corner. Pick up and knit 6 (8, 8, 8, 8, 8, 10, 10) sts across button band, 7 (7, 8, 8, 9, 8, 8, 8) bound off sts from neck edge, 16 (15, 16, 17, 17, 20, 20, 20) sts up side neck, knit 26 (28, 30, 32, 34, 36, 36, 36) from back neck holder or waste yarn, pick up and knit 16 (15, 16, 17, 17, 20, 20, 20) sts down opposite side neck edge, 7 (7, 8, 8, 9, 8, 8, 8) bound off sts from opposite neck edge, 6 (8, 8, 8, 8, 8, 10, 10) sts across buttonhole band – 84 (88, 94, 98, 102, 108, 112, 112) sts.
Row 2: Work row 2 of stitch pattern.
Rows 3-4: Work rows 1-2 of stitch pattern.
Row 5: K1, ssk, k to last 3 sts, k2tog, k1 – 82 (86, 92, 96, 100, 106, 110, 110) sts.
Row 6: K1, p2tog, (k1, p1) to last 3 sts, k2tog, p1 – 80 (84, 90, 94, 98, 104, 108, 108) sts.
Row 7: Repeat row 5 – 78 (82, 88, 92, 96, 102, 106, 106) sts.
Row 8: Repeat row 6 – 76 (80, 86, 90, 94, 100, 104, 104) sts.
Bind off knitwise.
See buttons on button band opposite buttonholes.
Stitch bottom of placket in place, making sure buttonhole side is on top.
Weave in all ends.
Final Thoughts on the Commando Sweater
I hope you enjoy this pattern as much as I enjoyed designing it! I love how it turned out and can’t wait to make one for my son. 😀
Happy Knitting!
Amanda
I LOVE this sweater. The style, the stitch pattern, the over-all look of it just shouts out WARM and COMFY! It looks amazing on your hubby, and I’m sure it would look amazing on any man. I can even see a woman looking great as well, with a few alterations. LOL. You have a winner here, no doubt about it.
Thank you SO much!! I’m glad you like this pattern 😀