
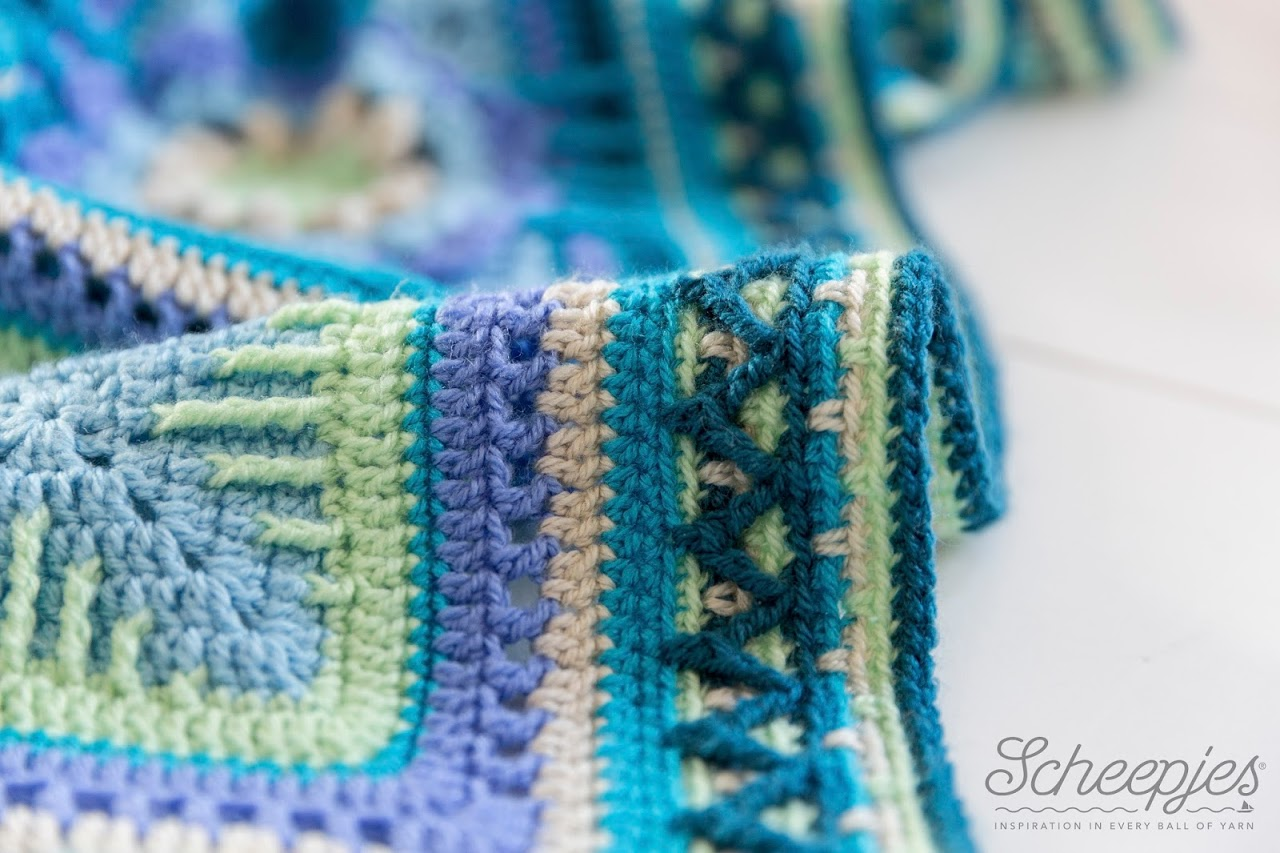
Looking for that perfect crochet border? Look no further!! Here are over 25 of the most marvelous crochet borders out there.
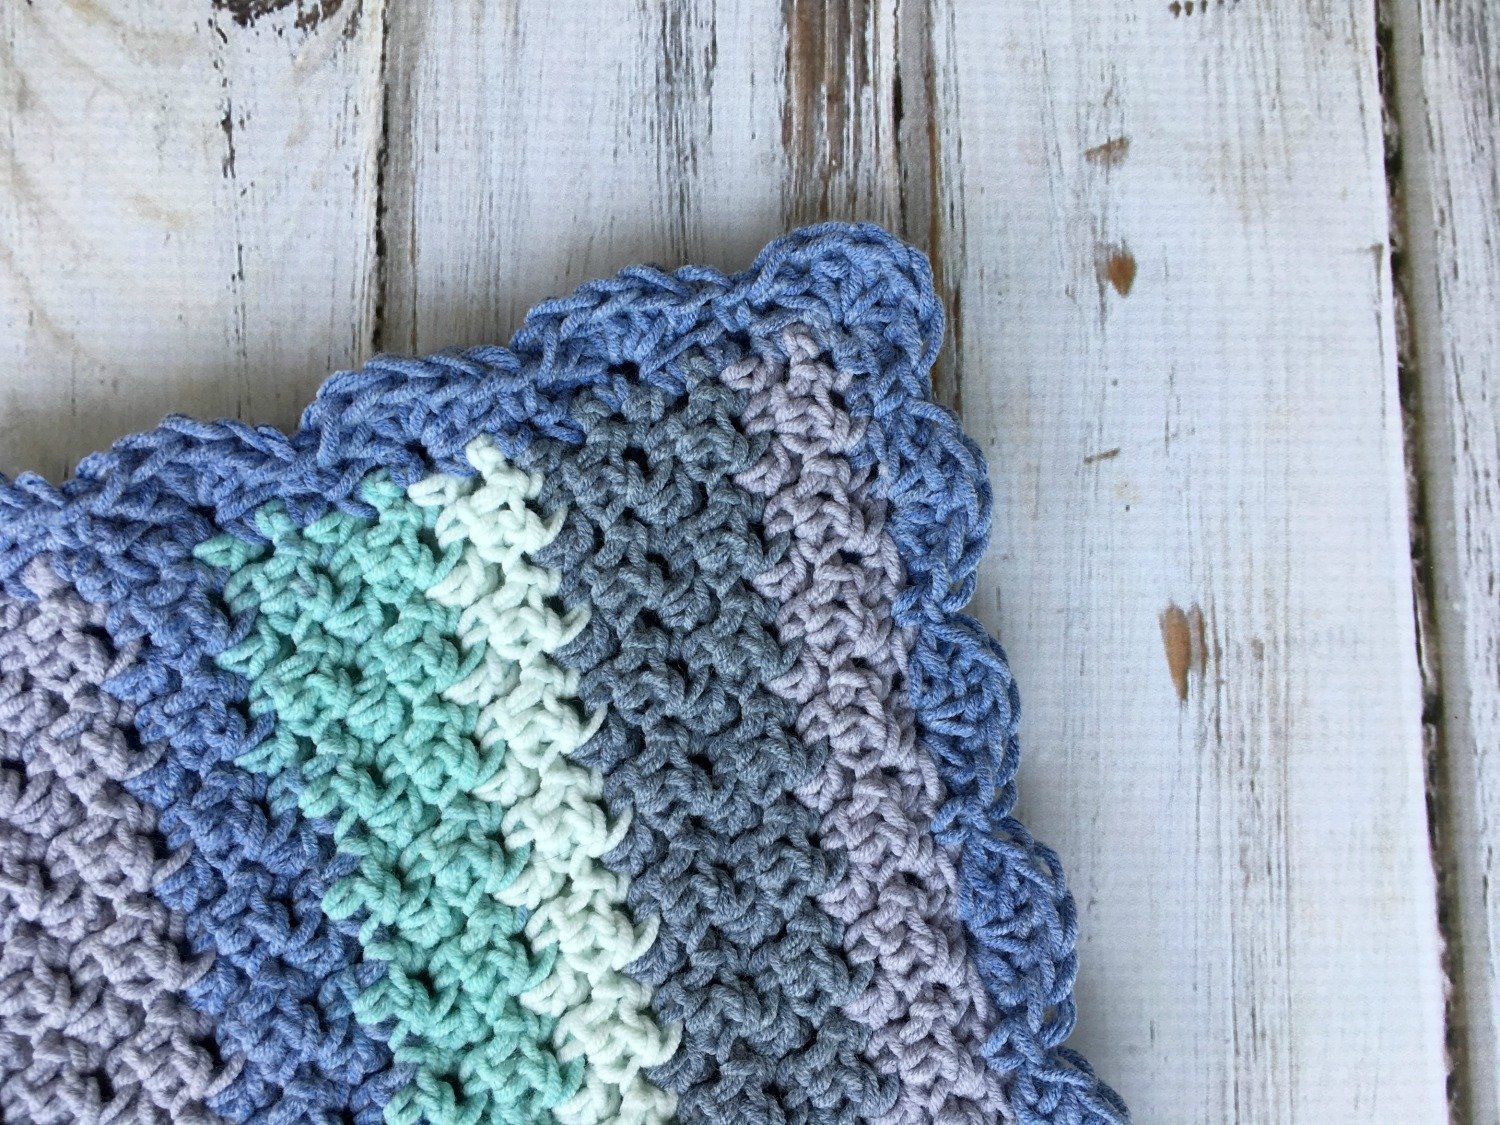
I know, I know, you’ve just finished a massive blanket pattern (or other large project) and you’re wondering, “Do I really need to add a border?”
I say, absolutely yes, and here’s why. Not only does a border add polish, but it also helps hide rough edges or lost stitches. A not quite square or rectangular blanket isn’t nearly as noticeable with an eye-catching border and you don’t have to worry about frogging your project and trying to figure out where you dropped a stitch.
There are so many different amazing borders to choose from. Each one has a different personality and adds a different effect.
Featured Video for Crochet Borders
Tips for Perfect Crochet Borders
It’s best to work a round of single crochet as your border first, even if the pattern doesn’t call for it. This is especially helpful if you are working a different color border from the body. In the corner space, work 3 sc or (sc, ch 1, sc).
This helps even out the edges and it really looks a lot neater. So, work that round of single crochet before moving on.
If the blanket edging is ruffling, you have too many stitches for the border. Go back, take it out (I know, I know!) and use less stitches.
If the blanket body (not the border) is pulling in or ruffling, you have too few stitches for the border. Again, take it out and then use more stitches.
Always check to see if your border has a stitch multiple. Some will need an even or odd number of stitches or a certain multiple to get the pattern right, so be sure to check that when you are working the border.
If you are still having trouble with an even border, you might have to go up or down a crochet hook size. Play around with it and see what gives you the most even result.
For more tips and tricks, see the video above or my post linked at the end.
So let’s jump on in to these amazing borders (easy borders, lacy borders, textured borders and every kind in between!).
Crochet Borders and Edgings to Add that Finishing Touch
Pumpkin Patch Edging
Everyone’s favorite fall fruit features in this fun crochet edging pattern (it’s kinda weird but technically pumpkins aren’t vegetables). You can use this border for fall throws, table runners, and for babies expected in October or November! You will use single, double and treble crochet stitches.
Designer: Fiber Flux Blog
_____________________
Windows Border
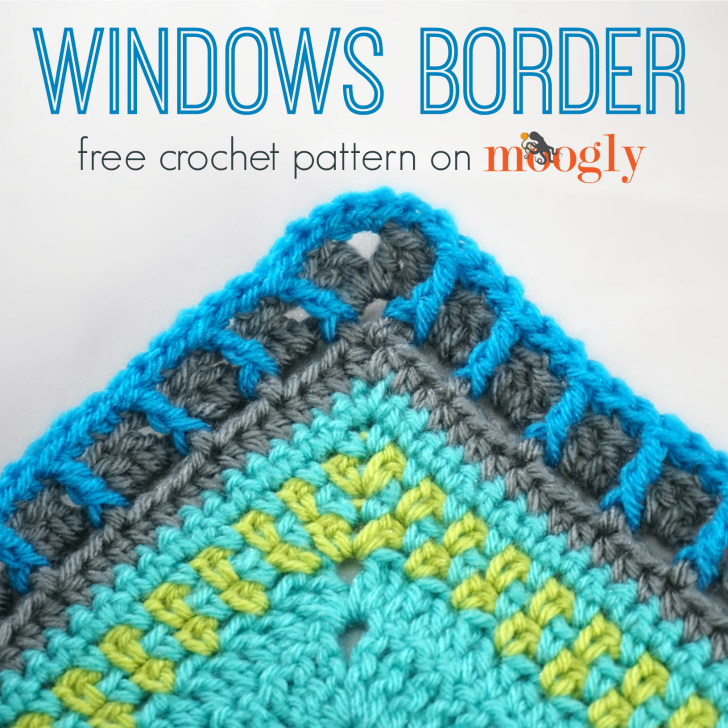
This deceptively simple border will give your project a finished look with a geometric twist. You will be using single, double and treble crochet stitches with some stitches being worked in the back loops only or around the post. There are only two rows and the no-frills design is perfect for projects like unisex baby blankets and crochet throws for men.
Designer: Moogly Blog
______________
Zig Zag Border
An eclectic zig zag border is a great addition to a crochet stitch sampler throw or tribal inspired project. Post stitches and spike stitches make this border a little more complicated than some of the other ones on this list but I think the results are worth it!
Designer: LillaBjorn’s Crochet World
____________________
Spades Stitch Border
A row of striking spades makes a bold statement border using double and treble crochet stitches. Now I really want to make a blanket inspired by Alice in Wonderland. This border only takes one trip around your project so it might go faster than you think!
Designer: Lyza Hats Crochet
_____________________________
Flower Border Edging

If you know how to chain stitch, slip stitch, and double crochet then you can make this border! Dainty flowers add a whimsical finishing touch to baby blankets for girls or a light spring shawl. This border is another quickie with only one row.
Designer: Naztazia
_____________________
Puff Edge
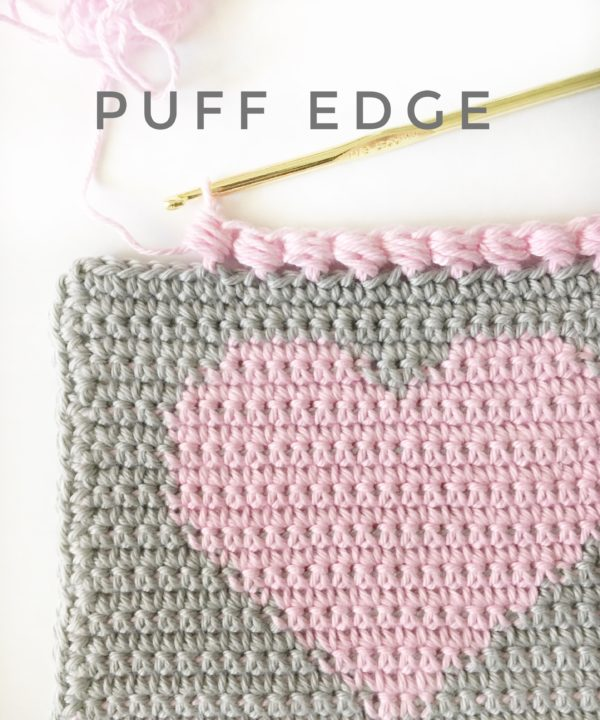
Puff stitches add interest to a plain blanket with dimension. There’s both a video and written instructions to help walk you through doing the half double crochets and half double crochet decreases.
Designer: Daisy Farm Crafts
_______________________
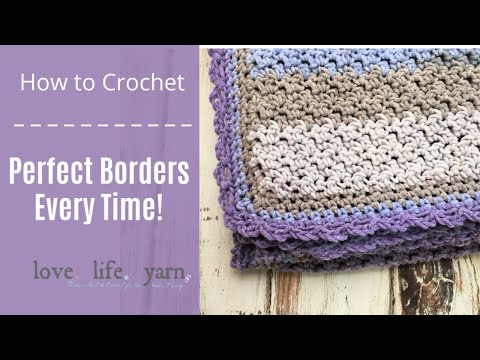
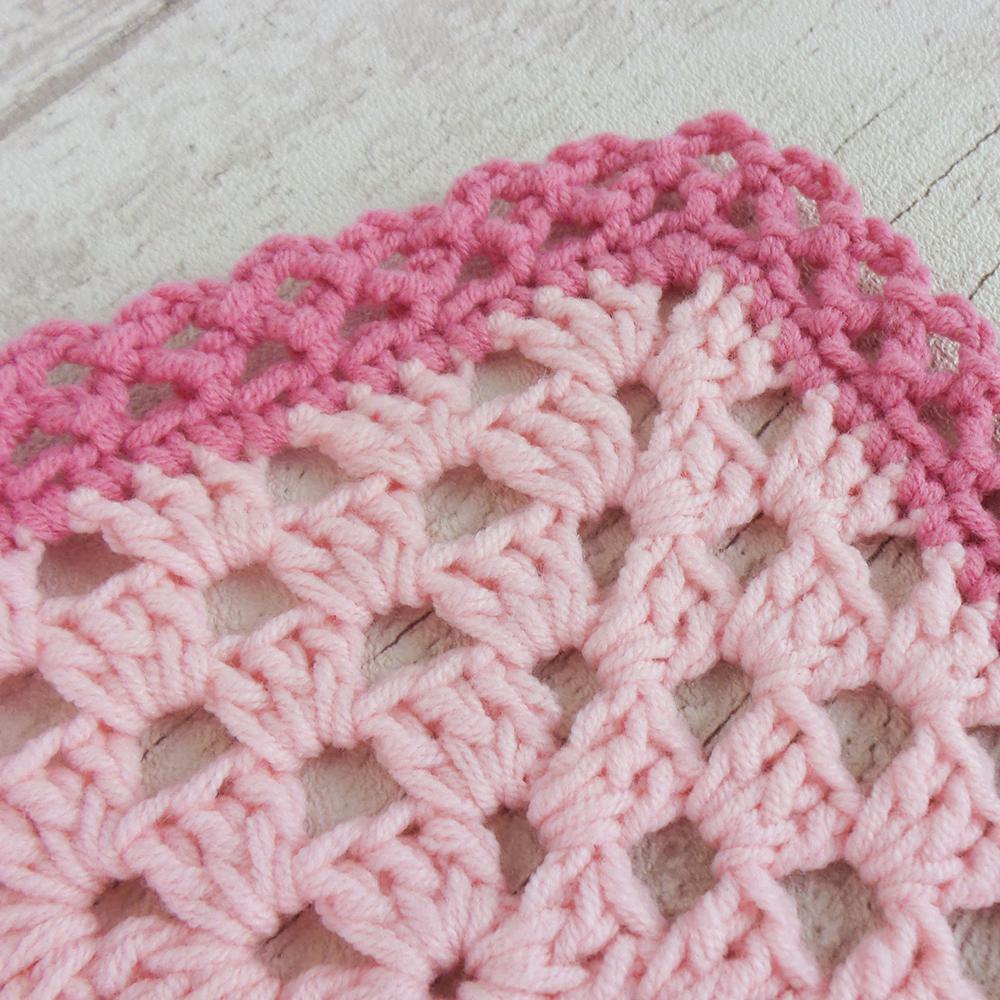
Easy Ribbed Border
You don’t want the border to steal the show. This simple crochet border is made with one round of double crochet stitches and one round of alternating front and back post double crochet stitches. Includes video tutorial.
Designer: Love.Life.Yarn
_____________________
Reverse Single Crochet Shell
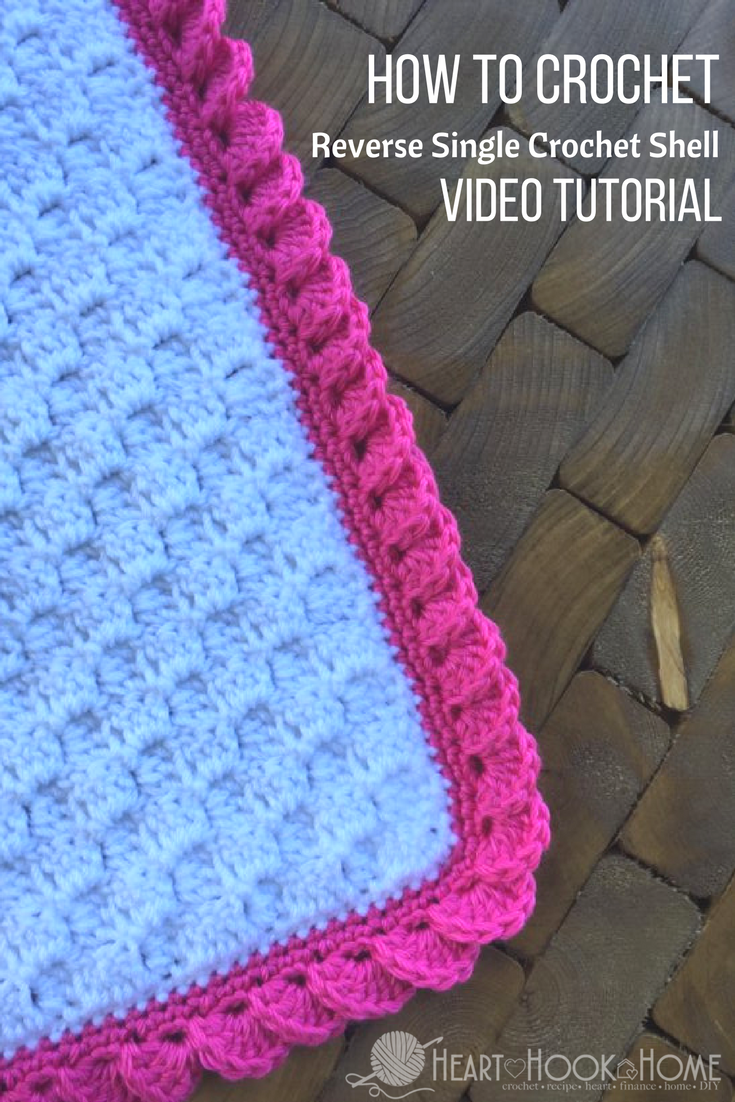
You’d never guess that this pretty shell border is made using just single and double crochet stitches. I love the depth that this border adds. It’s shown here on a corner to corner blanket, but it can be made on any length of crochet that has a multiple of 3.
Designer: Heart Hook Home
______________
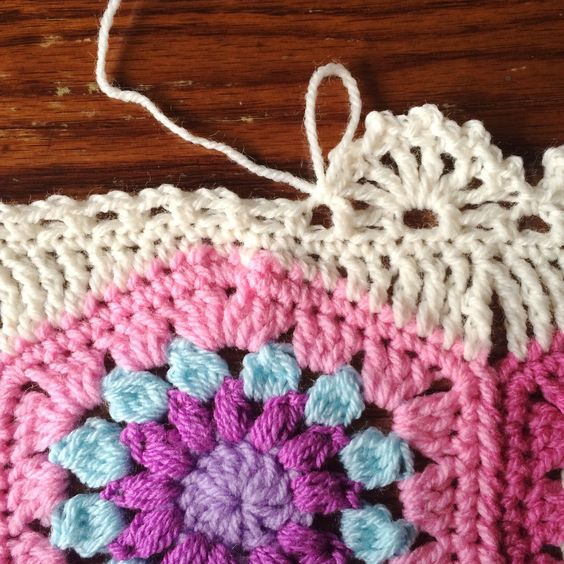
Granny Edging
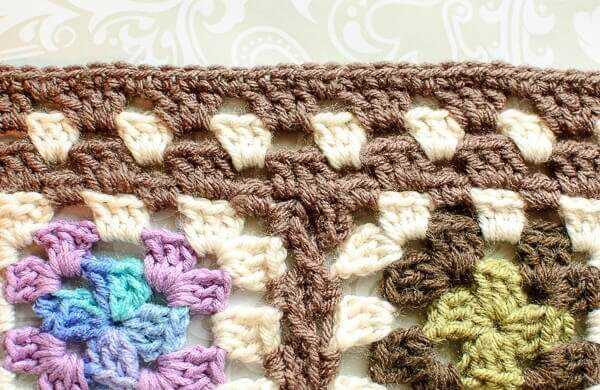
There’s no such thing as too much granny stitch. Finish off your granny square masterpiece with a granny stitch edging for a seamless transition. It’s simple but effective and it only uses double crochet and chain stitches.
Designer: Petals to Picots
____________________
Circle Edging
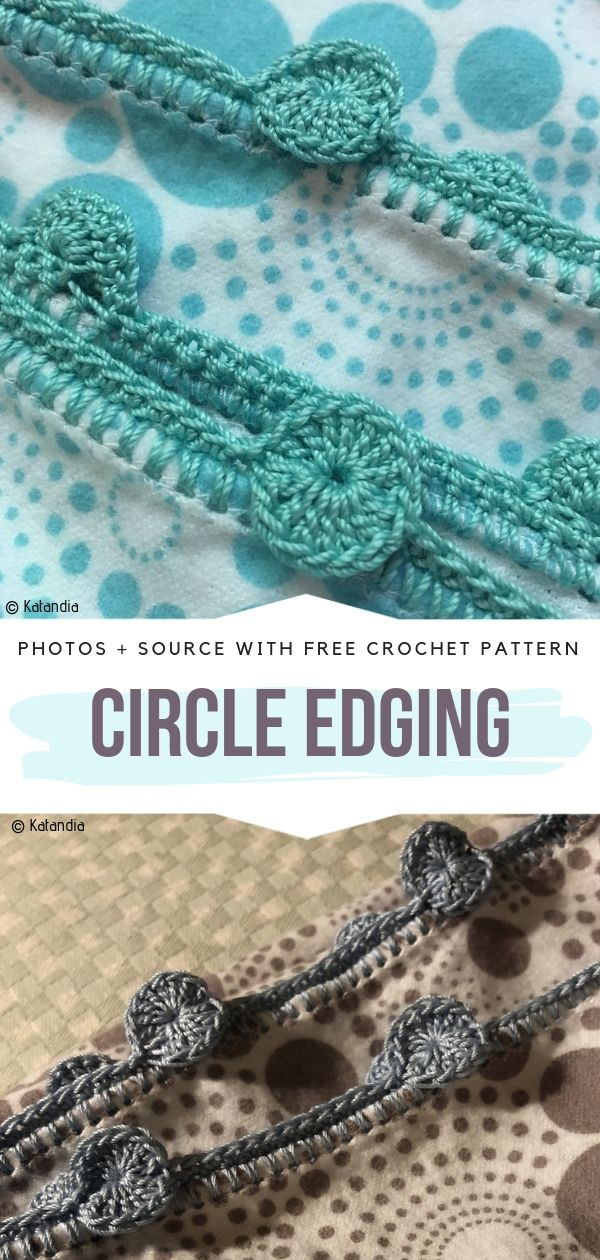
You can get this unique circle look with single crochet, double crochet, and slip stitches. I love how different and fun this design is and I think it would make a great addition to a blanket for a baby boy.
Designer: Yarn Crazy Girl Patterns
_____________________________
Crab Stitch Edging
Single crochet stitches are so last year. Try this cute crochet edging using crab stitches. It takes a bit of getting used to, but it’s basically just single crochet stitches worked from left to right instead of the usual right to left.
Designer: Lullaby Lodge
_____________________
Ole Ole Edging

Read the crochet chart for this design to unlock the secrets of this fabulous fan edging. This pattern reminds me of the traditional pueblo dresses the women sometimes wear in Mexico. Here’s a handy link if you need to know how to read a chart.
Designer: Le monde de Sucrette
_______________________
Tulip Stitch Edging
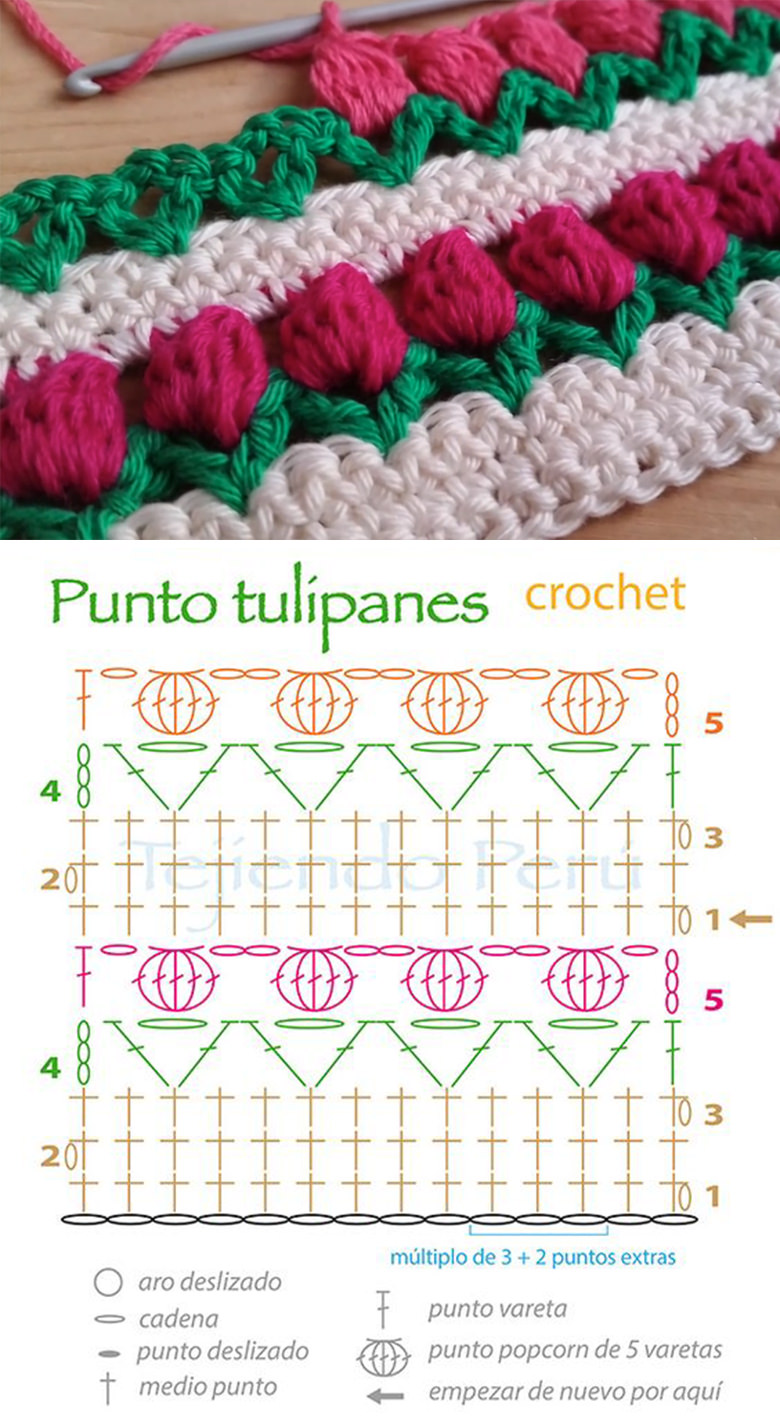
Pretty tulips all in a row are the perfect addition to a blanket for a baby girl or for a gardening enthusiast, or anyone really. I mean, who doesn’t love flowers? Green double crochet v-stitches are topped with a pink dc5tog to create this flower effect.
Designer: Crochet Beja
_______________________
Ruffle Edge
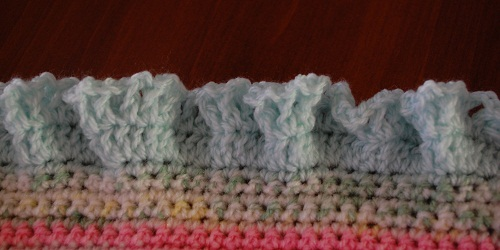
I don’t want to ruffle any feathers, but I think this ruffle edge is extra adorable! Multiple double crochet stitches in each stitch causes your work to bend up and down in a pretty and pleasing way.
Designer: Inner Child Crochet
_______________________
Mini Heart Border

This designer needed to add a handmade touch to a burp cloth for a newborn baby. What could be a sweeter sentiment than delicate hearts all in a line? Add the hearts onto a single crochet foundation using single and double crochet stitches.
Designer: Baking Outside the Box
_______________________
Meet Me on the Corner
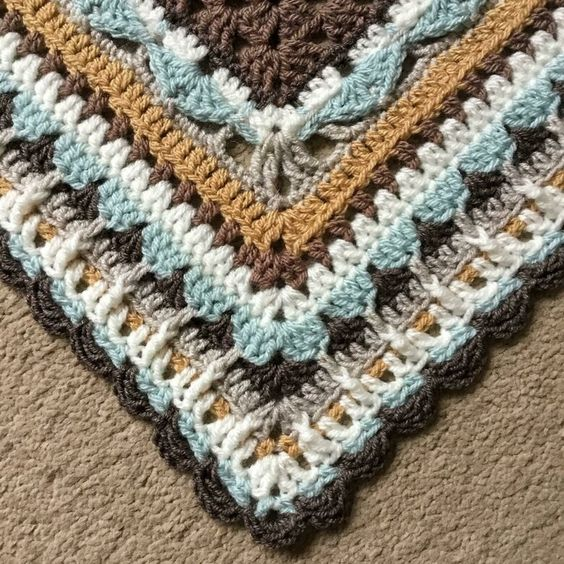
Shell and spike stitches make a striking combination in this intricate border design. I love the use of different colors here to make each section really shine! You can use this border for both square and rectangular projects.
Designer: Christine Bateman
_______________________
Alpine Stitch Border
Use a quick single crochet border to make sure each side of your project has an odd number of stitches (adjust as needed). Then you’re ready to make this textured alpine stitch border. It looks great both multicolored and monochrome – you decide!
Designer: Winding Road Crochet
_______________________
Iris Stitch Edging

You can make this lovely lace border using double crochet v-stitches. This pretty edging is a great example of a border that looks amazing without detracting from the beauty of the blanket! This border is also nice and wide just in case your blanket turned out a bit smaller than you thought it would.
Designer: Lullaby Lodge
_______________________
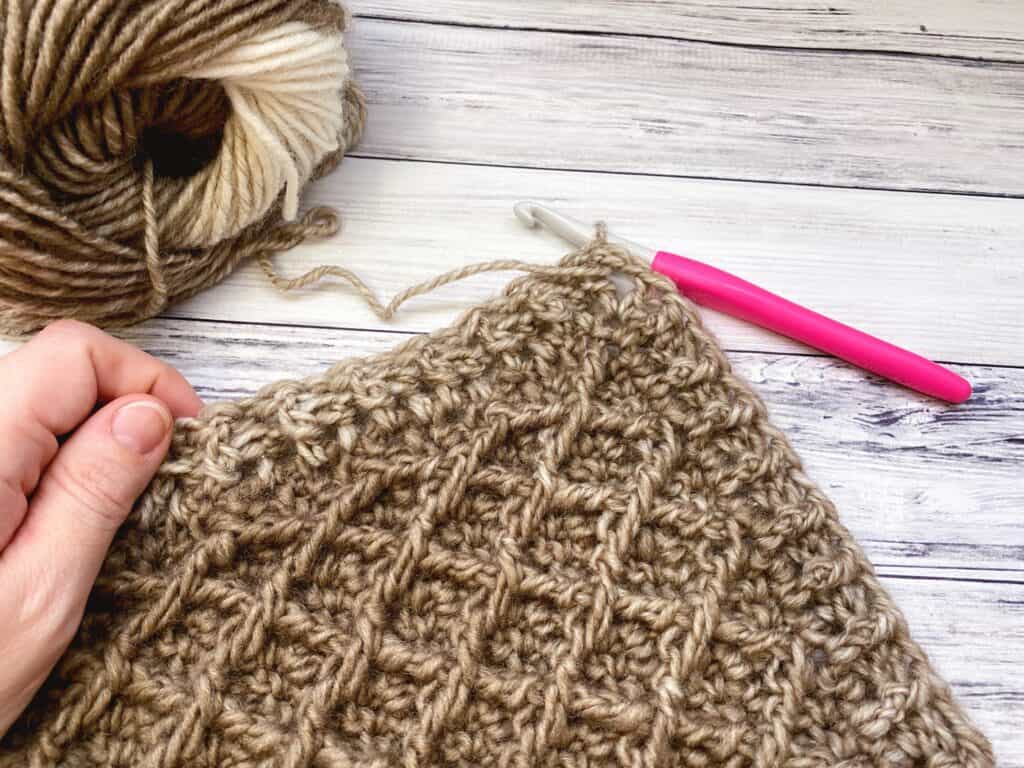
Camel Stitch Border

There’s a video and a written pattern to help you make this simple camel stitch border. You don’t have to worry about stitch count for this one and you can decide how many rows to add to get a thinner or wider border.
Designer: Winding Road Crochet
_______________________
Vintage Fan Crochet Edging
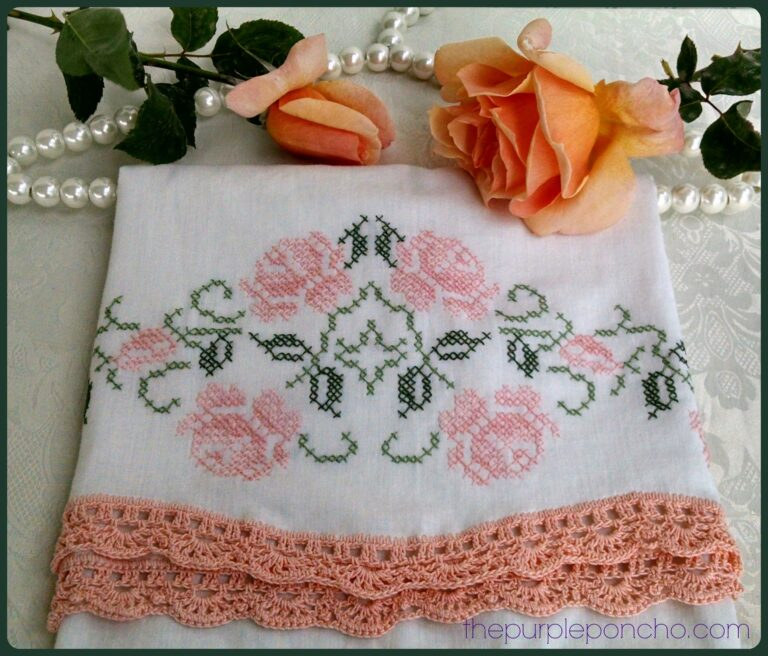
This designer wanted to put a vintage spin on a cross-stitch pillowcase. The first round is single crochet, the second round is similar to filet crochet with double crochet and chain stitches, and the last round adds picot and shell stitches for the ultimate pizzazz!
Designer: The Purple Poncho
_______________________
Candy Cane Border
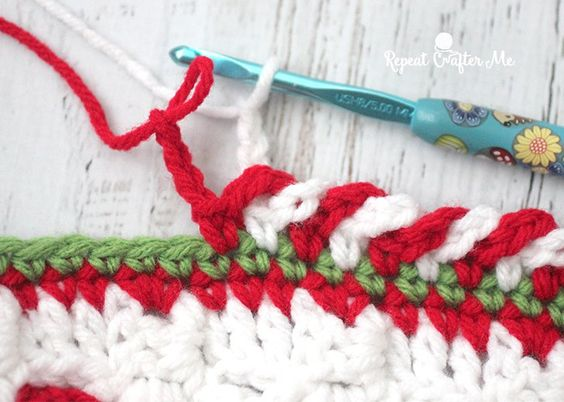
Do you have any Christmas projects on your hook yet? It will be here before you know it! This fun candy cane border uses single crochet and chain stitches in alternating colors to get this fabulous and festive effect.
Designer: Repeat Crafter Me
_______________________
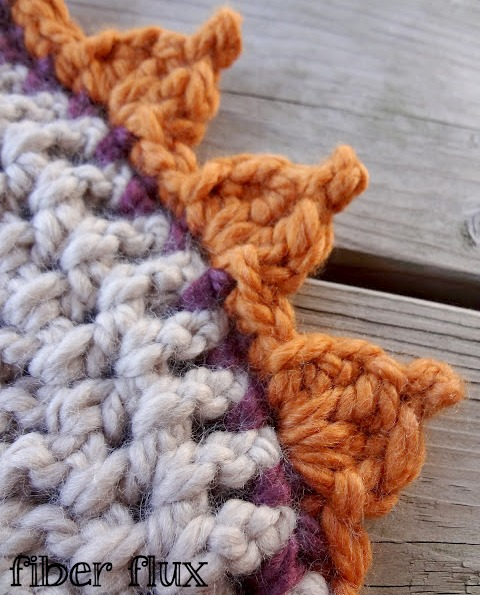
Spike Stitch Edging
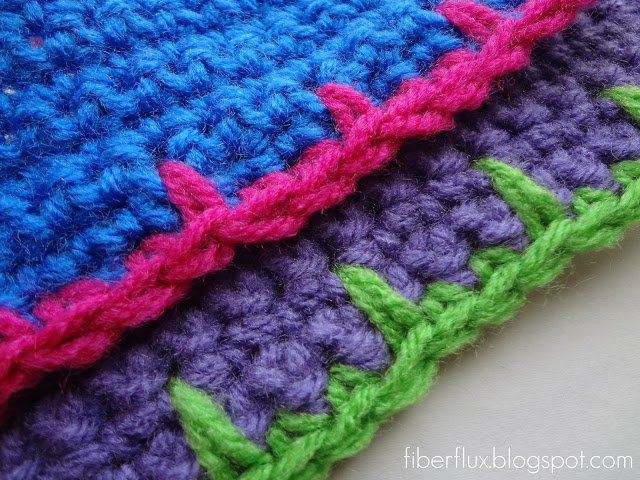
A single crochet stitch makes a big impact when you work it into the stitch a few rows down. Space these little spike stitches out evenly and you’ve got yourself an easy and eye-catching border.
Designer: Fiber Flux Blog
_______________________
Picot Stitch Border

Dainty picot stitches add a pretty flair to blankets, headbands, and sweaters! It’s pictured here on a nursing cover. Get in touch with your feminine side by making these picot stitches with chain stitches and slip stitches.
Designer: Heart Hook Home
_______________________
Moss Stitch Border

Alternating single crochet and chain stitches makes a lovely border that’s both easy and visually interesting. Make as many rounds as you’d like for the border width of your choice. Don’t underestimate the power of a simple and pretty border.
Designer: Every Trick on the Hook
_______________________
Treble Scallop Edging
Time to amp up the volume! You can make this dramatic scalloped border in two rounds. The first round is single crochet and chain stitches. Treble and slip stitches form this stitch’s signature fans in the second round.
Designer: Cypress Textiles
_______________________
Rose Border

This rose border is simply stunning! When worked in different colors as seen here, you can really see the delicate roses on this crochet border pattern. This crochet edging would be perfect for a baby blanket or scarf, or even for the hem or neckline of a garment pattern!
Designer: Look at What I Made!
_____________________
Lacy Border
This simple lacy crochet border is a very easy 3 round border that uses basic crochet skills for a perfect finish.
Designer: Sandra Paul
_____________________
Crochet Dot Border

This is so adorable for baby blankets! I love this simple crochet dot border and it has a video tutorial showing you step by step how to complete this edging. You will use a double crochet 5 together and they will walk you through it.
Designer: Daisy Farm Crafts
________________
Bonus! Tips and Tricks for Perfect Crochet Borders
If you’re struggling to get your borders to turn out as well as you’d like make sure you check out my blog post full of helpful tips for perfect crochet borders:
Tips and Tricks for Perfect Crochet Borders Every Time

_______________________
Final Thoughts on Crochet Borders
So, which free crochet blanket borders do you think would look the best on your project? Borders are a great way to add the perfect finishing touch to your next crochet project. A border can tidy uneven edges and adds a delightful finishing touch, so even adding just a very simple border can make your handmade goods look more professional. It’s also a fun way to add colorful crochet frames to the edges of a fiber project.
I would love to hear your ideas and see your finished projects in the comments below. Life’s too short not to recognize all your accomplishments, big and small. Let’s celebrate!
Psst… don’t forget to follow my blog on social media to stay up on all the latest crochet trends and free crochet patterns. Also, make sure you bookmark or pin this link so you can find it again when you are ready to add a border to your next project.
Thanks for checking out all these amazing crochet borders for blankets and other projects – happy crocheting!
Amanda
Lovely varied borders what stitch have you used to make the first example of your borders. It looks so pretty.
These crocheted borders work equally well on knitted items.
Thank you for collecting them in one place.
That is so true! I love when knitting has a nice crochet border 🙂
I LOVED THE CANDY CANE BORDER FOR XMAS – THEMED CRAFTING. BUT ALL WERE AMAZINGLY WONDERFUL! THANK YOU.
Thank you!
I was trying to get your book along with the tutorials but I was on my phone, new-don’t understand it yet, and all of a sudden I could not get into pay pal to pay altho I can get there by computer. Help
Hi! You can access the baby blanket workshop here: https://lovelifeyarn.com/better-baby-blankets-workshop/ I hope you love it!
thank you for putting this together. we
I’m working on a bulky #6 yarn crochet blanket, all done in HDC. It doesn’t call for a border but since my blanket sides are perfectly straight, I thought a border would look better. Can you suggest a border that would look good on this? Janice
I meant are NOT perfectly straight! lol Janice
Hi Janice! With a super bulky yarn I don’t like to get too complicated with borders. I’d suggest a simple border with a few rounds of sc or even continue in hdc. If the edges are super uneven you could even combine sts (like sc leading up to dc in areas where it’s obviously not as wide). This can hide some mistakes. 🙂 I’ve got a free workshop that has a lesson on even edges and another on borders – you can sign up free here if you’d like.
hi ive just finished te Virus blanket how do i edge it with the fans that ive got
Hi! I’m not 100% sure about the fans on a virus blanket, but when I have fans on the edge of a blanket and I want it to be straight I work taller stitches like dc in the middle of the fans and short stitches like sc on top of the fans to even out the edge. Then you can use any border you want.
My mother taught me 2 stitches ; single, double crochet.
After making a very boring throw I wanted to learn how
To add a nice finished edging, and found it here.
Your website is a treasure of beautiful examples and clear
Instructions.
Thank You !
very very nice