
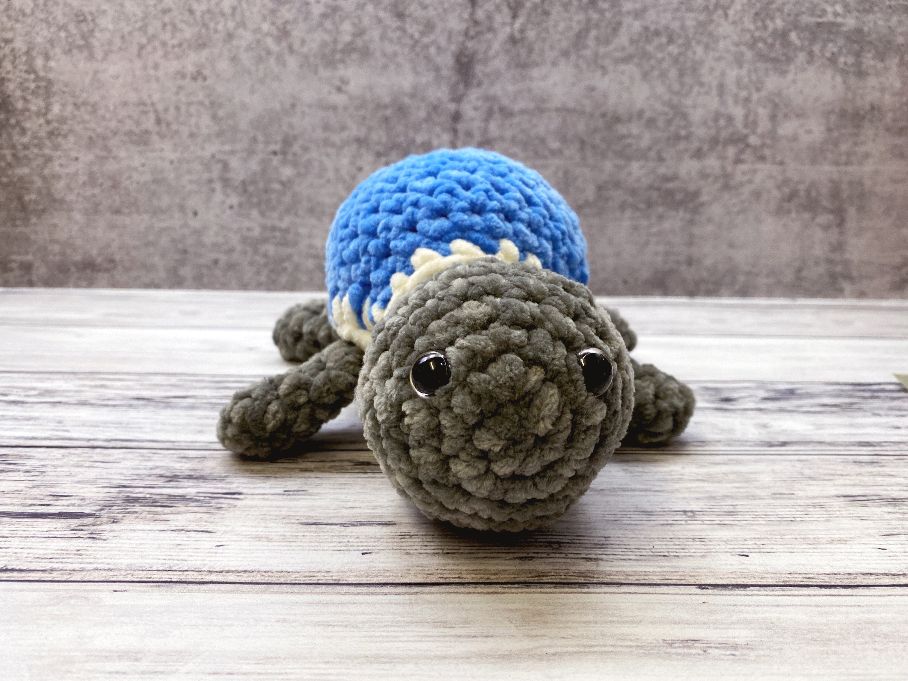
Create a cute stuffed pal with this easy, free crochet turtle pattern! Made from the popular Premier Parfait Chunky yarn, it works up fast.

Design Story and Inspiration for this Easy Turtle Crochet Pattern
A few years ago I created the Pipsqueak Turtle, and when I wanted to do an amigurumi creation with the Parfait Chunky yarn, I decided it was time to revisit that older pattern and make some updates.
I always loved the removable shell on an amigurumi turtle pattern, so it was an easy choice to crochet a separate body and shell. I totally changed up how I did the turtle shell for this guy and I really love how it turned out!
I think I’ll also do a sea turtle version of this guy. What do you think? A baby sea turtle crochet pattern may just be on my list to make soon.
Yarn Options for this Adorable Turtle Pattern
For this original pattern I wanted to use the popular Parfait Chunky yarn from Premier. I’ve seen it everywhere and crocheters are raving about using it for crochet toys, so I thought I would give it a try and I loved it!
This is a super bulky yarn (category #6) so it worked up super fast. I love projects like that. It was easy to work with and my only complaint was that it shed when I cut my yarn ends, but that’s to be expected with any type of chenille yarn so I wasn’t surprised.
It was easy to see the stitches with this yarn and my cute turtle worked up in about an hour (including stuffing and sewing time). You can see that I didn’t use green yarn for my turtle – I just used what I had on hand and I love the way it turned out.
You can use any type of super bulky yarn you have on hand, such as blanket yarn, fur yarn or really any size yarn that you want – just choose an appropriate sized crochet hook for your yarn (usually 2 sizes or more down from the recommended hook on the yarn label) and the only thing affected would be the size.

Buy the ad-free PDF of this cute turtle pattern here!
Before we begin… Let’s Get Social!
I would love for you to come follow me on
Instagram (get sneak peeks of what’s coming up!)
My Facebook Page (come join the fun!)
Follow me on Pinterest (I pin tons of free patterns to my boards!)
Join my Facebook group (lots of awesome crochet talk there)
Also, you can find me on Ravelry or join my subscribers on YouTube.
Amigurumi Turtle Pattern Details
This turtle crochet pattern is made with a few pieces. The head and body are made as one and the legs and tail are made separately and sewn on.
The turtle shell is created in three pieces, two for the top of the shell and one piece for the bottom with leg, head and tail holes.
This pattern only uses chain, slip stitch, and single crochet stitches, making it a great project for someone newer to the craft who can work in the round.
See It In Action:
More Free Crochet Toys Patterns

Buy the ad-free PDF for this pattern here
Crochet Turtle with Removable Shell
What You’ll Need
Yarn: Premier Parfait Chunky, 1 skein each of three different colors. I used Seal for the body, Blue for the top of the shell and Cream for the shell accents. This comes in 53 colors so use whatever you like best!
Crochet Hook: US Size J (6.00mm)
Notions: Safety eyes, fiberfill stuffing, yarn needle, scissors
Notes:
Do not join or turn unless instructed to do so.
Place a st marker in first st of each round to keep track of round if you need help keeping track.
Stitch Abbreviations:
Chain (ch)
Slip Stitch (sl st)
Single Crochet (sc)

TURTLE FREE CROCHET PATTERN
HEAD AND BODY
With turtle body color, make magic ring.
Round 1: 6 sc in ring – 6 sts.
Round 2: Work 2 sc in each st – 12 sts.
Round 3: *Sc, 2 sc in next st; repeat from * – 18 sts.
Round 4: *Sc 2, 2 sc in next st; repeat from * – 24 sts.
Rounds 5-7: Sc in each st.
Round 8: *Sc 2, sc2tog; repeat from * – 18 sts.
Round 9: *Sc, sc2tog; repeat from * – 12 sts.
Round 10: Sc in each st.
Round 11: *Sc, 2 sc in next st; repeat from * – 18 sts.
Place eyes and attach securely. Stuff head.
Rounds 12-21: Sc in each st.
Round 22: *Sc, sc2tog; repeat from * – 12 sts.
Round 23: *Sc2tog; repeat from * – 6 sts.
Finish stuffing body. Cut yarn, leaving a long tail. Draw yarn through remaining 6 sts and pull tightly to close. Weave in ends.
LEG (Make 4)
With turtle body color, make magic ring.
Round 1: 6 sc in ring – 6 sts.
Rounds 2-8: Sc in each st.
Stuff lightly if desired. I did not stuff legs. Flatten leg and sc across, closing leg.
Fasten off, leaving a long tail. Use remaining yarn to sew legs to body as seen in photo above.
TAIL
With turtle body color, ch 3.
Row 1: Sc in 2nd ch from hook and next ch; turn – 2 sts.
Row 2: Ch 1, sc2tog – 1 st.
Fasten off, leaving a long tail. Use remaining yarn to sew tail on body.
SHELL (Bottom)
With shell accent color, ch 9.
Row 1: Sc in 2nd ch from hook and each ch across; turn – 8 sts.
Row 2: Sl st in first st, ch 1, sc 6, leave remaining st unworked; turn – 6 sts.
Rows 3-4: Ch 1, sc in each st; turn.
Row 5: Ch 2, sc in 2nd ch from hook, sc 6; turn – 7 sts.
Row 6: Ch 2, sc in 2nd ch from hook, sc 7; turn – 8 sts.
Rows 7-8: Ch 1, sc in each st; turn.
Row 9: Repeat row 2 – 6 sts.
Rows 10-11: Ch 1, sc in each st; turn.
Row 12: Repeat row 5 – 7 sts.
Row 13: Ch 2, sc in 2nd ch from hook, sc to last 2 sts, sl st in last 2 sts.
Fasten off.
TOP SHELL (Make 2)
With shell main color, ch 11.
Row 1: Sc in 2nd ch from hook and each ch across; turn – 10 sts.
Row 2: Ch 1, 2 sc in first st, sc to last st, 2 sc in last st; turn – 12 sts.
Row 3: Repeat row 2 – 14 sts.
Row 4: Repeat row 2 – 16 sts.
Rows 5-10: Ch 1, sc in each st; turn.
Row 11: Ch 1, sc2tog, sc to last 2 sts, sc2tog; turn – 14 sts.
Row 12: Repeat row 9 – 12 sts.
Row 13: Repeat row 9 – 10 sts.
Fasten off first top shell. For second top shell piece, continue below:
Join shell accent color, sc evenly around most of shell while holding both top shell pieces together, joining. Stuff with fiberfill and continue sc around edge of shell. Join with sl st.
Fasten off.
Finishing
Sew top shell to bottom shell, leaving an opening for the head, legs and tail. I found this easiest to do by connecting the piece that goes under his neck and then keeping the shell on his body while I sewed on the part that goes between the legs and around the tail.
You can get a better idea of how this is connected in the video on this page.
Weave in all ends.
I hope you’ve enjoyed this free crochet pattern as much as I enjoyed making it! He’s so cute and my third son has already claimed it as his own lol.
Happy Crocheting!
Amanda
Amazing little turtle will be fun for my youngest granddaughter she is 2 I’ve made her a lot of amigurami toys this one will be perfect thanks for the pattern .