
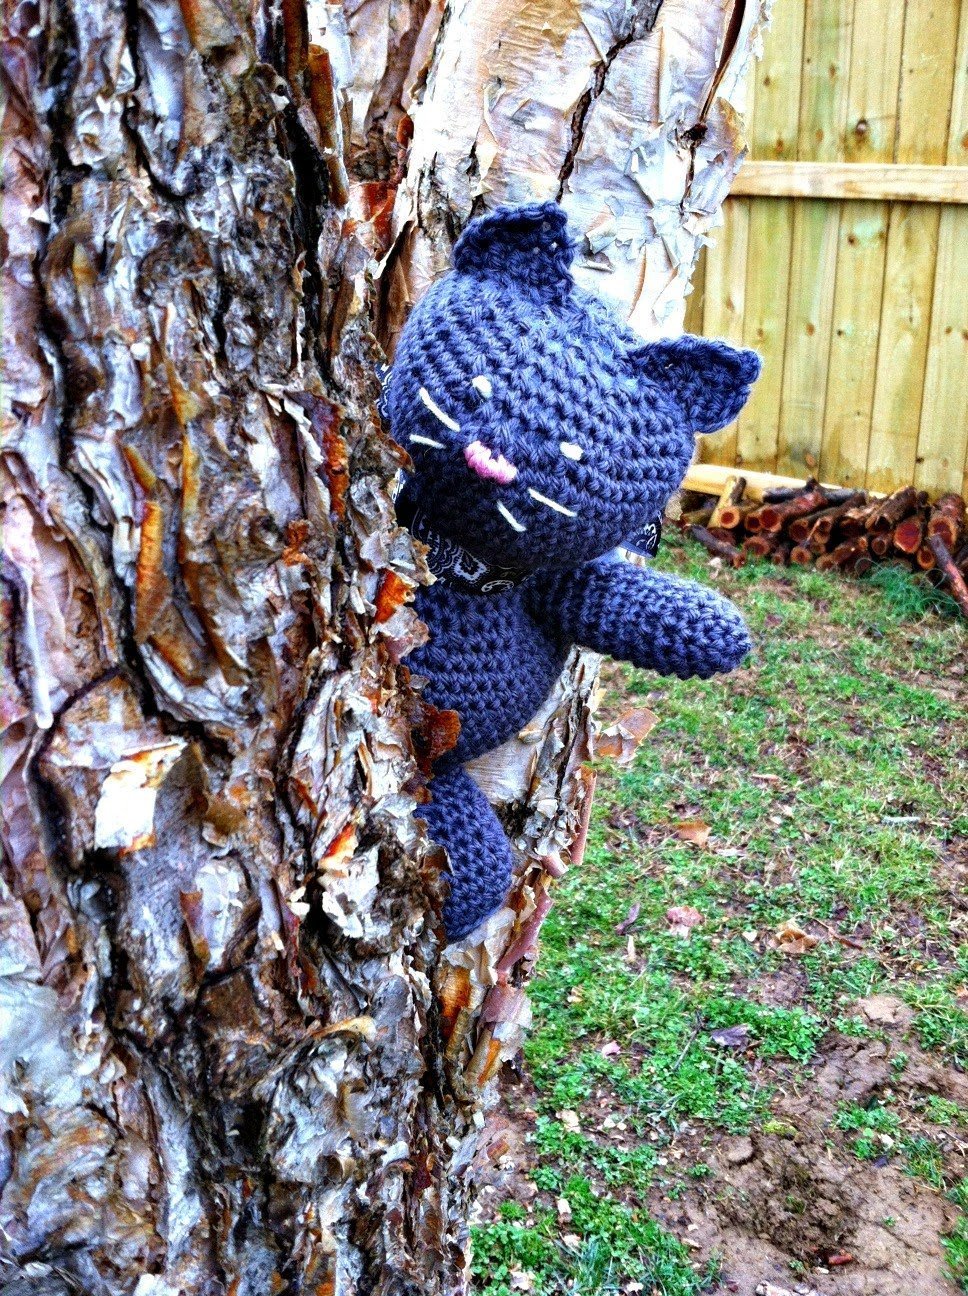
Looking for a cute crochet cat pattern? Check out Jenny – a simple, cute project easy enough for beginners.
Buy the ad-free PDF of this pattern in my shop here!
Design Story and Inspiration for Jenny the Crochet Cat
I wanted to design something new that I haven’t done before and decided upon a stuffed animal. At first I had a bear in mind, but once she was almost finished I just had to make her a kitty instead!
That seems to happen to me a lot when I create amigurumi. I start out with something in mind and then it takes on a life of its own. I don’t mind!
I’m a cat lover and we have three cats, so a kitty toy was perfect. I hope you enjoy this original pattern for a cute cat!
Common Questions about Crochet Cats
The basics of crocheting an amigurumi cat are no different than any other stuffed animal. They are worked in the round and usually involve some seaming to put the pieces together.
You will need to know some basic crochet stitches to make any amigurumi. These are the magic ring/magic circle, single crochet stitch, slip stitch and chain. You also need the ability to work in the round, as amigurumi is mostly always worked in the round with no joins.
Yarn Options for an Easy Crochet Cat
This crochet pattern is worked in worsted weight yarn (size #4) so the yarn substitutions are super easy. I chose Galway Worsted wool yarn for my sample, but she can easily be worked in any fiber.
You can also change the yarn weight, just be sure to change your hook size. I typically go with a size or two lower than the recommended hook on the yarn label when making amigurumi.
Before we begin… let’s get Social!
I would love for you to come follow me on
Instagram (get sneak peeks of what’s coming up!)
My Facebook Page (come join the fun!)
Follow me on Pinterest (I pin tons of free patterns to my boards!)
Join my Facebook group (lots of awesome crochet talk there)
Also, you can find me on Ravelry or join more than 16.5K subscribers on YouTube.
Crochet Cat Pattern Details
This pattern originally called for a slip stitch join at the end of each round, but it has since been modified to be worked in continuous rounds. This eliminates the seam in the back.
To work this pattern, make sure you place a stitch marker in the first stitch of the round so you can keep track of where you are in your pattern.
Pieces are made separately and sewn together, so some basic seaming skills are a plus.
How to Customize Your Cat Pattern
This pattern is easy to customize! You can easily change the face and ears when adding the embroidery – and you have a lot of options for the eyes!
You can also make it as large or as small as you want by changing up your yarn and hook size.
More Free Amigurumi Patterns


Get the ad-free PDF here!
This pattern is completely free and can be viewed in its entirety below, including a complete video tutorial. However, many readers have requested ad-free PDF’s of my patterns so I provide inexpensive options for these.
If you like to crochet on the go or just prefer paper, you can print this PDF and take it with you anywhere.
If you would like to buy the ad-free PDF, you can purchase on Etsy here.
Pin now, crochet later!

Buy the ad-free PDF and crochet on the go!
Jenny the Crochet Cat
What You’ll Need
Yarn: Plymouth Yarns Galway Worsted (weight #4): 1 skein Mouse Gray
Crochet Hook: US Size H (5.00mm)
Notions: Yarn needle/Tapestry needle, fiberfill, scrap yarn for embroidery (white yarn for eyes and whiskers, pink yarn for nose, black yarn for mouth, etc) and a ribbon (if desired).
Skill Level: Easy
Finished Measurements: Approximately 10″ tall
Gauge: 18 sts and 16 rows = 4″ (10cm) in sc
Notes: Place a marker to denote first st in each round. Rounds can be worked with a slip stitch join and a chain 1, or in continuous rounds. Continuous rounds prevent a seam in the back.
Stitch Abbreviations:
Chain (ch)
Slip Stitch (sl st)
Single Crochet (sc)
Free Crochet Cat Pattern
LEG (Make 2)
Ch 2.
Round 1: 4 sc in 2nd ch from hook – 4 sts.
Round 2: Ch 1, 2 sc in each sc around – 8 sts.
Round 3: Ch 1, *sc, 2 sc in next st; repeat from * – 12 sts.
Round 4: Ch 1, *sc 2, 2 sc in next st; repeat from * – 16 sts.
Round 5: Ch 1, *sc 3, 2 sc in next st; repeat from * – 20 sts.
Round 6: Ch 1, *sc 4, 2 sc in next st; repeat from * – 24 sts.
Rounds 7-8: Work even in sc.
Round 9: Ch 1, *sc 4, sc2tog; repeat from * – 20 sts.
Round 10: Work even in sc.
Round 11: Ch 1, *sc 3, sc2tog; repeat from * – 16 sts.
Round 12: Ch 1, *sc 2, sc2tog; repeat from * – 12 sts.
Rounds 13-15: Work even in sc. Fasten off.
ARM (Make 2)
Ch 4.
Round 1: 3 sc in 2nd ch from hook, sc in next ch, 3 sc in last ch, sc in opposite side of chain – 8 sts.
Round 2: Ch 1, 2 sc in first 3 sts, sc, 2 sc in next 3 sts, sc – 14 sts.
Rounds 3-8: Work even in sc.
Round 9: Ch 1, sc2tog, sc 6, sc2tog, sc 4 – 12 sts.
Round 10: Ch 1, *sc, sc2tog; repeat from * – 8 sts.
Round 11: Work even in sc.
Fasten off.
BODY
Ch 5.
Round 1: 4 sc in 2nd ch from hook, sc in next 2 ch, 4 sc in last ch, sc 2 in opposite side of chain – 12 sts.
Round 2: Ch 1, 2 sc in first 4 sts, sc 2, 2 sc in next 4 sts, sc 2 – 20 sts.
Round 3: Ch 1, *sc, 2 sc in next st; repeat from * three times, sc 2, repeat from * four times, sc 2 – 28 sts.
Round 4: Ch 1, *sc 2, 2 sc in next st; repeat from * three times, sc 2, repeat from * four times, sc 2 – 36 sts.
Round 5: Ch 1, *sc 3, 2 sc in next st; repeat from * three times, sc 2, repeat from * four times, sc 2 – 44 sts.
Round 6: Ch 1, *sc 4, 2 sc in next st; repeat from * three times, sc 2, repeat from * four times, sc 2 – 52 sts.
Round 7: Ch 1, sc back loop only in each st around.
Rounds 8-14: Work even in sc.
Neck
Round 15: Ch 1, *sc 4, sc2tog; repeat from * three times, sc 2, repeat from * four times, sc 2 – 44 sts.
Round 16: Ch 1, *sc 3, sc2tog; repeat from * three times, sc 2, repeat from * four times, sc 2 – 36 sts.
Round 17: Ch 1, *sc 2, sc2tog; repeat from * three times, sc 2, repeat from * four times, sc 2 – 28 sts.
Rounds 18-21: Work even in sc.
Stuff body.
Head
Round 22: Sl st 2, ch 1, *sc 2, 2 sc in next st; repeat from * three times, sc 2, repeat from * four times, sc 2 – 36 sts.
Round 23: Ch 1, *sc 3, 2 sc in next st; repeat from * three times, sc 2, repeat from * four times, sc 2 – 44 sts.
Round 24: Ch 1, *sc 4, 2 sc in next st; repeat from * three times, sc 2, repeat from * four times, sc 2 – 52 sts.
Round 25: Work even in sc.
Muzzle
Round 26: Ch 1, sc 24, 2 sc in next st, sc 4, 2 sc in next st, sc 22 – 54 sts.
Round 27: Ch 1, sc 24, 2 sc in next st, sc 6, 2 sc in next st, sc 22 – 56 sts.
Round 28: Ch 1, sc 24, 2 sc in next st, sc 8, 2 sc in next st, sc 22 – 58 sts.
Round 29: Ch 1, sc 24, sc2tog 6 times, sc 22 – 52 sts.
Round 30: Sl st 2, ch 1, *sc 4, sc2tog; repeat from * three times, sc 2, repeat from * four times, sc 2 – 44 sts.
Round 31: Ch 1, *sc 3, sc2tog; repeat from * three times, sc 2, repeat from * four times, sc 2 – 36 sts.
Round 32: Ch 1, *sc 2, sc2tog; repeat from * three times, sc 2, repeat from * four times, sc 2 – 28 sts.
Round 33: Ch 1, *sc2tog around – 14 sts.
Stuff.
Round 34: Ch 1, sc2tog around – 7 sts.
Cut yarn, leaving a long tail. Draw through remaining stitches and pull tight.
EARS (Make 2)
Ch 7.
Row 1: Sc in 2nd ch from hook and each ch across; turn – 6 sts.
Row 2: Ch 1, sc2tog, sc 2, sc2tog; turn – 4 sts.
Row 3: Ch 1, sc, sc2tog, sc; turn – 3 sts.
Row 4: Ch 1, sc3tog – 1 st. Fasten off.
CROCHET CAT TAIL
Ch 2.
Round 1: 4 sc in 2nd ch from hook – 4 sts.
Rounds 2-21: Work even in sc. Fasten off.
FINISHING
Stuff arms, legs and tail (if desired). Sew ears to top of head and attach arms, legs and tail. Use scrap yarn to embroider face and any other details as desired.
I hope you’ve enjoyed this free crochet pattern for Jenny the Crochet Cat!
More Crochet Patterns You’ll Love…
Happy Crocheting!
Amanda
Very cute! Love your Jetsetter Sweater, too! Thanks!
So adorable!!
Too CUTE!
Adorable!! Thank you!!
Adorable!! Thank you!!
Congratulations on your upcoming addition! So happy for you!
Cute pattern too 🙂
I a very confused by your pattern. For the body, what do you mean by 2 sc? Are they attached to the previous row? And why do you do a slip stitch at the end of every row? Trying to make this for my boyfriend’s little niece.
Hi Emily!
Where it says 2 sc you would do 2 single crochet in the same stitch (so if you see “2 sc in first 4 sts” you end up with 8 sts – it is how you increase the size). I found a video showing how to do this.
As for the slip stitch, it is possible to create a stuffed animal doing what is called a spiral (where you don’t join with a sl st). This article explains the difference well.
Let me know if you have any other questions!